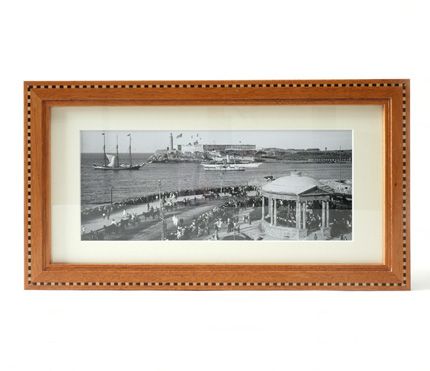
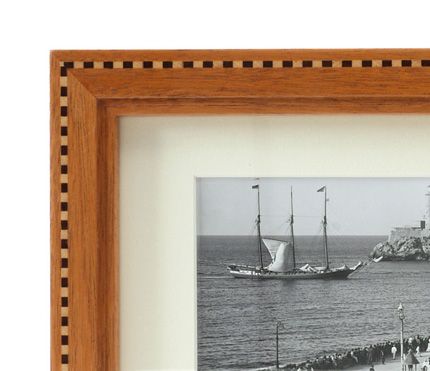
This mahogany picture frame needed just a touch of embellishment to bring it to life. A checkered inlay did the trick.
A few months ago, after shooting our recent Video Workshop on building and using a specialized tablesaw sled for picture-framing, I went frame crazy. With the holidays on the horizon and a new baby on the way, my shopping budget was cut in half, so I figured I’d find some interesting photographs to frame using my new toy.
By browsing the online digital collections of both the Library of Congress and the National Archives, I was able to find several great historical photographs-all of which are high-resolution, downloadable files, and free! But I digress.
My goal was to produce a unique frame and I settled on Honduran mahogany with a checkerboard inlay made of scraps I found laying around the shop (ipe and ash). The technique I used serves as a simple, inexpensive way to add a bit of class to the right project. Allow me to stress that last point: the “right” project. It’s easy to get carried away with this sort of technique and I strongly feel that embellishment just for the heck of it can lead to loud, gaudy furniture. So be careful!
How to Make a Checkered Inlay
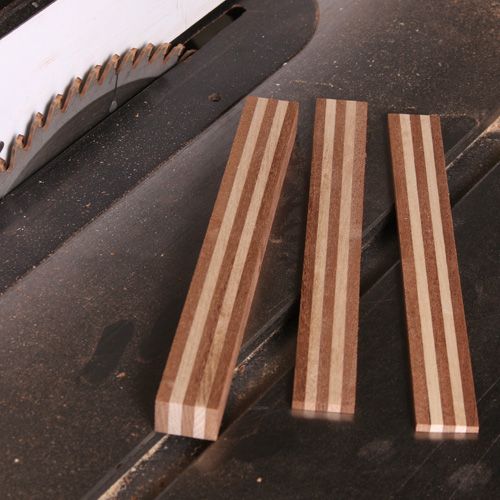
I began by scouring my scrap bin for two woods of contrasting color that would work well with the subtle amber tones in my mahogany. You’ll want to rip several thin strips of each-in my case, I ripped some 2-in. by 9-in. strips to a thickness of 1/4-in. Once you’ve got these thin strips milled and cut to size, you’re ready to begin producing inlay.
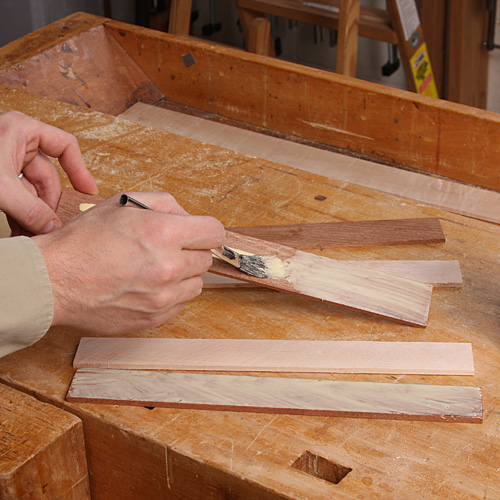 |
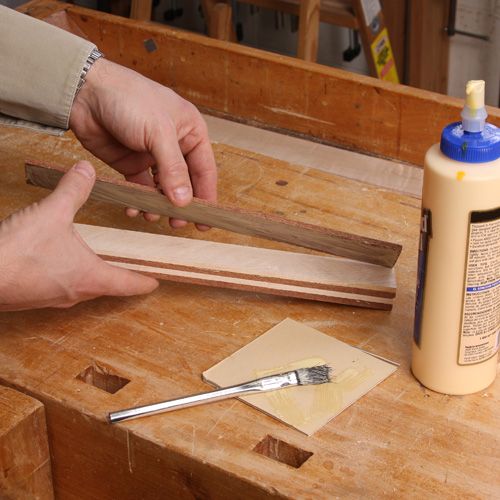
1) Layout your strips of contrasting woods and apply glue to every other strip. Try to be conscious of grain direction when gluing up the block. Later, you’ll be handplaning a face and will want to minimize tearout. |
 |
2) Create a sandwich by alternating between the dark and light woods. Be sure to give each strip a bit of a wiggle to distribute the glue evenly. |
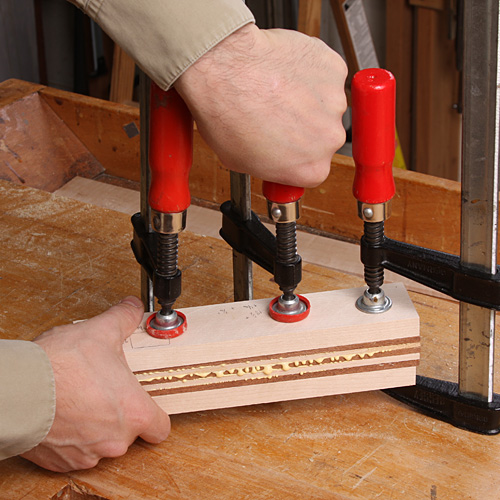 |
3) Clamp it up and leave it to dry. You’ll want to use a couple of cauls to help distribute the pressure evenly and to keep your clamps from marring your inlay. |
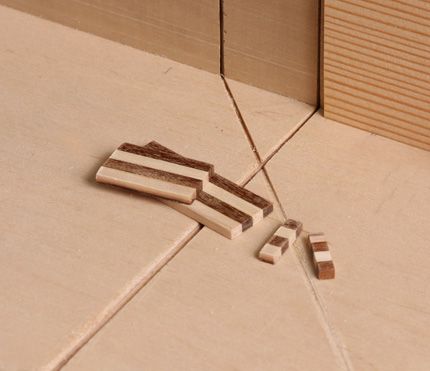
With your inlay block glued up, your ready to prep it for final cutting. The process is simple. After jointing one side square, rip several strips at the tablesaw and then crosscut them by hand. The number of inlay pieces you’ll require will depend upon the perimeter measurement of your frame–or whatever it is you’re inlaying, and the thickness of your glued-up blank.
 |
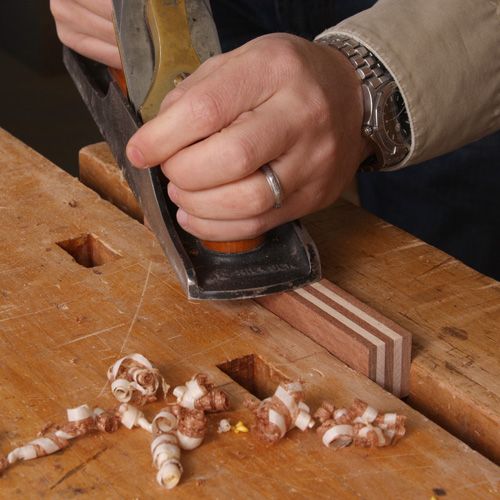
4) After the glue has dried, scrape away as much of the squeeze-out as you can and mill one of the sides square and true. Since my “sandwich” measured in at less than a foot in length, I jointed one side using a handplane (as opposed to my jointer). When dealing with stock this short, it’s always a better idea to joint by hand. |
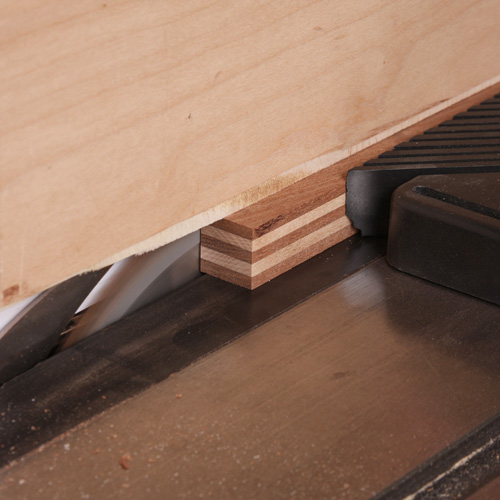 |
5) Now you’re ready to rip several thin strips at the tablesaw. Use a push-stick with a notch that supports both sides of the stock as it gets bisected by the blade. This will prevent off-cuts from being shot back at you. A featherboard also makes for a safer cut in this case. Rip these pieces slightly thicker than the depth of the groove they’ll be fitting into. That way, you can go back and plane them flush. |
 |
6) Turn to your miter block. Use a stop block and cut a series of inlay pieces. In my case, I was cutting 1/4-in. pieces. My frame required me to cut about 50 parts, but this all depends upon the thickness of your “sandwich” and the perimeter length of your frame – or whatever it is you’re inlaying. |
Once you’ve cut the number of inlay pieces required to get the job done, it’s simply a matter of routing a groove in your workpiece and gluing the inlay into place. Allow the inlay to dry and then handplane it flush. Voila!
| More on Inlay and Embellishment
• A Simple Way to Inlay Mother of Pearl • Dress Up Your Work With Creative Stringing
This site is protected by reCAPTCHA and the Google
Privacy Policy and
Terms of Service apply.
Get It All! UNLIMITED Membership is like taking a master class in woodworking for less than $10 a month. Start Your Free TrialUp NextFeatured Workshop With its graceful curves, cabriole legs, and ornamental back splat, a Queen Anne side chair is a bucket list build for many woodworkers. Dan Faia had a very specific Queen… Featured Projects & Plans Discussion ForumHighlights
Get the latest from Fine Woodworking Magazine |


Comments
Great information on inlays but I'm curious about the photos. What kind of printer and paper did you use? Thanks!
Looks like you ended up with end grain showing. That's a different look vs face grain.
Hi wdcraftr1:
In my frame, I actually experimented by using the end grain side but the demonstration in my post is for face grain - since that's more popular.
Man, you have a sharp eye!
Best,
Ed
tmercer: I used a satin finish paper and had the print made at a custom digital outfit in New York that I love. The only downside was that - since this is a panoramic print - they had to use 16x20 paper - which makes it a bit more expensive for the print (in this case, $45). But the materials were essentially free as was the actual image so I felt it was worth it, and now have a happy grandmother. LOL.
Best,
Ed
Nicely done. For those interested in making inlay bandings, I highly recommend Steve Latta's dvd "Fundamentals of inlay: Making ornamental bandings". He demonstrates the entire process beginning to end, in a manor that anyone could follow. I was particularly impressed with his methodology for cutting pieces on the table saw. Efficient, accurate, repeatable, and above all safe. One of the nice features of the dvd is he'll use large blocks to illustrate the techniques.
Thank You for the tips. Looks good and I am going to try it.
Thanks!
Log in or create an account to post a comment.
Sign up Log in