
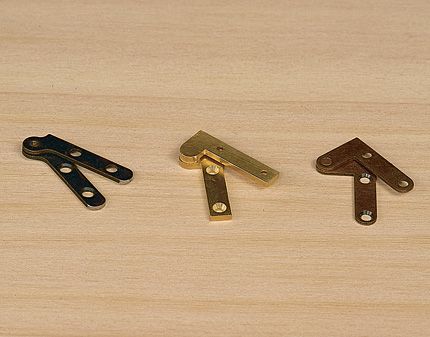
Knife hinges aren't all created equal. The hinges on the left and right are stamped steel with a riveted pivot pin, making them nearly impossible to install accurately. In the center is a Brusso hinge, well-machined and much easier to install.
Installing Knife Hinges
Learn Fine Woodworking contributing author Gary Rogowski’s technique for super-solid knife hinge installation.
The straight knife hinge is used in situations where the top and bottom of the carcase extend over the door frame, and the door frame covers the carcase sides.
An L-shaped knife hinge, like the one seen here, is used on full inset doors. The short leg of the hinge, into which the pivot pin is set, moves the pivot away from the carcase so that the door can swing clear of the carcase side without binding.
Accurate Placement is Key to Success
Laying out the mortises for either type of knife hinge involves essentially the same steps. Layout is the most critical part of setting them. Installed correctly, knife hinges will hold a door true to the face of the carcase and establish a consistent reveal between the door and the carcase sides all the way around. The key to achieving both of these goals is accurate placement of the hinge leaves. This comes down to a precise hinge setback in both the carcase and door and shimming the door hinge against the carcase wall to set the reveal.
Hanging a door with knife hinges begins with making sure the dry-assembled carcase’s face is flat and square. Before gluing up the carcase, lay out the two carcase hinge mortises, disassemble the carcase and then rout and pare the hinge mortises. Glue-up the carcase, and then let the glue dry, checking again to make sure the carcase is square across its opening. Plane or sand the face of the carcase flat.
 |
For a consistent reveal around a door, use shims the same thickness as the hinge washer. Many varieties of plastic laminate are the right thickness, but cardboard and other materials will often work as well. |
 |
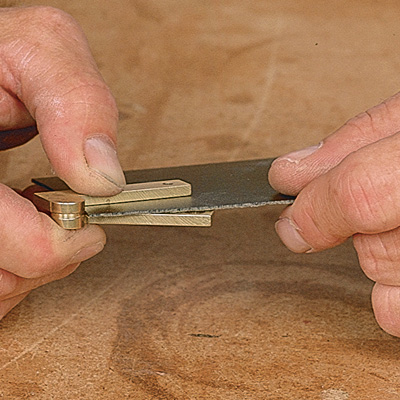
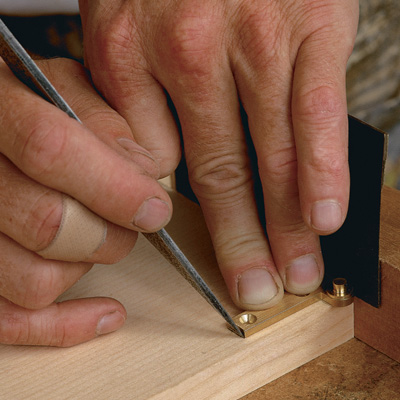
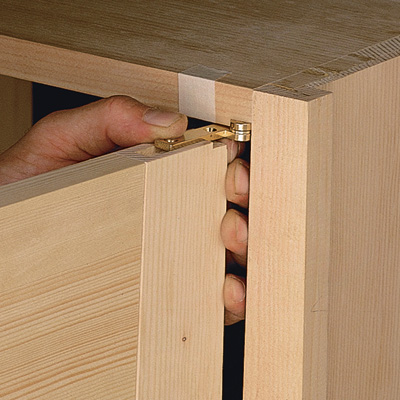
To lay out the hinge mortise, start with a pencil. With a laminate shim between the carcase wall and the hinge, the author marks the end of the hinge leaf and the edge of the short leg of the “L.” These reference lines set limits for a marking gauge, which is used next. |
 |
Marking-gauge line establishes front edge of mortise. Scratch a marking-gauge line from pencil mark to pencil mark. The marking gauge should be set for the distance from the center of the pivot pin to the outside edge of the hinge leaf’s long leg. Try not to let the gauge wander along any sloping grain. |
 |
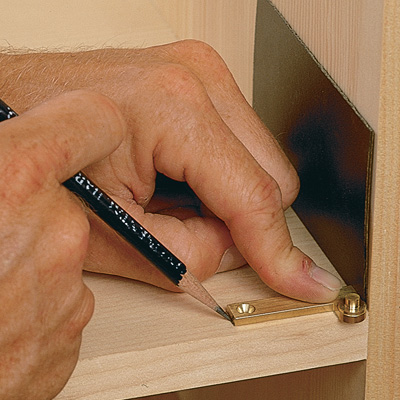
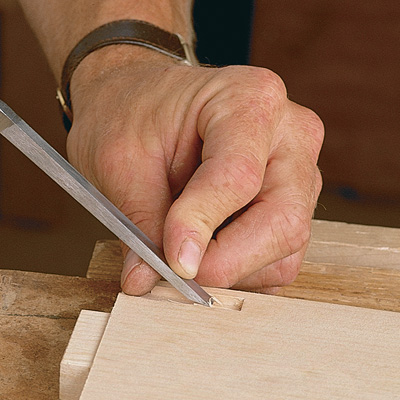
Use a knife to mark edge and end of mortise. Position the hinge leaf on the marking-gauge line, mark the end of the hinge leaf and the inside edge of the “L” with a knife, and then erase the pencil lines. |
Carcase Mortising-Continued
 |
Now pencil in the back edge of the mortise. This line is just a rough approximation to keep you safely within bounds when routing the hinge mortise. You’ll mark the actual back edge of the hinge later with a knife. |
 |
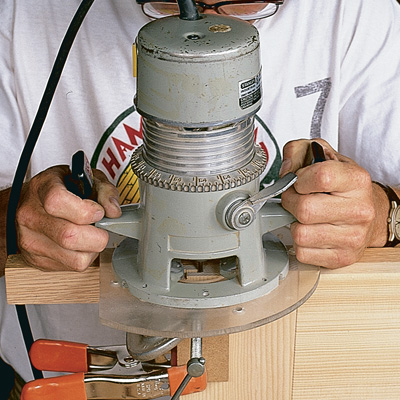
Router removes most of mortise quickly. The author uses a 3/16-in. bit set for the thickness of the hinge leaf. He stays well away from the pencil mark and knife marks that define the mortise. |
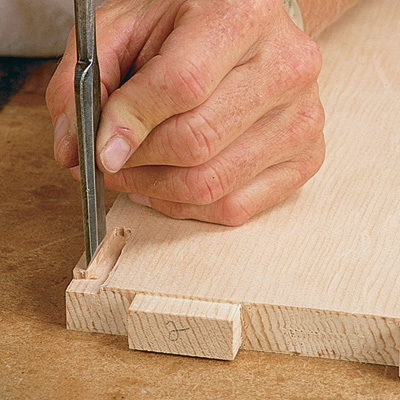 |
Paring chisel cleans up front edge of mortise. Be sure to take the mortise no farther than the knife mark. |
 |
Clean up roughness left by router along back edge. With a chisel, the author removes most of the waste remaining in the mortise. But take care to stay well away from the pencil line–the bqack edge still needs to be marked with a knife. |
Doors Should Fit Snugly
The door should be built to fit snugly in the carcase opening. Trim the door, so it just fits in the opening with shims along the bottom rail and the hinge stile. The shims should be the same thickness as the washer that separates the two leaves of the hinge (leave the handle-side stile and top rail right for now). At this point, you’ll have mortises in the carcase and can cut the mortise in the bottom of the door. You’ll be laying out and cutting it in much the same way you did for the carcase.
The next step is to put hinge leaves into their mortises. A friction fit should keep them in, but you can tape them in if you like. Put the door into the carcase opening with the bottom hinge connected. Check and mark the reveal again on the bottom, hinge-stile side and on the top, as necessary. Plane or sand the door’s edge to get the reveal right on these three sides. Then lay out and mortise for the top door hinge.
Screw the carcase hinge leaves and the bottom door-hinge leaf into place, but be sure to drill and cut the threads first by screwing steel screws of the same size into the screw holes. This keeps the brass heads of the screws that come with the hinges from marring or stripping.
The final fitting of the door will be done with both hinges in place but left unscrewed. Hold the top door-hinge leaf on its mating leaf in the carcase while you set the door into the lower hinge pin. Slide the top of the door onto the door-hinge leaf (see bottom photo on this page). Close the door, and check and mark the handle-stile reveal. Open the door, slide it off, plane or sand the door’s edge to get an even reveal all the way around and reinstall the door. The door-handle stile can be trimmed back at a slight angle to provide clearance for the door as it swings past the case
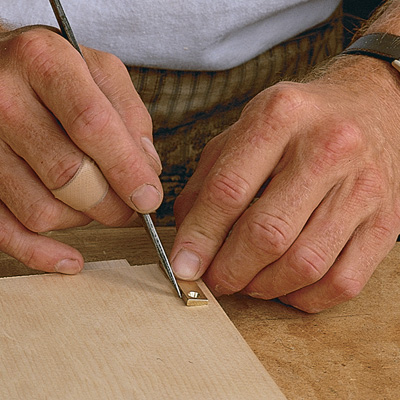 |
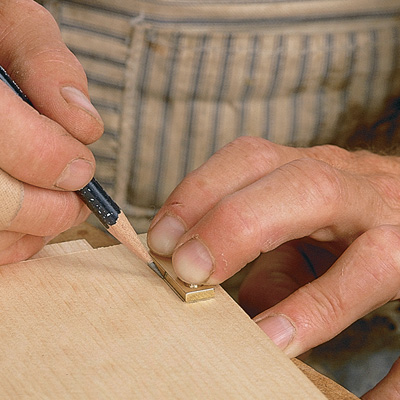
Mark back side with a knife. Tile the hinge leaf into the mortise, and hold it tightly against the front wall of the mortise to mark the back edge. Then pare carefully to this knife line, checking frequently to see if the hinge leaf will fet. Once it fits, that mortise is done. The procedure is the same for all four mortises. |
 |
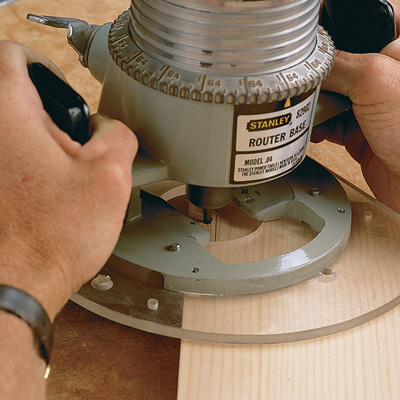
Cutting mortises in the door. A board clamped to the door gives your router a steady platform. Otherwise, routing the mortise in the bottom edge of the cabinet door would be a tippy proposition. Be sure to use clamp pads (here held in place with spring clamps) to avoid damage to the door. |
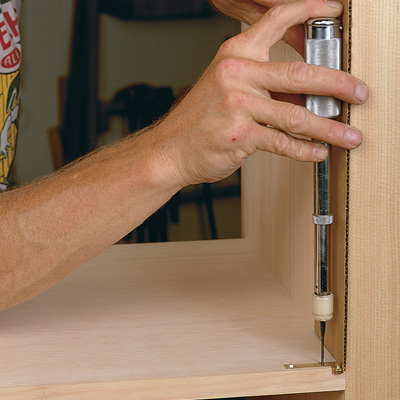 |
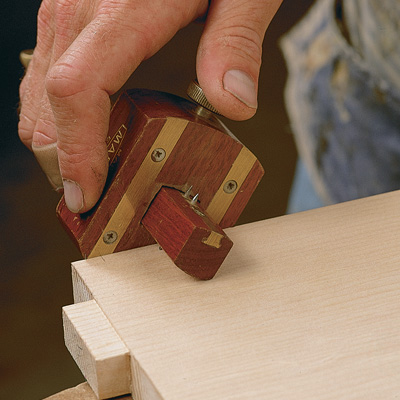
Drill suited to a tight spot. A Yankee drill lets the author drill screw holes against the carcase’s side. This would be impossible with a power drill or a corner brace. A piece of cardboard prevents the side of the carcase from being marred by the drill. |
 |
Now try the fit. For a final fit of the door, set the door into place. With the bottom hinge connected, slide the door onto the top hinge. Friction should hold the top carcase hinge leaf in place, but tape adds a measure of security. |
For more information on hinge installation, be sure to catch Gary Rogowski’s original article from Fine Woodworking #111. Plus, read the first installment of this series-How to Install Butt Hinges.


Comments
Not sure if the author or anyone will be checking in, but can anyone offer trouble shooting advice and a little more guidance on installation? For example, are the pin hinges always in the frame/cabinet and the open/female pieces in the door? If pints start to jam or tighten, what might cause that?
Sorry for such rookie questions, but you'ld think $25 hinges would come with at least a little instructions! We aren't all seasoned pros... alas... :-)
Log in or create an account to post a comment.
Sign up Log in