

I like making boxes. It’s something you can make in an afternoon or evening from just a bit of wood. And when you’re used to working on a piece of furniture for weeks, or months, at a time, it’s refreshing to get something done in just a few hours. However, boxes are a challenge, too. Because they are small there is no room for mistakes–not in the joinery, not in the design, and not in the finish. That’s another reason I like them.
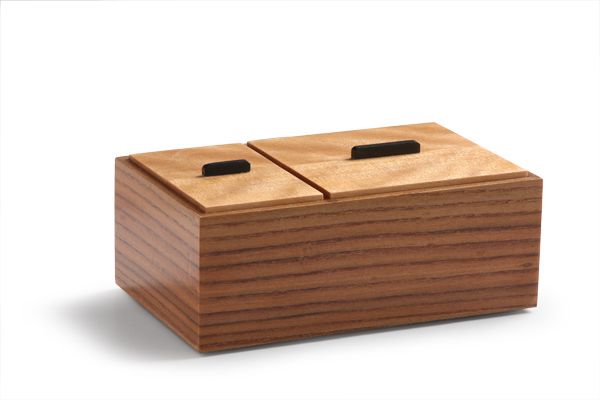
And that’s how I found myself down in the shop recently on a Friday night. Earlier in the day, I had come up with an idea for a small box subdivided into smaller sections. I wanted the section dividers to be just as tall as the box sides, so that the lid would need to be cut up into smaller lids. I thought the strong geometric look would be attractive. I also thought that it would be fun to size all of the parts using my Phi ruler. Once I got into the shop, I realized that because the overall dimensions of the box were on the small side (about 2 in. wide by 4 in. tall by 6 in. long), I couldn’t put in as many dividers as I had wanted, so I went with just one. But I located it by dividing the internal space according to the golden ratio (Phi). I really like the way it turned out.
| More on Box-Making Basics • Video Workshop: Box-Making • Making a Wooden Box Hinge • Make a Bandsawn Box • A Better Way to Build Boxes |
It took me about 3 or 4 hours to make the box. I used a mix of hand tools and power tools. I planed the miter joints on my shooting board, and cut the grooves for the bottom with my grooving planes. The rabbets for the tops were done at the router table with a rabbeting bit, which I also used to rabbet the bottom. The divider is joined to the sides with a bird’s beak joint, which I routed with a 90 degree v-groove bit.
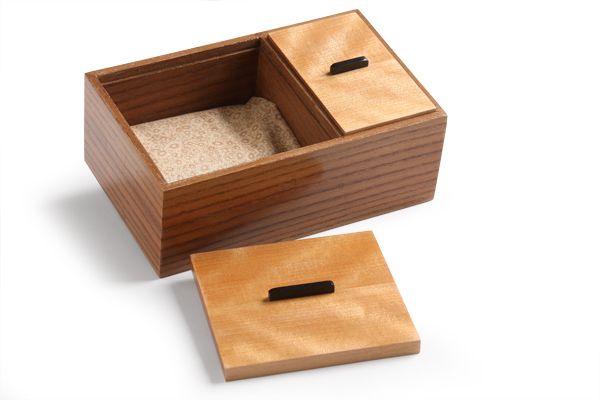
The box body is English elm, left over from my box making video workshop. The lids are flame birch, I think. The wood came from a table leg. My mother-in-law gave me an antique table with the understanding that I’d re-use the wood to build stuff–the table wasn’t worth keeping intact–so I don’t really know what it is. (I really need to make her something!) I had a perfectly sized piece of ebony scrap for the pulls. I’m in the process of making padded inserts for the two sides. They’ll be covered in the fabric you see.
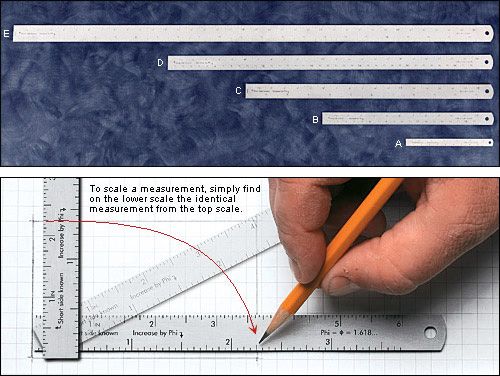
A note on the Phi ruler: I bought the 36 in. version because I wanted a long ruler, and I was confident that it would be easy to read and well-made. It hasn’t disappointed me. However, I’d never used it as a Phi ruler until this box. I liked it and could see using it for boxes again. I don’t think I’d use it for furniture, though. I really don’t use a ruler very much when making furniture. After I build a carcass, I fit everything directly to the case. I wish I had a shorter version for boxes, though. I suppose Christmans isn’t too far off.
-
-
-
Learn how this simple ruler helped to determine the final proportions of this box.


Comments
Nicely done Matt!
Did you use the trick of ripping a piece down the middle and then turning it inside out for the sides so the grain would run around all 4 corners?
I know how you feel about wanting a project that takes a couple of hours instead of weeks. That's how my 2 year old son ended up with a chair. I got to quickly knock out a project, use up some scraps, and make my wife and son happy all in one night. It's a great way to prototype chairs too. It seems that all of my friends are having kids now, and I've found that they make great gifts.
That box looks great by the way. I like the idea of the sectional lid. And I've got one of those 12" phi rulers. Great ruler, but it doesn't get used for its intended purpose much either.
Blaine
EngrMike,
Yes, I did re-saw a thicker board for the sides. I always do that, even when I use a dovetail joint at the corners. It just looks nicer, and it's one of those small details that you have to pay attention to when making boxes. The smaller the box, the more important it is. The trick when re-sawing is that once you have re-sawn the board, joint the matching faces just enough to get rid of the BS marks. The less material you remove the better the match with be at the corners. To plane the board down to thickness, only take material away from the other faces of the sides. At least, that's how I do it. I explain the process in greater detail in that box making video workshop linked in the post.
I love the box ! Its a great gift idea. I've bookmarked it. Thanks for sharing !
there are also Phi protractors available that could serve as a faster way to reference the golden ratio. FW could easily do a whole article on Phi. It's pretty fascinating - especially the prevelance of Phi in living things.
As a woodworker turned artist, I appreciate the use of phi in your design. Art teaches us about the natural aesthetic created by the use of phi proportions. It also tells us that we don't need a ruler to find phi. Draw a square the width of your short side, divide the side in half, draw an arc whose center is the half mark, and starting from an opposite side's corner arc to the base line. This is then phi times the short side. I hope this helps anyone who doesn't have a ruler and wants to try the box.
Matt:
Just finished a marking gage based on your design in the March/April FWW. In it you did not mention how you chose to finish it. Did you put a finish on it or just left it raw?
Thanks,
Adam
Adam,
I did use a finish: just a single coat of Tried & True boiled linseed oil. I hope the gauge works well for you. Matt
Log in or create an account to post a comment.
Sign up Log in