
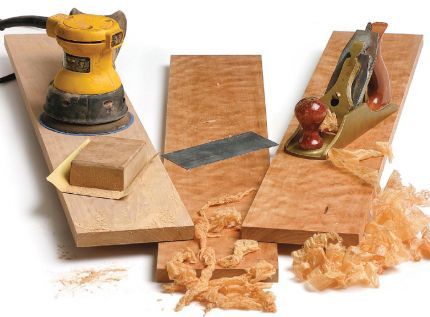
We know from our reader surveys that just as many of you use a sander for prepping surfaces as use handplanes and scrapers, so why is every workbench plan aimed at the hand-tool user?
Purists would have you believe that you aren’t a woodworker if you don’t handplane all of your surfaces and dovetail every joint. The truth is that many a fine woodworker prefers power saw, sander and router over handplane, chisel and mallet. So why hasn’t anyone designed a workbench for the rest of you?
Traditional workbenches are designed to hold boards for handplaning, so everything from their height to their holding devices are aimed at that purpose. For handplaning, you need a hip-height bench that allows you to bear down on the tool. But it’s much easier to run a router and sander at belly height, where you have better vision and control. A power strip is also a must.
|
More on Workbench Tech |
Tell us what else you’d like to see in a wired bench. Want a router table built in? Room for a compressor or tool-triggered shop vac below? Both? Or would you rather have storage cabinets down there?
What about holding devices? What type? One vise? Two? None? Would T-track be better than dog holes? There are lots of handy clamps and holding devices that don’t rely on dog holes.
What about the top? It’s hard to beat the good old slab of laminated maple, but should we go with MDF instead? Or a torsion box of some kind?
And last but not least, do you see this as the only workbench in a shop, or as more of a second bench if people have room? Lots to think about. C’mon, power-tool junkies, help us help you!
-
We know from our reader surveys that just as many of you use a sander for prepping surfaces as use handplanes and scrapers, so why is every workbench plan aimed at the hand-tool user?
-
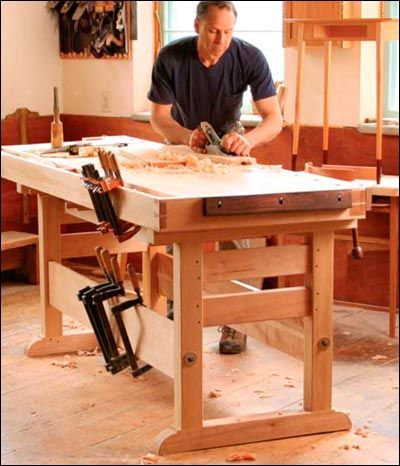
The traditional workbench is great, but what would a bench for power tools look like?


Comments
I made a free standing workbench with open tooltray, it is there for when I cut with my jigsaw or circular saw. After my first misses I favor a sacrificial mdf top over thin hardboard on top of a torsion box. I have shelves for the essential power tools, where the shop vac hose should migrate to the ceiling.
for a power tool bench I like the idea of a power cord drop instead of a strip on the bench. An easily replaceable top would be great like a mdf top (or masonite)on a torsion box. Hold downs that are strong and with flexible placement are a must. for me that has been the Kreg hold down clamps, bothe the tracks & the hold down plate. Depending on the space in your shop including a router table would be great. If you let us dream- sure put in a vac system & small air compressor with hose storage. a place for chargers is a must for sure, This would likely be one of the benches. In a hybrid shop, like mine is becoming, it is just another place to work.
My Festool MFT (table) sits just beside my self-made maple workbench, and it is all I ever need for power tool usage. The workbench is perfect for hand tools. I don't think the two can be combined successfully and I would not really want to try. The workbench takes more abuse, and needs to be built more sturdily for hand plane and chisel work. The MFT is light, has a grid of dog holes for clamping, and is great for routing, sawing and sanding.
Hi Asa,
I agree with mouppe - a lot can be learned from the Festool MFT, including all the attachments, both Festool and third party (like QWAS dogs). It is designed specifically for power tool use - and is 'the one to beat' - or at least try to equal, IMHO.
I've two MFT 1080's joined short-end to short-end with the Festool connector bars designed for the purpose. Gives a bench almost 8' long and 27" or so wide - its my primary bench in my little 12 x 16 shop.
That said, the workbench you and Matt Berger did in season 2 Beginning Woodworking might be a place to start. Keep the double-sheet MDF top - but add a hole grid like the MFT How to do this would be interesting to see - the MFT grid is very precise, can be used to assure square or various angles, as well as holding and clamping.
Add side T-rail track like the MFT - but also at the top along each edge, too. Possibly some track recessed into the top running between the holes.
I've sometimes thought of buying just the 1080 top(s) for $99, and the long MFT siderails - and making a bigger, more sturdy, MFT. But so far my double-1080 is working out just fine for both hand tool and power tool use.
Maybe also Google 'Jerry Work Festool' - and see what he has done with the MFT, too. (http://www.jerrywork.com/) Might be worth paying him a visit for his ideas as well.
Regards,
Chris
Hi Asa,
If we go with an MFT style perforated top, I'd like to see the bench also function as a large downdraft table. It might be built somewhat like a torsion box, but there would be a sloped cavity below the ribs for the dust and debris to settle into.... attach either a shop vac or central vac.
Also, if I were going to build a bench intended to house a compressor, I might think about integrating a few vacuum clamps.
Cheers,
-Michael
I would like:
o a slide out or tip out tray or shelf underneath, or at least in reach, that secures power points and powered battery chargers, with clearance for batteries, and space for cordless tools. Hand tools ok there too.
o Good old thick heavy LEVEL SQUARE hardwood top and massive legs. I like the accurately spaced and squared holes ideas. Probably need hardpoints to keep holes accurate. If top gets beat up, just plane it down. (be sure to lower hard points)
o Full width, stable, double screw end-vice.
o front leg vice, used along with sliding vertical support board with holes and pegs or horizontal hold down for traditional edge planing. (must move clear of battery shelf)
I like the idea of starting with the MFT tops. $99 for material and precision drilling of holes and guides sounds like a reasonable price to me. Second layer of MDF (for stability) could have larger and less precise holes. And definitely two.
I'd like to see a CHEAP, but far sturdier base than the MFT has. I'd probably leave it in a fixed position.
I think the base should be cabinets to hold jigs and tools. Compressor and dust collection already occupy a separate space.
Tracks on the sides of the top sound good, but I'd probably place it against a wall so maybe one side is expendable? Tracks flat on the top seem overkill.
This is already starting to sound expensive. How about adding a goal to keep it reasonably priced? Maybe a half-size (one MFT top) for woodworkers just starting out at around $250 and a full-size (two MFT tops) at no more than $500 - in both cases NOT including jigs or tools?
Wow, I had no idea we'd get som many good ideas so quickly! I think we struck a chord here.
I'm loving this idea of the Festool MFT top and then DIYing everything else, but good points were made about a sacrificial MDF top and Kreg holddowns also.
Let's see what others say. We'll feature this blog in an upcoming e-Letter, and then we'll get a whole new flood of advice!
I was in this bar on a planet far, far away, and watched what happened when a MOAMFT (mother of all MFTs) fell in love with an older wide-body WorkMate. Their offspring had the precision matrix of surface holes of the MFT combined with the clamping surface of the WorkMate. Interchangeable center inserts (like table leaves) allowed for either a flat surface or a clamping surface. Recessed aluminum extrusions along the apron, similar to the edge on the MFT, allowed the use of other FancyClamps, while still providing a wooden edge to protect the stock.
Asa,
You can combine the MFT precision hole top with a sacrificial MDF top.
Whenever I'm using my TS-55 with my MFT 1080s, or doing anything else that might damage or mar the top, I simply place 2 sheets of 2' by 4' 1/4" MDF on top. These are slightly trimmed to leave one row of holes on 3 sides, all except the front.
When I need 'more holes' for clamping etc. - I simply remove the 1/4" MDF.
Chris
for hold downs i like the kreg trac & plate. i like power drops from the ceiling rather than power strips on the bench. gotta have some good spots to stache the chargers
I've had my own shops since 1977. I started in woodworking in 1964.
Every woodworking shop I've been in, including my own, has a large bench, plywood surface, built around the table saw; always the same height or an eighth or so lower, never higher. I saw one that was covered in formica, and it had a depression in it at the outfeed end of the saw table. I liked the formica, but not the depression because I thought stuff could get caught up in there.
Also, other large tables, usually 4' x 8' on sturdy legs, are often seen. I use them myself. If you work a lot of plywood, they can't be beat. The old time woodworker's bench is specifically designed for making wooden parts by hand. I believe all woodworkers do some handwork now and then, but, if you have a good vise, or use portable vises like I do, that is not a problem.
That's not to say that I never saw one of those old benches in the shops I worked in, but usually off in a corner somewhere covered in dust. A romantic purchase, your might say, at the beginning of the woodworker's career.
Asa,
I have power tool bench that I made that measures in at 42" wide by 97 1/2" long and is made of maple with torsion box top and a sacrificial MDF top. It has two steel quick release vises as well. If you are interested, I could send/post some pictures to help with the idea process. I just need to know where to send them to.
Thanks,
Eric
I was wondering, when you-all are designing your workbench for power-tool lovers, how much power do you like to have at your workbench? What is the minimum amount of power you feel you must have? One 20A circuit, or two; or 30A or.....?
I'm asking because I'm about to finish planning a workbench and since I'm not sure what I'll be doing at the bench it's very difficult to know what I'll need. That's why I'm asking what you-all consider to be the minimum you need for your power tools.
TIA
LongOfTooth:
Key question: On your workbench will you be using 'benchtop' versions of stationary machines - such as perhaps the Grizzly G0505 12 1/2" planer (a Great machine for $295, IMHO)?
If so, I suggest three 20A minimum circuits. One for dust collection/shop vac. One for the benchtop stationary machine. One for hand tools (sander, router, nail gun/compressor, etc.).
Otherwise, without the large benchtop machines, two circuits, assuming you are the only one working at the bench, should do it.
I get away with a single 20A 110V service to my entire new 12 x 16 shop. Its an outbuilding about 150 feet from the main house, and when my Dad put in the 'mower shed' (maybe 8 x 10) that is next to it, he only had it wired for a single 20A line. Currently I run heavy 12ga extension cords from that, and it actually works fine. Lights, small electric heater, shop vac - and one other machine at a time..:>)
Chris
I have 4 portable tool carts in my shop, here is the rundown:
The first is a router table/station it a modified 'NewYankee' design that is on wheels, I got tired of dinging the 24x36 top, so I bought a galvanized pan(about 1/2" deep from AutoZone and put it upside-down to protect the top when I am using it for 'other' non router functions.
The second and third are small 24x20x30 roll abouts that have a bunch of 6" drawers full of ‘stuff’, and one oversize drawer with a 12" delta planer...I put T-tracks in the tops and have a drawer full of hold-downs , T-bolts and other T-track accessories. I added a few custom attachments, one that holds a dust-collection clear of the out feed table of my planer. I have handles on the sides and hooks to hold the extension cord.
The last one is, dare I say an old B&D WorkMate, nothing special but sure gets a lot of use!
I plan to make another cart like the other two, then I would be at five. This time I am thinking of hiding an extension reel inside, but reverse it so that the plug is on the pull-out end, then have a set of outlets on the side one to be ‘auto-switched’ for a dust-collection or an inexpensive shop vac.
Here are my thoughts, after trying to figure out this exact thing for several months. It isn't easy to look at the various innovations through the lens of "what's best for my power tools and usage" given the huge number of ideas out there and the various options to choose from when it comes to T-tracks and metal clamping options.
- I can't imagine using anything other than a maple top. Its just so heavy and strong and looks like a woodworker's bench. I appreciate completely my benches made from solid core doors and laminated MDF, but they just don't look like a woodworker's bench to me.
- I think round dog holes are a must. They let you clamp at unusual angles and hold pieces in a way that square dog holes don't. They are also much easier to machine into that maple top :).
- Overhead power is a lot more valuable to me than power on the side or power underneath. I have extension cord reels and power plugs over the bench to keep the cords out of the way during use.
- That said, I very much appreciate having an easy to use dust collector under the bench. A way to downdraft through the dog holes might be nirvana but I haven't done that yet (it would mean building something under the table to channel the air and I can't figure out how to do that easily.)
- To leverage those dog holes, I decided on a full-width twin-screw tail vise with aligned dog holes. The trick to working with power tools is to keep the dogs low - below the workpiece mostly. I also focus on using this instead of clamps whenever possible as I keep finding the clamp is in my way when routing or sanding or whatever.
- I also decided on a patternmakers vise (Emmert clone) but I haven't installed it yet. It just feels like it has more utility than a front-mounted standard vise but I'll have to see after I have it installed.
- I also went with storage space underneath to hold the various tools in their cases (jigsaw, circular saw, biscuit jointer, drills, sanders, etc.)
- The one detail I love about the Festool MFT is the guide rail system for circular saws. I just didn't feel that it was worth the pain of those side tracks to get it. I have a cheap aluminum rail I clamp and use when I need it, but its not as convenient as the Festool I'm sure.
I can't wait to see what you come up with as I think this is a very interesting topic!
Somebody asked about a 30 Amp circuit you can't get that in 120 volt not a receptacle. If you need that much then the machine should be rewired to 240 volts to reduce the current.
For my shop I ran a 40 amp service to a sub panel. I have the table saw on 240, all electric heters are 240, the lighting is configured to a 3 wire edison so that the breakers see 240 volts. Dust collector is 240 I can run all the heaters, the table saw and dust collector at the same time without a problem.
For 120 volt circuits I have 2 20 amp circuits to either side of the shop wired with 15 amp receptacle per strap. If you need a dedicated 20 amp then you will need a 20 amp rated receptacle on a single yoke.
Got to remember how many tools can you use at once. My shop is a one man shop and I keep it that way.
Even with the two 240 volt saw and dust collector and heaters running I am with in 80% capacity of the service. Which is quite acceptable.
If you are rewiring a shop make sure everything is grounded. And don't depend on a ground rod to trip the breaker in the case of a fault. on the 120 volt circuits it is required to use a GFCIs ahead of the down stream receptacles, its good protection. They are cheaper than the breaker. Two GFCI's 15amp 20amp feedthru.
Thats the way I'd do it. or you can bump it up to 100 amp and put in a 30 space panel with all the bells a whistles and at todays wire prices and breakers you are starting to get into some serious money.
In my opinion, if you design a bench exclusively for power tools you need:
1. Plenty of power and in different locations on the bench.
2. A way to hold down objects of differing size w/o interfering with milling operations.
3. A place to store the smaller and most used tools.
4. A replaceable top that’s tough enough to withstand power tool use.
5. out feed support and down draft capability for differing operations.
6. Should still have a vise of some sort to help in those impossible situations where nothing else will do.
You must bear in mind that a bench for power tool use will also be lower than a hand tool bench, because most power tools are more comfortable and safer to use at a lower height.
Chaim
I would like to see a design for a bench that incorporates the essentials of a traditional bench with the necessities of a power tool bench. I would think that John White is someone who could design a bench that would fit today's woodworker. After all, his latest bench design printed earlier, is a good example. He seems to figure the angles that most of us recognize after the fact. I put a great deal of stock in his assessments.In other words, turn it over to him and lets see what he comes up with. My guess is that it will be awesome.
I would like to see a replaceable piece of hard wood on the front of the bench flush with the working surface that could be used as a bearing guide for a router.
Use the dogs to hold the board in place just over edge and route a joined decrative surface.
I would like to see a replaceable piece of hard wood on the front tof the bench flush with the working surface that could be used as a bearing guide for a router. Use the dogs to hold the board in place just over edge and route a joined or decreative edge.
While I would love to have a big Lie-Nielsen traditional bench, the truth is that style of bench is not practical in most shops. The bench I found most practical for both hand and power work is a multiple duty table that serves as a saw outfeed table, assembly surface, area for gluing and sanding, using for sliding miter saw, etc. In my old shop this was a 4' x 8' table made of six 4" x 4" legs with an upper apron and large lower shelf. It had a top made of double MDF layers covered with a laminate surface. It bumped up to the saw for outfeed, but on that end the surface (about 8" of the 4' width) gently sloped down about 1" below the saw table (so a +/- 1/8" difference in hight between saw and table would not matter). Two large drawers, one shallow, one deeper; electrical receptacles on the apron and two receptacles hanging over the table. A large woodworkers vice mounted parallel with the long side of the table at the far end of the table from the saw, with parallel round dog holes across the width of the table for any handwork needs. A moveable bench jack made it possible to clamp long boards in the vice along the length of the table for hand planing long edges. Wax the top of the table and saw when cutting sheet goods and it is effortless to push them. Throw a large sanding pad on top for sanding jobs. Use a hand scraper to pop the dried glue from the top after glue-ups. The monster shelf on the bottom about 8" up from the floor can hold far more than we would ever put down there. A roll of craft paper can be suspended on the far end and easily pulled up to cover the entire surface when needed (painting, etc). Over hang on the top edges for clamping. Best all-round work table I ever used.
I found that a manually-adjustable, 2-inch thick laminated maple top table makes an excellent workbench. The height can be adjusted to perfectly fit what ever I'm working with. I put lockable casters on it so it can double as an outfeed table for the table saw or jointer. I haven't drilled into it yet to mount a vise. I avoid banging too hard on it so that I don't break the height-adjusting mechanism.
For a Powertool workbench, I would include the following:
1. I would recess a power strip into the top or into an end, so that it could be easily used and not in the way. A power strip screwed to the side of a leg would possibly be a substitute, but more in the way, I would think.
2. I would make it at least 34-36" tall, so that routing or sanding operations would be at eye level.
3. I would incorporate a vise, at least at the front. I have done this and have a series of dog holes for the vise and a pair of wonderdogs for holding flat panels.
4. I would have at least a large shelf, for holding portable tools. To me, a router and a jigsaw would be the most commonly used portable tools, along with battery powered drills/drivers.
5. For the top, I made my benchtop out of 4 layers of 3/4" Plywood. So far, it has held my dog holes without any trouble chipping, etc.
6. I am non-plussed about a downdraft table built into the bench. As long as the area is well supported, and you could hammer or whatever in that area, it would be fine. But I would worry about violating the top with a large area of weakness, as I use all of my bench at one point or another.
7. As above for a router table. Frankly, I think that is better suited for a separate unit from your workbench.
8. For hold downs, I like the traditional round dog holes for the multitude of gadgets for them. I use bench dogs, wonder dogs, and Bench Cookie risers in mine. I also have four larger holes arranged in the middle of my bench, and underneath have four pipe flanges screwed to the underside of my bench top. This allows you to screw in a pipe nipple into the flange, and then use a deep-reach pipe clamp on the nipple to hold things down. I mainly use it for holding down a portable planer, but it could be used for a lot of different things.
9. I would probably incorporate a pancake compressor to power air nailers or staplers. It would also be handy to have compressed air at your fingertips with a blowgun attached.
10. Drawers are a funny breed with workbenches. They are handy. They also have a tendency to fill with sawdust, especially if you perforate the top with dog holes. If I would going to put drawers in it, I would just use t-track for hold downs.
My biggest wish on almost any workbench for use with power tools is a place to store tools with the power cords connected, while keeping the dust and chips under control. Drawers don't cut it - Dust and chips collect in them. Cabinets are a pain because you end up on your knees digging around in the back of the cabinet. Shelves are quick to get the power tools out of and back into, but dust and chips are a problem there too. Downdraft tops are a possibility, but any opening big enough to grab router chips is big enough to have parts fall into.
Maybe a convenient way to plug the dust collection port on the tool into the dust collector and some sort of sensor for the tool power feeds that turns the dust collection on when the power tools are in use. I think putting it on the leg of the bench is a possibility.
For power connection, I screwed an outlet box with a duplex (dual) outlet on each leg of my workbench. Then I added those six outlet covers to each one so I have twelve outlets on the front of my bench. With the outlets on the legs, the cords are usually out of the way. Your picture may be a joke, but sort of like that with the six outlet covers added. I tried overhead outlets and outlets on the back of the bench, but I quit using them because I was constantly fighting cords. Plug strips under the bench edge interfere with clamping and the cords tend to get in the way.
A vise on each end on the front face of the bench, round dog holes, a substantial top (mine is made from face glued clear douglas fir 2x stock), a strong base (maple trestles), and some Rockler biscuits to elevate the piece being worked on over the bench top.
The addition of a power point to a work bench is interesting but a much better solution is to have the power points suspended from the workshop ceiling. This is how I have setup my workshop with four power points arranged over an island work bench that runs for two thirds of the length of the workshop. three are 10 amp amd one is 15 amp to cater for my welder. In addition I have power points on the walls around the workshop for other items such as a lathe; a band saw; a bench drill; grind stones; etc.
Terry Hemmings
ACT
Australia
My workbench for the most part like every other workbench with a wood vice (record 52½
Sorry that I fat fingered the previous entry. I think that the work bench should include Masonite or hardboard surface which can be easily replaced with storage space for tools beneath. I can't see any shop in the future with out a computer and possible a CNC router, and hence the bench should include 2 power strips (One surge protected and the other just a regular strip). I love my CNC it makes woodworking what it should be: accident free. It allows me to cut out pieces keeping my fingers away from moving hazards.
I am thinking about a second workbench where the top will house my lathe and I will be able to rotate the bottom side up and serve as an outfeed for my surface planer.
Adjustable height would be a most useful feature for a workbench, for both hand tools and power tools. Retractable cords for extra reach, when that power tool comes with a short cord. An on/off switch for the power.
10 years ago I built a workbench with a 40mm kitchen-laminate top and a shopmade twin-screw front vise. The vise is 600mm long and can be used as a router guide. The top has threaded holddowns for routing. Circular dogholes for traditional clamping and planing.
Currently, I'm building a hybrid hand-power workbench.
Top is 4 layers of MDF totalling 75mm thick, with silky oak edging.
Two rows of T-Track along the full length instead of dog holes, with crosswise T-track opposite the front vise.
Legs are 75mm square hardwood. Locking swivel wheels so that I can move the bench around.
Vises are shopmade using pipe clamps and electric drive. A cordless drill motor and clutch at the back of the vise drives a threaded rod which runs inside the pipe. The pipe clamp head provides manual fine-adjust from the front. Foot switch controls the power-action for quick no-hands clamping. 12v battery for power.
Endvise on the left, frontvise on the right because I'm lefthanded.
No built in power, I prefer that overhead, and I want the bench to be cordless (for mobility).
A workbench is a workbench, whether it is powered or not. It is a stationary tool to hold something in place while you are working on it.
I built a traditional bench with built-in vices and dog holes to hold my work. But I added a four-outlet box at each end, to conveniently plug in power tools like an electric drill, sander and biscuit cutter, as these are often used at the workbench.
I added a shelf under the bench about a foot above the floor. This is a convenient place to set the tools when they are not being used, and it keeps them from cluttering the work surface.
I added a sloped shelf about a foot above the bottom shelf to deflect dust and chips which fall through the dog holes -- keeping them off of the tools.
The outlet boxes are positioned on the inside of the legs, so that the plugs will not intrude into my legs, or interfere with anything that I may want to clamp onto the legs. The outlet boxes are connected to each other by a piece of heavy duty extension cord. You don't have to use Romex or cladded cable, since the bench can be considered to be a portable tool. Care must be taken to securely connect the extension cord wiring to the the terminals.
The wiring from one box to the other box is routed under, and secured to the bottom of the bottom shelf.
The power wire is again a heavy duty extension cord which is routed through a cord protector which lies on the floor. It terminates in a plug which conveniently plugs into a wall outlet, like any other tool.
I only have two hands and therefore, I only operate one tool at a time, so I'm not concerned with overloading the circuit.
I have a few "must have's", and a couple "wanna have's":
Must have:
- Durable wood top, obviously (beech?)
- Holes for bench dogs
- Adjustable vice at each end (preferably quick release)
- Dust proof drawers for tools and accessories (two small, one
large)
- Electrical outlets on each end, with master circuit breaker
Wanna have:
- Leveling feet (possible height adjustment as well)
- Top 6" under worktop would be setup for use as a downdraft
table using the bench dog holes as input vents
I agree, power should come from above. And don't forget air. I have a cord reel above my bench, and one on the other end of the shop. I also have a coil air hose above the bench,and one to the left, so i can go back and forth from the nailer to the stapler. I have two doors with pull out shelves for power tools and drawers for smaller parts. It has a vise, but *gasp* I rarely use it.
Forget mounting outlets on the workbench. They may be easy to reach but the tool cords will be draped across the bench ready to be cut or sanded or get tangled. With outlets on the front side of the bench the cords are ready to trip you up. Instead mount heavy duty outlet boxes on the ceiling (or dropped down support) above the bench facing downward. If a tool gets out of control it is easilry to pull the plug. Also the bench is free to be moved for odd sized projects.
Consider powering the stip with a separate circuit with a cut-out contacter box. This makes it easy to disconnect power from the outlet when no one should be using the tools and with a trip string strung thoughout the shop you can quickly disconnect power in and emergency.
Whatever you do, don't position the outlets facing upward. They fill with dust and if they get hot, they burn.
Using both hand and power tools, my work bench is 56" wide, 96" long, 33 7/8" height to accomodate my table saw as an outfeed table. The top is two sheets of 3/4" MDF with a 1 1/2" rock maple top. On the right side I have a double T track running 2" parall from the edge to use for Kreg hold dowm clamps as well as for my push clamp for the Rousseau router lift which is centered at 4'. Using a Rousseau router fence at the router lift, there are two perpendicular T tracks so that I can adjust the fence and remove it when necessary. The router lift is housed within a cabinet with a exhaust/dust collector port at the bottom and the dust collector hose, which is also connected to the table saw, runs full length of the table to a Delta dust collector that is remote controlled. I use a Festool dust collector with its yard arm and hose when using my hand power tools. I found an excellent wood screw and nut on E-bay and made my own wood vise which is on the south end of the table on the left side. Then I purchased a Festool track hinge and T mount, mounted a hinge T mount at each end of the table and the Track hinge at the south end of the table, the stabalizer on the north end of the table. It is mounted so that it does not interfere with the screw vise. When not in use, I simple remove the tracks for the T-55. Beneath the table are various drawers, with doors, for hand tools as well as shelves for power tools. Works for me. Ed
After working in a plumbing/tin sop for a while, when I built my first work bench it was 4'x 8' with 4 4x4 legs on each side a duplex outlet on each leg. A 12" shelf was cut around the full length on both sides for setting power tools, ala the tin shop work bench. My latest reincarnation of the above was 3' by 6' with butcher block top edged in oak garnered from shipping pallets. Cleaned up and planed to 1 1/4 by 3" makes a very sharp and HARD edge when needed. Easily and cheaply replaceable. Being a small shop the overhead if used for wood storage so I could not do without my wired bench.
ok for starters, stop thinking of wood workers as Either hand tool OR power tool junkies. I expect the vast majority of us are BOTH. Ok so now think of a bench for Both uses:
Adjustable bench height
Vise and vacuum-work-holder
dog holes and bench top T-tracks
over head task lighting (in addition to regular lights)
over head power bar & retractable power cord.
over head compressed air retractable coil.
Double top work surface over and tool shelf under
two top shallow drawers for layout and hand tools
four deep lower drawers for power tools and accessories
Make the bencetop a combination torsion box and dust collection system by using the spaces down-draft style.
wall mount cabinet for hand planes, chargers, drill bits,saw.
anti-fatigue matts all around bench (on conc. floor).
wall mount ipod station (behind plexiglass) and radio headphone hearing protection.
wall mount phone with light indicator
top at least 36"x84"
bolt-down legs. (why do people need a 400lb bench, bolt it to the concrete floor, now it is 20 tons)
shopvac and compressor located remote to bench (noise control) but control by swiches at the bench. One dedicated plug-in for router that activates the shopvac, over-ride switch to turn on the shopvac for other uses.
flip-up bench edges that support bar clamps.
fitted compartments in drawers to hold: bench pups, hold-downs, driver bits, calculator and pencils, note-pads, small layout tools, chisels, mallet, etc.
I think BirchWoodGuy has pretty much nailed it. I'd add:
1. the adjustable height feature should be "easily adjustable". This so the height can radily be adjusted, depending on the task at hand.
2. A replacable top
3. Switches at the bench to remotely control (wireless) the air compressor and the dust collection system. A wireless master power switch to the overhead power supplies might also be a good add.
4. 12 volt power supply included with overhead power sources.
I've seen a lot of comments about having an overhead power source. When I was a kid, my mom had a device attached to her ironing board that held the power cord about 18 inches above the board surface so the cord wouldn't get in her way. It was essentially a wire spring with long legs terminating in a loop at one end and a clamp at the other. The thing would clamp onto the board and the power cord was threaded through the loop at the top. I'd like to see something like this attached to a workbench, it would be low-tech but effective in keeping the cord out of the way and easily removeable.
@DocGHines -
Please do NOT put a plug-in strip or outlets in the benchtop. They will inevitably fill up with sawdust and other crud that the shopvac will not be able to extract. Worst case is that crud will accumulate just enough to separate plug from receptacle bars _just_enough_ to cause arcing, and a subsequent fire.
Safety first, everyone.
My bench kind of "grew" over the years from a simple table build of construction-grade lumber. In its current incarnation, it is 4' wide x 2' deep with an 8" tray at the back. The size is due to space limitations. The top is 3 layers of 3/4" MDF plus a bottom lamination of 3/4" plywood (the original bench top). The front edge is 3 pieces of 1 x 3 oak laminated and bored for bench stops, and the end vise is entirely shop-made, and uses the screw from an old machinist's vise. There is an outlet strip under the front edge which I find very useful for power tools and battery chargers.
The drawers are full-extension, rated at 120 lbs. each.
There's a photo at http://www.gate.net/~walts/IMG_5694.JPG
Walt
Of course, it needs to be WIRED - with multiple outlets too.
Hand tools alone were Good before Al Gore invented electricity, but are no longer the smartest and best for everything. Purists are in self denial or something. Bones1
Of course, it needs to be WIRED - with multiple outlets too.
Hand tools alone were Good before Al Gore invented electricity, but are no longer the smartest and best for everything. Purists are in self denial or something. Bones1
Electric....??? What about air....?? I use air for my staplers and nailers. Something kind of overhead is what I like.
Our workbench is two big laminated slabs of 65mm (2 1/2" for those of you living in the past) with a removable centre well.
Four rows of dog holes on the top line up with four more on the Veritas twin screw vice at one end. A pattern makers vice sits on the side at the other end, with a row of dogholes on the side cheeks to support long boards or plug in a bench jack.
The removable centre well means we can drop in the shop made router table when needed. Don't see the need for levelling - the floor is level, or fixing the top to the ash frame - gravity manges that just fine. A 6 way power strip on the floor takes care of all our electrical needs - we use the FWW tip of a year or two back of identifying the tool and plug with coloured tape wrapped round each end of the lead.
Don't see the need for a variable height - routing and sanding are just fine at 36", but we do have a little bench to clamp on top for close work, such as grinding shaper cutters or hand-cutting dovetails.
It's a tiny 550 sq ft workshop but my son and I have managed to walk sideways like crabs and scrape a living out of it for the last year. It also has a very low ceiling so we can't stand e.g. house doors upright. Top of the wishlist when we have a few bob (a bob is 5 UK pence) is to put in a concrete floor and some doors in another currently open-fronted dirt floor outbuilding and stick in a 8' x 4' assembly table.
I saw the article, and was so excited to add my two cents, I haven't read any comments yet. So I apologize in advance for repeating or squishing anybody's comments or advice.
I have been in the process (for a few years now) of designing a workbench for my own needs. I know there are hundreds of plans out there, and dozens of sources of both paid and free information. I have been taking the approach that costs nothing but time: pay attention to what people have, watch podcasts and videos for what is being used, and notice what I need and want. While no two woodworkers are going to be exactly alike, I have noticed some common things that appeal to many.
There was a plan published (don't remember by whom just now) that included an automatic switch outlet, I believe sold by Kreg. iSwitch (i believe) also sells one, for powering dust collection. these are nice to have as they relieve outlet requirements and reduce cords snaking across the shop. I also firmly believe in installing a power cutout switch on the front of the workbench (such as the one available from Rockler) which will operate all of the power on the table. Running conduit underneath the bench top cuts down on the distance, but running the wires under the bottom shelf is safer.
as for dust collection, I believe a 2" inside diameter line is more than enough, with one "pop-up" floor sweep station (removable) at one end, and another access line along the "back" edge. If you keep your bench against a wall, you can notch out for the ducts, and put flush-mount covers over the holes when the ducting has been removed (say, for assembly). If you have access all the way around your workbench, an overhang and flexible hoses are a necessity.
for vices, I believe you can get by with just one. The sliding tail vise from Veritas (recently reviewed by several magazines) seems to be the best possible option for this. I have also seen a plan online that sandwiches a simple handscrew clamp between planks that make up the table top, to act as a simple end vice.
as for the table top itself, that is best left to the realm of personal decision. I've seen the articles on LVL, the support for SYP, heard the arguments on birch, maple, oak, ash, hardboard, MDF, and plywood. Keep in mind, it will all get used, so here is a matter of personal taste. Just remember to keep an eye on your fingers.
Don't forget the gas and oil for the chainsaw...
The electrical outlet is great, but I would prefer that it be a GFCI outlet, or know that the circuit is wired to a GFCI circuit breaker.
At Cerritos College, where we have around 23,000 sq. ft. of shop area, all our benches are dual duty. They have heavy maple tops with tool channels and side vises. That may sound like a hand-tool shop but when you add four drop cords and four compressed air lines per bench, the utility of power tools is obvious. So that's what I think is best. If you're serious about making furniture to use, rather than as an antiquarian statement or personal artform, you need power tools. However, there are times when the precision of a well-sharpened plane or chisel is essential. So let's get off the "one or the other" kick and admit that we need benches that work both ways. Personally, I like drop cords and airlines. I also like the idea of a down draft box, but whether it should be built or sit under the bench until it's needed I'm not sure. Plenty of good ideas, here, but again I say let's not get hooked on One Way.
I'm planning a new shop and new bench. I had not thought of power in the bench, duh. From the comments I like the idea of drop cord and air lines. I will probably put mine on reels to keep them out of the way when I'm not using them. I prefer traditional hand tools. Sometimes time is more important then approach.
Great Topic, thanks!
I built a great bench about 20 years ago out of 8/4 pecan ( 54" X 102")- hard as maple but at a much lower cost. I built it just at hip+ height ( including the HD locking wheels) and have had no issues whatever with either hand (preferred), or power tools - I use both. I cut parallel rows of bench dogs down each edge ( about 6" in), a 16" side vise wth "flip-up" holders on top of the vise face as well as two other holders out on the bench surface at 12" and 24 " out, and a full width end vise with matcing bench dogs for holding large pieces and panels. It has a full length and width 5/4", lower shelf about 8" off the ground for tools and dowel storage, and I equipped it from the beginning with HD electrical outlets under each apron on the inside of the 4 X 4 glued-up legs. It has a 10'long 14/3 drop cord out of the tail vise end to allow me to carry my power with me as I move the bench to accomodate various projects. I have cement flooring so had no other viable choice other than a power cord to the workshop wall. If I had a floating floor or underside access, I'd still provide power the same way, but plug it in from underneath. I have experienced no voltage drops even while sharing my bench with neighbors, friends, Boy Scouts, or granchildren and each of us using the heaviest routers, drills, sanders, or other tools simultaneously.
Electric on the bench. I like the retractable extension cords that I mount on the ceiling over the bench. The come with a sliding ball to adjust the length of the cord.
I guess if I were to put power to the bench I'd mount plug-mold under the upper support rails on either side of the bench. They would be out of the way yet handy when you need them.
One thing I would like to see is for power tool manufacturers to put longer lenght power cables on their tools that reflect real world use. Why put an 8 foot cable on a circular saw when to have any practical use at all requires a twelve foot cord? Then when you build a bench there should be lots of outlets. And they should also be all metal quad boxes and face plates connected by armored cable. Sweet!
I have a welded frame, wood top, bottom, rear, and sides, on 4" locking wheels. I have a 6 foot strip across the back top and a 3 foot strip on a shelf below to which I have several battery chargers attached to it. Two drawers I added below the top are very nice to have too.
I would love to see a workbench built for my height and reach, not for a gorilla. I'm 5'6", and stand on a stool to use our table saw, not too safe, but I can reach better being 6" taller. I love the idea to have retractable cords and air compressor hoses above the bench, holding cords out of the way is aggrevating. I think the downdraft idea for dust and shavings is mega cool. I would like the bench to have swivel wheels with brakes, so that it can be moved where ever it is needed and to accommodate for large projects. It should have drawers, so tools are readily accessible. It should also have an overhang deep enough to use clamps. My current bench was designed to go against a wall, so one side is deep and the other side has no overhang, truly frustrating. The worst part of working on a project is keeping de-cluttered.
I also thought that these comments needed a chick to butt in because not just guys have workshops ;-}
A. Sacrificial top that removes easily and stores onboard for panel cutting with circular saw. A good choice is Eurekazone's SmartTable top and track system. Supports on side of bench to store the top and tracks.
B. Flat sacrifical top that also stores onboard, for gluing/finishing.
C. System for clamping while sanding. Maybe a downdraft?
D. Outlets are best placed above the bench, hanging from ceiling, with some kind of pivoting arm.
E. Dust collection hoses also best above the bench.
F. Skip the router table. In the way, a waste of space. Get a router table or mount one to your table saw.
G. Clamp pads for pocket hole assembly.
H. Bench dogs.
Just wondering if anyone on FineWoodworking.com ever uses the Internet in connection with their fine woodworking?
Am I the only one running back and forth between the garage and my PC inside, or trying to find a place near the workbench to perch my laptop where it won't get destroyed while I work?
These days one of my most important "power tools" is a networked PC. I use it for plans, cut charts, instructions, tips, and who knows what all.
So how about incorporating some sort of industrial-strength mounting system, with a display above, or to the side of the bench, and a keyboard with trackball that pop out when needed, probably covered with either a retractable or elastic plastic shield?
Reading through the posts to date I have seen a number of suggestions for retractable power cords dropping from the roof.
I would just like to point out that running power through any form of coiled power cord poses a fire hazard unless the cord is always fully uncoiled. The coiled turns of cord have significantly more inductance than the cord would have if fully uncoiled. This has two effects, a significant increase in the voltage drop in the feed to the tool, and generating significnt heat in the tightly coiled cord within the case of the coiling mechanism. The safest way to avoid this problem is to avoid any form of coiled power cord.
A very usable alternative is to run one or two steel wires accross the bench from end to end just below the ceiling. Then attach carabiners to the wire (one for every couple of feet of wire) and the power cord from the carabiners with cable ties, allowing enough slack in the line for it to extend the required span. The cable can then be retracted to one end to give clearance over the bench, or drawn accross the bench to here power is needed. I find that having the cord terminate at about 3 feet above the bench is suitable but this may vary to suit userr requirements.
Years ago there was a fine woodworking article about a guy who installed shelves or drawers under his workbench where he could store his power tools and keep them plugged in. A lot of tools are now cordless, but I'm constantly taking out or putting up sanders. This should be my next shop improvement.
My own workbench has evolved. It began as one 3/4" plywood sheet ripped up the middle and mounted on legs providing an easily replacible worktop and a bottom shelf. later, it developed a wood vise, then shelves for power tools, like sanders, jigsaws, drills, and even a specific shelf custome made (blade slot included) just for my circular saw. Later, a drawer appeared to store such things as a dado blade, sanding drums, special bits, ramdom paperwork, a notebook for doing rough sketches, that sort of thing. Next a cupboard was built in to store other items, like my Dremel, my dowel jig kit, my biscuit joiner and biscuits, and so on. During this evolution, there also appeared two power strips (one on each side) on the back of the bench.
It's not pretyy, but it's pretty functional, providing me with all I need in my confined space. Perhaps some of these ideas may work with the designed bench.
There are a lot of great ideas here. Asa, You pointed out the height requirement differences for hand work and power tools. Surely there is a solution for both in one bench: An adjustable height top, or heavy duty pullouts for hand work.
Agree with Timiti in El Cerrito - PCs have a place in the power tool pantheon.
Aside from my hand tools and 'classic' power tools, I have a (small) CNC mill and CNC lathe in my shop. I'm very concerned about keeping the PCs running in the harsh shop environment - would love some ideas for protecting and managing PCs in a shop in conjunction with the bench discussion. Maybe an idea for a series - CNC: the next generation of shop power tools?
My own bench (2' X 8') uses four layers of MDF for the top - dead flat and massively heavy for stability, on 4x4 frame and legs. Not only dead flat, but I don't anguish when a chisel or saw nickes the surface, and it's easy to re-smooth after many months of activity.
I set the bench height at 34" - high for most people my height (5'11") but I get back aches working any lower. It's been a great compromise when planing or when routing. It only has one power strip, in front which is some inconvenience with cord management, but has a retractable air hose that's been very convenient for stapling and pin nailing.
I built the new fangled workbench shortly after it appeared in FW back in 1999. It has been the center of my workshop ever since, probably the most successful fixture project I’ve ever done. John White is a genius. There is very little that I cannot clamp or hold with the bench. The planing beam is especially good for holding large panels.
I did add a shelf to the stretchers which is very convenient for electric tools stored in their cases. I also added an outlet in the middle of the shelf and on either end, a double outlet. The double outlets are very handy, allowing me to plug in three sanders with successive grits.
I've had a wired work bench that I built about 40 years ago. 3 leg modules made from 4 x 4 cedar. Outlets inset into leg. Amazing how old becomes new again.
I use both power and hand tools on my bench. My solution
is hanging a drop down cord from the ceiling. The advantage
of this that the cord is out of the way of power equipment.
I store all my power tools right under my workbench top in a fixed order. That way, I know intuitively where to reach for the right tool, and I have them all immediately available.
From left to right:
- Planer
- Jigsaw
- Router
- Drill
- Circular saw
- Sander
- Angle grinder
- Battery charger for cordless screwdriver
Where needed, I made holes for e.g. the jigsaw blade, the router bit, etc.
At the back of the freestanding workbench, I have a 10-outlet power strip, where all the power cables are plugged in the same order as the tools. That way, the cords get (almost) never tangled. Most of the cables are long enough to use them at any place on the workbench, and it is only exceptionally that I need to unplug a tool. The outlets are vertically oriented to prevent dust from accumulating there.
In addition, each power outlet bears a label with the name of the corresponding tool, and the power cables have their own name label as well. That way, I never need to double-guess which cable belongs where.
My current bench has no power supply, but I've located it near an outlet in my shop.
My next bench will have drawers below for about half the width of the bench and one or two open shelves in the remaining space.
I'd not thought about a power supply, but it's a good idea, I will probably put a surface-mounted 2-gang box on each end with a length of 12/2 and a plug to the nearest outlet. (Basement shop, no way to run wiring below the floor.)
As I saw with my right hand, I will have two vices, one center-mounted on the long side and one corner-mounted on the left side, leaving the right side clear for use when sawing.
The left front leg has a long-board support on it level with the bottom of the center vice. Narrower boards are supported by off-cut 2x stock of varied sizes.
Due to space limitations, I don't have room for a second work table, so the new bench will double for that, it will be 36x72 inches with 3x4 legs, built from 2xSYP, 2.75 inches thick, all components ripped square. The thickness is designed to mount my vices simply by drilling holes for the mounting bolts.
Overhead lighting will be provided by multiple compact fluorescent fixtures.
My estimated cost is about $100 for materials.
I noticed a few comments about bench dogs.
Mine are wooden, cut square to about 3/4 inch and then shanked to 1/2 inch diameter below the head with my dowel plate, I rough-turn them on my lathe.
My bench is bored at intervals with 1/2 inch holes, all I have to do is put them in where needed.
They're waxed, tap in and get removed with a pair of Channelocks. It's crude, probably more costly in the long run than metal dogs, but effective. When they get borked, I make more, but the important thing to me is that my tools never get damaged by them.
If you haven't checked it out yet, the Noden adjust-a-bench is a promising dual power/hand tool bench. Just saw it on This Old House saturday. I am seriously considering taking my existing maple top and mounting it on a Noden frame.
Besides the usual bench functions (dogs, vises, supports, etc.), I would like to see a panel or block that provides access to AC power (two 15-amp outlets), pressurized, filtered air, vacuum (2 inch). While you're at it, add an ethernet port (Category 5, unshielded twisted pair).
The individual ports should be fairly close together to avoid a spiderweb of cables and tubes. Each outlet should have a dust cover or blast gate.
A Powerbench...
The EZ-ONE?
Open and adjustable top with squaring and sliding stops.
http://www.eurekazone.com/content/ez-one
One thing I would NOT like to see, is a PC anywhere in the shop. PC's and dust do not mix. When our truss plant went 'paperless' the IT guys installed PCs at every station. the stations closer to the dust sources would only last weeks before the keyboards, powersupplies, CPUs, motherboards died. No PC lasted more than 18 months. We then changed to laptops - the keyboards would clog up but the guys on the floor would blast them with compressed air! It was two years before we started to have major problems with the laptops. When they now die, they are replaced with 'military' spec laptops (you know - spill coffee over etc). The IT guys are happy - no more calls to the floor.
I simply put a 4' bar surge protector on the short end of mine. Had it there for years. Works excellently.
I agree with the suggestion that the workbench be waist high. Partially because I use more power tools than traditional hand tools and because I am taller than average.
I would like to see storage cabinets below. Maybe shelves for power tools such as a router or sander but also drawers for smaller tools such as planes or measuring tools. The shelves should have doors to enclose them to prevent build up of dust. Power outlets that are built into the workbench would seems so much more appropriate than the spiders web I have hanging from the rafters.
There's really no need to choose between a track system or dogs. I have both on my bench and use both.
I like an overhead power supply. I have a 3 outlet pig-tail that hangs above my bench that works well. My sander and router equipped for dust collection get plugged into my shop vac which turns on when the tool is switched on. So a place for a vacuum under the bench might be useful.
I have a roll of butcher paper that hangs under one end of my bench that I roll out if I'm doing something particularly messy. My bench is covered with a removable piece of 1/4" hardboard, but I've never changed it out. It's finished with a wipe on oil finish. Dried glue scrapes of pretty easy with a putty knife.
I would like to have drawers under the bench that could be opened from either side. I haven't had any luck finding any heavy duty drawer slides that fit the bill. It's a tall order. Having the weight of the tools in the bench would add to the stability of the bench.
I've made the height of my bench match my table saw height. My table saw is on a mobile stand. Having the bench at the same height is helpful when handling large stock.
I have a full width end vice which allows the use of dogs along the face of the each side of the bench as well. But I need to add a sliding bench jack to support work held in this manner.
DEADLINK REPORT: The last link in your list of five in the box ("Guide to Workbenches") lands me at "Oops! We're sorry, but we can't seem to find the page you are looking for."
I use an older version of a Sjoberg 2500 bench in my garage shop 34" high with a single row of dog holes and four storage boxes with drawers and doors beneath it. I like it, but here's what I'd change: 1) the tray underneath the bench is too narrow and hard to get at to effectively store anything. Raising the gap and making the bench a little taller would help. 2) Casters to roll the bench out into the middle of the garage to allow access from all four sides. It only works well for narrow assemblies since the rear wall I have it placed against gets in the way. It's too heavy to drag away from the wall. I've been reluctant to put casters on it because I worry that it won't be rigid enough to work on. And while you're at it, a leveling feature would be necessary too. Most garage floors slope at 1/4" per foot toward the garage door. I've leveled it front to back as best I can with shims but if I move it, it will be out of whack. 3) some elegant way of handling cords from the front without them getting in the way of my thighs or being trip hazards while I'm working. Right now I plug in above the bench which means cords are always getting in the way of work on top of the bench. 4) The vise should have dual screws so that it doesn't cant when securing a narrow part off center. 5) flush plugs for the dog holes to keep screws and things from falling down them when not in use for a dog, which is about 95% of the time.
I would like to add a list of features from my current bench (built after 30 years of wood-working and many-many "make-do" benches. Here's my list:
1. Location: As recommended by others as well- locate bench out in the open where you can get all around the bench when you need to. I have my 38" x 84" bench set out in the shop with only one end at a wall. This gives me access to any work I am doing and the wall provides a place for my power bar, and task-light switch, as well as a small cabinet for handsaws and hand planes.
2. Secondary Storage: One long side of the bench is only 4-feet from another wall where I have wall mounted storage and a small work surface (only 16-inches wide) for tool sharpening items (bench grinder, water stones, narrow belt sander) under the small sharpening area bench I store other frequently used items so they are near-by to the bench. I have found that by having this secondary place to put things, I don't put them on the work bench where they will be in the way. (and I am not tempted to put them on the table saw either)
3. Bench storage: I have found a "tool well" to be a major pain and ends up being a dust collection trough and a place for a table leg to drop just as I am clamping up. That said, you really do need a place to put down a tool while you do something else for a few minutes and then quickly retrieve the tool again, so I built my current bench with a 5-1/2" space directly under the top. The space is close at hand from both sides of the bench, stays clean since the bench top shelters it, and keeps most items out of the way while the bench top is free to hold the work. With some practice you will learn to place and retrieve tools from under the bench top without looking, your hand knows where it put the plane a minute ago (just as my fingers remember the QWERTY keyboard) but it will take some getting used to at first and disapline to force yourself to stop putting tools on top of the bench.
The space below the bench storage area is all divided into drawers. I put six drawers arranged into two stacks of three, with the top drawers only 3-inches deep (for chisels, layout tools and small items) and the four lower drawers about 7-inches deep for larger tools and frequently used items like clamps, bench jigs and power tools. I used all super heavy duty full-extension metal drawer glides, and as one other member noted, I had to go with the drawers opening to one side of the bench as I was not able to find a glide that would open to both sides in the size and weight range I needed. Having used the bench for a few years now, I am happy with the drawers opening only one side, It is easier to remember where the tools are and the front of a drawer is always the front this way.
4. Bench Top: This is a whole topic on its own. I have read and experimented with a number of tops. I even thought about casting a concrete top up-side-down over a surface of Baltic Birch plywood to create a rigid and heavy bench top. In the end I built my top out of four layers of plywood (3 @ 3/4" and 1 @ 1/2") all fully bonded together and edged with 2-inch solid beech cut to match the 2-3/4" top thickness. The tops' 2-3/4" thickness matches the requirement of my main vise (A "Tucker Vise" from Lee Valley Tools) this thickness is plenty solid supported by two treasle legs spaced about 50-inches apart. The 2/3/4" thickness is also enough to hold bench dogs securely in place. I opted for the 3/4" diameter round dogs as it was easy to drill these after installing the bench vise (so the dog holes line up exactly with those in the vise) and I can add more in the future if needs be. Finally, the plywood top does not move with seasonal changes in humidity so stays flat and stable at all times with no need to adjust it ever. One issue is the surface is only Baltic birch plywood, so some care is needed to prevent gouging out the surface during use. After two years of use, so far so good, just remember to use a scrap block under any work you are chiseling or saw with a bench hook. I am happy with the top but still plan to someday build a replacement top of the same thickness using solid hardwood - someday.
5. Vises and clamping: I built my top to match the requirements of my main vise, a pattern-makers style vise by Lee Valley Tools called the "Tucker Vise" after its inventor, (also the vise was a very special gift from my wife after she saw me drolling over one on display a number of years ago).
I set the main vise at the left hand end of my bench on the same side as the drawers. I am right handed and I find it more suitable for the vise to be on the left side (where my left hand is available to support a cut-off as my right hand does the sawing. I designed the bench-top overhang to match the required width of the vise so there was as much support as possible from the leg, without the leg interfering with the operation of the vise. I then set two rows of dog-holes through the top of the bench in line with those in the vise. Since the holes are not over my tool shelf (under the bench between the legs only) any saw dust or chips that fall through the dog holes falls to the floor. (Nice). On the opposite corner from the bench vise I have a tail vise. This is mostly used for holding parts for hand plane work, and again a row of dog holes are drilled through the top in line with the hole in the vise, this row is parallel to the long back edge of the vise. For edge planing work, I have a birds-mouth that locks onto the bench-top at the end of the tail-vise row of dog holes (with 3/4" dowels) and two sets of supports line the bench rear legs (more 3/4" holes) so that the board edge can be supported for hand planing. I thought about a sliding "dead-man" but didn't see any need for one, if the board is short, I just put a narrow (1x2) on top of the leg supports and that supports the edge of the board during planing. That way my tool shelf is not blocked by the dead-man.
6. Bench weight: A lot of comments have been posted about the need for bench to be heavy and solid. I have a heavy bench for sure, and the tools stored in the drawers under the bench certainly add to that, but I have a better method for adding weight to the bench: the floor under it. After I set my bench into position in the shop I put my very best 4-foot level on the top and spent some time carefully setting the top perfectly level by cutting hardwood shims for under the tressel legs. I didn't use wedges, I used full surface support shims and took the time to carefully cut each one the the required thickness to leave the bench exactly level and flat. Then I drilled 1/2" quick-bolts trough holes in the bottom of the legs into the concrete floor below and torqued up the bolts tight to hold my bench with the mass of about 30-odd tons of concrete floor. The bench is so solid nothing can budge it. If concrete floors and quick bolts were around I do not doubt Mr Roubo would have done this as well.
7. Lighting: A lot of good info on this topic has been posted before so I will just say: good natural non-direct lighting is best and some over head task lighting so there are no shadows formed by your body when you lean forward is the way to go for your bench.
8. Floors: Here is a topic most seem to overlook, what you stand on will affect how comfortable you are and how well you work. After a lot of years standing on bare concrete floors I finally did two things about it: One, I bought some comfortable work shoes just for work in the shop. Two, I bought some anti-fatigue mats and stuck them to the floor in the areas i stand for long periods. (ie in front of the Bench, table saw, sander) this has had a dramatic affect on how my back feels and how I feel after working in the shop. I like the insulated and plywood floor in Matts shop, looks like a good idea; warm, easy on the back and less damage to a tool dropped on it!
ok that is my advise on the issue from my experiences.
Robert.
Asa,
With all the great suggestions, it seems the bench design really needs a Festool-like 'systems approach' based on modularity and interchangeability. Interchangeable tops (i.e. Festool MFT1080 plate, or traditional hardwood, or torsion box, or sacrificial MDF, a combo of some sort, or?). Perhaps a couple interchangeable base designs - trestle, or 'box' like your 'Beginning Woodworking' video example, or a kitchen cabinet, or?
I would also ask that you slightly 'adjust' the objective - not power tool only, but rigid enough for at least hand saw, chisel and plane use as well.
Can't wait to see what you come up with..:>)
Chris
Asa,
Hmmm. So many possibilities... How about doing a 'build off' at your FWW shop? Sorta like the 'mudroom' built-ins a couple issues ago?
But more than two - how about three, or four?
Each 'contestant' gets this thread to read for background. (But editing/distilling it would be better..).
Then they go to work. A week? Two weeks? FWW foots the bill for materials and supplies.
Then each design is presented - and FWW members get to vote!
The winner gets a nice new Grizzly Bandsaw or something of similar value.
Why not?
Chris
Ideas for a bench I would like.
-built for both hand and power tools with proper height.
-power (outlets/power strip)available below the surface and power coming from the wall.
-dust collection for sanding on the bench top, have downdraft available when needed with dust export piping on the side or below the bench top.
-have compressed air available, in my situation, have the air source coming from the ceiling.
-having a roll of paper under one end of bench for messy jobs is a great idea.
-having the option of drawers/storage space below the top.
-must have heavy sturdy legs so the bench doesn't move.
-I like the idea of a tool trough on the top
-both end and side vises with bench dogs.
-whether we like it or not, PC's are here to stay and shop accommodations have to be made to use one in the shop - online woodworking plans/instructions are becoming more and more available and PC's are required.
If I were to build a bench today, I would incorporate the above items. FWW, we are waiting.
Jerkru has the right idea, and he's covered most of my "wants and needs".. I'v added power drops suspended from the ceiling at various points in my shop, inluding over benches.
I agree with the purists, and nothing compares with the satisfaction of completing a project made strictly with hand tools, but when you reach my age and have arthritis in your hands, elbows, back, etc., you begin to rely more and more on power tools to keep your hand in the game.
I also have found that ovehead air drops are convenient for brad, nail and staple guns, etc.
Ron Godbout
Northfield, NH
Log in or create an account to post a comment.
Sign up Log in