

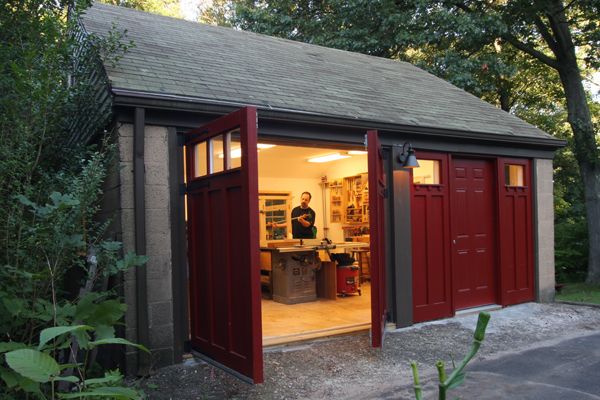
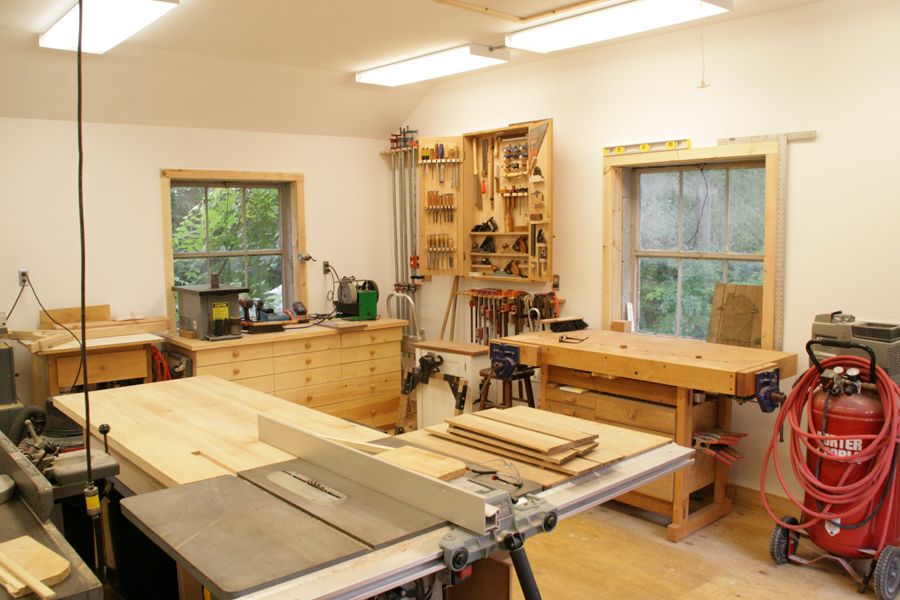
My extreme garage makeover. I replaced the old roll-up doors with carriage doors in one bay and a walk-out door in the other. A comfy plywood floor, high ceiling, and white walls with plenty of light make for an a nice place to work. It also didn't hurt that I bought a shed to house all of the non-woodworking items previously cluttering the shop.
How it all began… All I wanted to do was throw some insulation between the rafters and call it good. That’s been the plan for every summer I can remember. But, well, I ‘m a woodworker and it’s hard for us to leave well enough alone.
If I was going that far, I thought I should do something about the rotting gap-prone doors. I figured most of my heating dollars were being spent there anyway. And if I was going through the trouble of installing a walk-out door and pair of carriage doors was I really going to be happy with a cold concrete floor? Of course not.
But adding a raised floor would mean that the low ceiling joists would get even lower, so why not raise the ceiling while I was at it? By the way, I have never been happy with the meager lighting so now was the time to fix it. And if I was going to insulate the walls (and why wouldn’t I?) I wanted to address the issue of not having enough outlets…
And so went the thought process every year. The idea of one small improvement leading to an unending parade of others until it became so overwhelming that nothing was ever accomplished.
Until this year.
| More on Building Your Dream Shop • Set Up Shop on a Budget • Fine Woodworking Shop Tours • Tour the Ultimate Garage Shop • Wiring a Garage Shop • Dream Shop in the Woods |
Shop makeover for the sake of some hand tools
The breaking point was a set of carving tools. I had purchased them while making a lowboy (that’s another story), and my first thought was that I’d have to keep them at work so they wouldn’t rust in my unheated home shop. It was then I asked myself if I was going to get serious about my home shop or sell my equipment and let it fully revert to it’s former life as a garage. I chose the former. Fortunately, I had no idea how big of a job lay before me.
Upcoming magazine feature
You can read about my journey in the Tools and Shops issue due out this fall, but it won’t tell the real story. It will have some nice pictures and beautiful illustrations and hopefully a lot of information for folks who are looking to improve their shops. But it will tell you to simply make some doors, add a floor, insulate the walls and roof and maybe raise the ceiling while you’re at it and you’ll have a great shop… true enough, but it’s not the whole story…
Hard, mean, nasty, sweaty, dirty job
The bigger truth is that it was a hard, mean, nasty, sweaty, dirty job. An unending list of tasks that seemed to multiply just as the end was in sight. I’ve spent so much time at Home Depot they gave me my own orange vest. I started in April and took the final photos at the end of August, but there’s still some work left to do. After every stage I’d think “that was easy enough, but now comes the hard part…” But then, I’d spend a few sleepless nights working out the details and find a way to make it through that stage as well.
Of course each step meant new tools, unfamiliar materials and a sometimes steep learning curve. The work was hard, exhausting at times, but fun. It’s a nice change to work on a larger scale with not-so-tight tolerances to meet. One challenge was to ignore the woodworker in me that insisted on measuring drywall cuts in 1/64’s.
-
My extreme garage makeover. I replaced the old roll-up doors with carriage doors in one bay and a walk-out door in the other. A comfy plywood floor, high ceiling, and white walls with plenty of light make for an a nice place to work. It also didn't hurt that I bought a shed to house all of the non-woodworking items previously cluttering the shop.
-
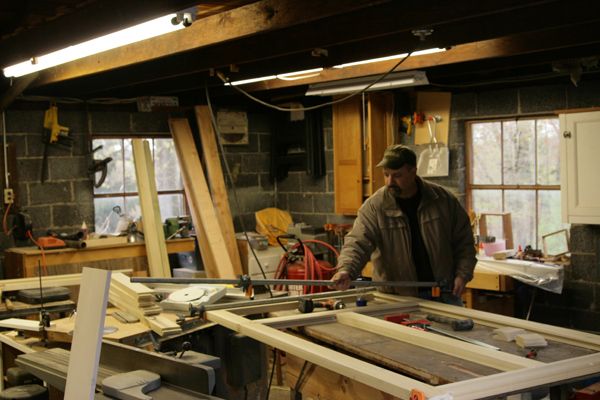
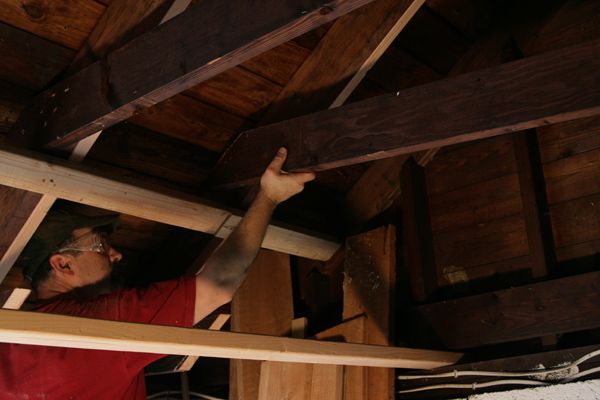
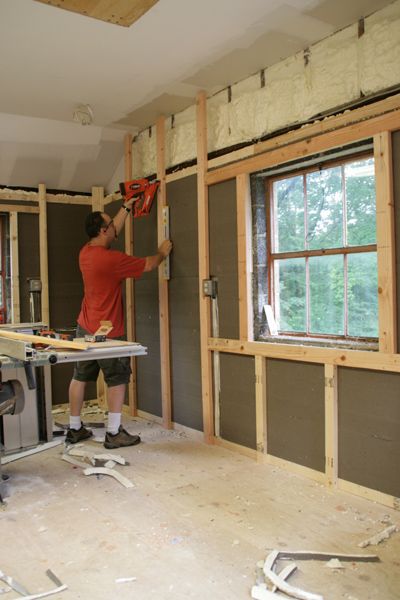
I'm working on the carriage doors here, but it gives a good idea of the former work space. Yikes.
-
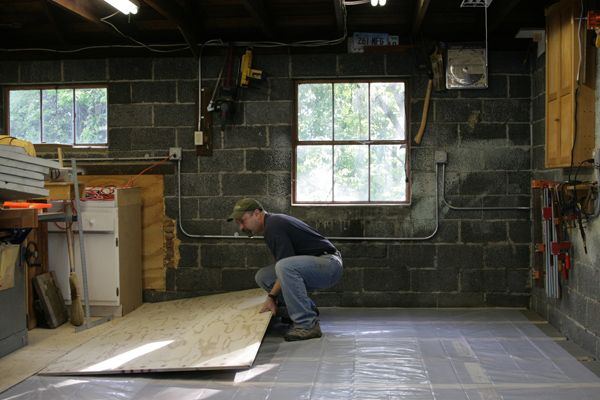
The T&G plywood floor rests on pressure treated sleepers glued and nailed to the concrete. There's rigid insulation between the studs and 6 mil poly over it as a vapor barrier. I was actually able to install the floor in a day. I rented a powder-actuated nailer for the job.
-
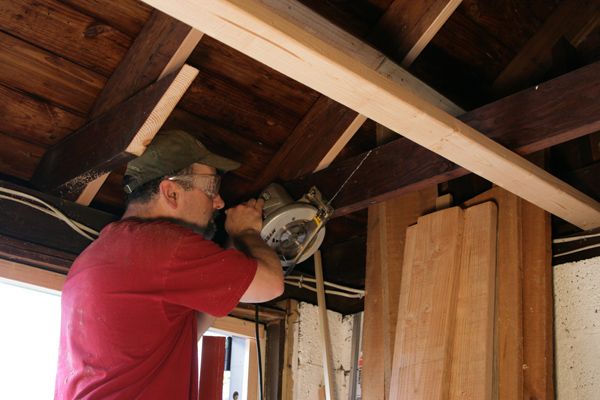
I didn't go into how I raised the ceiling joists in the article because it probably won't be relevant to most of the readers, but I'll share a few pictures here. I started by screwing 2x4s across the joists to support them while I cut them. I marked the final length and correct angle on the end of each joist and cut one at a time and raised it.
-
Here I'm raising the joist to it's new location. I screwed a 2x4 along the rafters to give the joist a secure perch while I lifted the opposite end in place and nailed it.
-
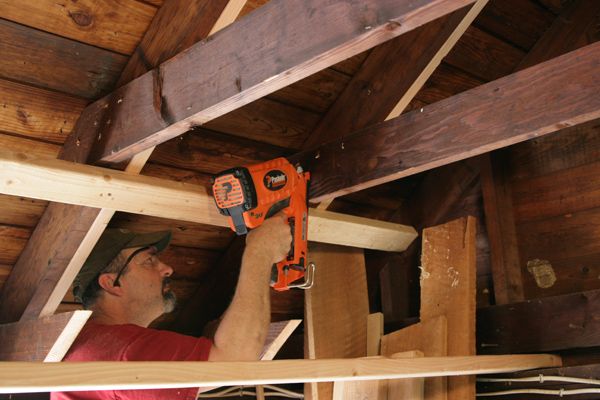
A cordless framing nailer was a big help. Another smart rental. Between the framing nailer and the powder-actuated nailer, my arms and wrists really took a beating.
-
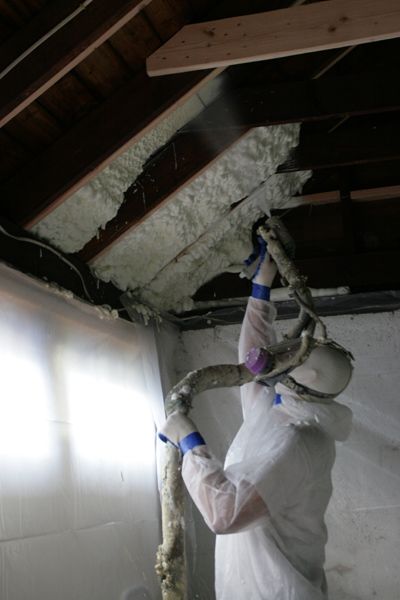
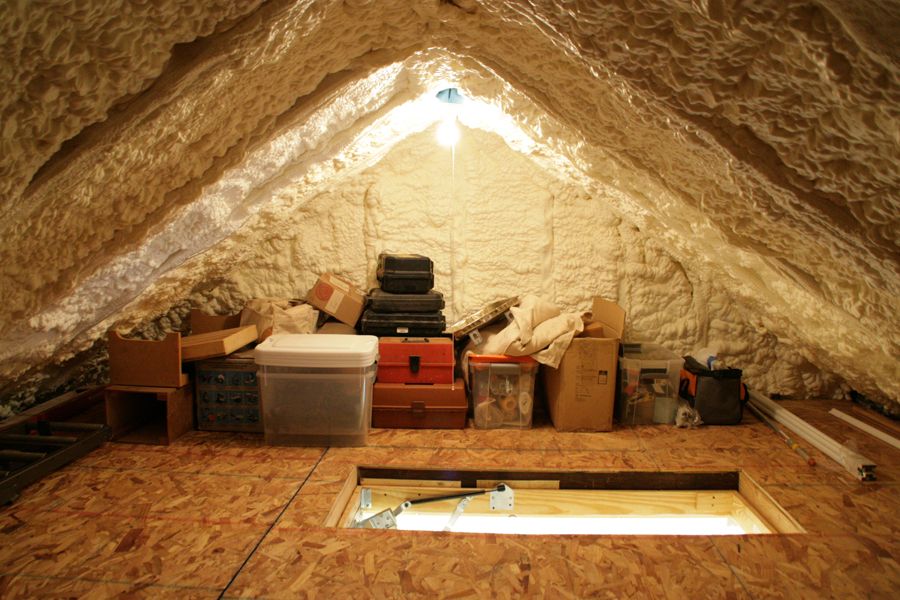
The only job I hired out was the spray insulation under the roof and I'm glad I did. I priced out the DIY spray kits and there wasn't much of a savings. It's certainly more expensive than fiberglass batts, but it should do a good job of eliminating air flow which is a big culprit in heat loss. The heating bill will tell if it was a good move.
-
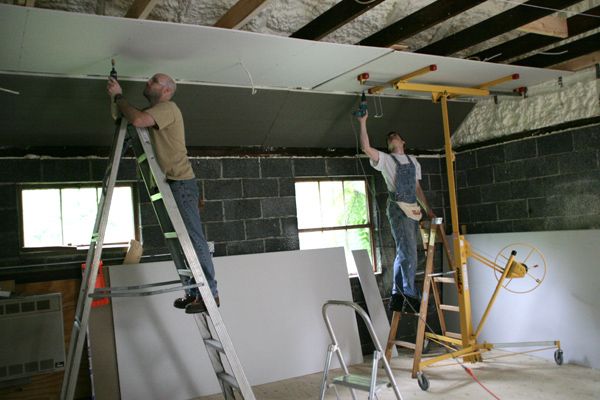
It's good to have friends in high places. A drywall lift doesn't hurt either. Patrick McCombe (right) not only edited the article, but was also my chief technical consultant and electrician on the project. He talked me into using 12 ft drywall sheets. They were cumbersome to carry, but they eliminated a lot of seams to tape. Matt Kenney (left), normally a hand tool guy, is a mad man with drywall screws.
-
I went with a double-layer of rigid insulation on the cinder block walls. I installed the first layer cutting around electrical boxes and conduit. I installed the studs flat against the first layer and placed a second layer between them. The idea was to isolate the studs from the cinder blocks to eliminate a thermal bridge from the locks to the drywall.
-
This is how my driveway looked for most of the summer.
-
The shop is only 20x20, but I wanted to carve out a nice corner for bench work. A lot of stuff that went into storage during the remodel never made it back into the shop.
-
One big igloo cooler. A folding ladder provides access to an attic with less head room, but much more storage space than the random boards that used to span across the open ceiling joists.


Comments
Hi Michael!
Life is rough isn't it!
Have many happy hours in there and be careful with your fingers. Congratulations are in order.
Stig Lundberg.
You did a nice job on your shop.
The remodel looks great however readers should consult an engineer prior to cutting structural members in their buildings.
johnbgood247- You're absolutely right about getting professional advice before cutting into your roof structure. In my case I talked to the engineer at the building department in my town. My roof peak was 6 1/2 feet above the ceiling joists so I was able to raise the joists a maximum of 2 feet (1/3 the height). In order to do so, I also had to sister the rafters with an additional 2x6 along each rafter because they were spaced 24 inches. I ended up raising the joists only 18 inches, but that gave me the 9 foot ceiling I was hoping for. I don't think there's anything you can do about engineered trusses used in newer construction.
-Mike
There actually is something that you can do about engineered trusses: Replace them with new trusses that satisfy the load requirements but give you more head room. You can usually find off-the-shelf scissor trusses that will do the job. They leave you with a vaulted ceiling, but you can always install a suspended acoustic ceiling under the central peak, which is also a good way to install lighting fixtures. Or you can go to a truss manufacturer that will custom-design a truss that gives you the most headroom possible, but in that case it might end up being cheaper to raise the building side walls instead.
-Steve
Wow Mike! What a great design. I really like how you tweaked every aspect of this space in order to come up with a more functional and comfortable place to work. You have given me some good address to help address my "garage envy". Thanks for the great ideas.
Congrats, Mike! This looks great. I guess this means you won't be storing your in-progress furniture projects in the FW shop anymore for clumsy (former) editors like me to bang up with clamps. The doors are my favorite part....
Mike
We're building a detached workshop similar to yours. The decision giving me the most difficulty is what T8 lights to buy (brand name & model). I read somewhere that Cooper T8 fixtures are good. But even when you know a brand name, there are so many different models that it gets confusing. I've narrowed down what I think might be good to 2 bulb 4 footers that surface mount and have a wrap-around cover - hinged would be great, if possible.
Your shop looks like it has great lighting. Would you mind sharing info on which lighting fixtures you bought and installed?
The info would be a real help.
Thanks
Jodee
Hi Jodee- I took a cue from a lighting article that ran in FW 209 and went with Lithonia SB 432 4-bulb fixtures. So far, so good. They're nice and bright without any buzzing or flickering. I'm interested in how they'll do in the colder weather. The only knock on them that I've read about is their tendency to get damaged during shipping. I tried to avoid that by buying them from my local home center, but even then, one unit out of the nine was damaged and had to be exchanged.
Good luck -Mike
Wow! I can't wait for the full article. Just this taster has given me the idea of putting in a plywood floor to my comparatively tiny shed. Well done.
Although it took a few months of hard work, as you use your new shop you will find yourself spending more time there. It's very simple... you are more comfortable in a heated and well-organized shop and therefore can enjoy the shop more. Congratulations in a job VERY well done.
This is exactly what I need to do to my garage functioning as a wood shop. How much did it cost? and what are you doing for heat? Looking forward to the article.
Great shop! However, I am constantly underwhelmed with these kinds of projects touted as shop makeover or shop in a one car garage. What if you don't have a garage? I have built a 10 x 14 shop in my previous house and partially renovated a room in my current house to be a shop. The first one took me 3 years and the renovation on the second one is about 90% of the way there after about 18 months. I would like to see someone do an article for the 'average' guy. Someone that has to balance 2 kids, a full time career with limited funding and space. Sure this is a great shop but it is way out of reach for most average woodworkers. Could you do a shop renovation where money, time and space really were an issue? I would like to see the spaces that real people are working in and ways to improve that.
You make a good point jdelmon. I'd love to see more of these type of shops as well. People with shops-in-the-making (including you!) should post pictures in our shop gallery:
https://www.finewoodworking.com/shop-tour
We haven't seen many new posts in our shop gallery lately and maybe it's because people are bashful to highlight work areas that haven't reached "dream shop status" yet.
We all love stories about people making do... below are links to some of my favorites. I do hope that others will post photos of their "average" shops.
RV workshop:
https://www.finewoodworking.com/item/4087/workshop-on-wheels
Studio apt. shop:
https://www.finewoodworking.com/item/5097/woodworking-in-a-new-york-city-apartment
36-sq-ft shop:
https://www.finewoodworking.com/item/11897/japanese-shop-stool
Outdoor workshop: https://www.finewoodworking.com/item/14479/wood-shop-al-fresco
"Dungeon" workshop: https://www.finewoodworking.com/item/25730/tokyo-dungeon-workshop
To conclude, thanks for the suggestion, I'll forward it to the magazine editor. And as a reminder, we welcome article ideas and submissions from woodworkers like you. For more info on submitting your ideas, go to:
https://www.finewoodworking.com/submissions
Great job. An inspiration!
Jdelmon: Interesting question. I am about 3/4 of the way through a 2 car-attached garage shop conversion, and it's been 2-years. My wife was threatening to park her car in there, so something had to be done . If I ever get it completed, I'll consider submitting the story and photos to FWW perhaps for an article. It started with insulating the roll-up doors (I live in a sub development with an HOA, so changing the doors is NOT an option), and insulating the walls, so that it wasn't so hot in the summer, and cold in the winter.
WOW what a difference that made, which meant that I wanted to spend more time in there, so I built cabinets/work surface that covered the south wall, and houses my radial-arm saw, and miter saw so that out-feed are taken care of at the same time.
This of course evolved into my cutting a trench through the concrete floor to run the 220 for my Robland x-31 combination machine, so that I could stop tripping over the extension cord all of the time.
I am now in the middle of hooking up a 3-HP dust collector that I picked up on Craigslist and running piping, and with winter coming on, I want to get that 220 electric heater suspended from the ceiling, which means making a bracket and running the electricity - so that I no longer have to keep moving it all day just to get it out of my way.
Next, I need to install better lighting. I ran the electrical junction boxes into the ceiling back when I installed the subpanel 2 years ago (one circuit is NOT enough to supply even the most Spartan wood shop, so that is the first thing to consider by anyone putting in a shop), but just haven't gotten to it, but I will this winter.
So as you can see, like you I have a life outside of woodworking, which eats up more time that I would like, and I have a very limited budget, so I have to do small improvements one paycheck at a time. But I must say; if you love woodworking, the improvements that you make in your shop add more than the sum of their parts (or time in labor and expense).
As mentioned, keep your eye out, perhaps one day you'll see photos and my story in the pages of FWW. In the mean time, pick the most pressing upgrade (I'd always start with making sure that you have enough power - subpanel in most cases), and do it. Unless you have the money and time, do not give yourself a deadline, just upgrade as time and budget allows.
This will be a killer shop! Articles like this are extremely valuable to me as I too am about to build a shop. This spring I retired from a middle school/high school band director. What made this possible is my Internet business that started out as a hobby four years ago. My business involves mostly my craftsmanship. My business has out grown my current backyard sheds/shop(s). That and my wife wants her green house back that is requiring me to expand into a new shop. It was once upon a time in place far away from where I am now that I did residential construction. It was one of my college days part-time and summer jobs to be the fetch and carry type (read strong back and weak mind) for a master carpenter. It was a good thing that I was on my colleges' weight lifting team. I'm saying all this as fine woodworking is somewhat different from structural construction (duh). To help bring myself up to speed on current building techniques and materials and since I am semi-retired I volunteer one to two days a week for local Habitat for Humanity. Habitat here builds five houses at a time and they have an aggressive building schedule. Doing this volunteer construction has significantly improved my knowledge and provided many ideas that I will be able to use on my new shop. It will take time as we will be building as we can afford too. Consequently, I am carefully planning and researching how I can best build with economy and optimal use of structure and space.
Thanks for a great building journal!
It looks like the windows aren't trimmed out yet ;-> But seriously, I'd like to see more info on the making of your garage doors - they look great. Maybe an article for Fine Homebuilding?
tobiasshadow- I have a direct-vent 25,000 btu propane heater in the shop. It was too expensive to run in my uninsulated shop, but hopefully it will do the job now.
I can't really give you an exact cost on the renovation. The biggest single cost was the spray insulation under the roof which ran about $1100. You could save a lot by going with fiberglass bats instead. The lights were the other big expense at $500. Aside from the entry door, the rest of the materials consisted of plywood, construction lumber and drywall. I bought supplies as I needed them so the expenses were spaced out over 6 months.
jdelmon- Thanks for the comment. I understand your frustrations, my shop has been 13 years in the making and I'm definitely that guy juggling 2 kids (Anna and Eli), a full-time job and a tight budget. My garage was the perfect storm of unpleasantness; dark, dank, cramped and drafty. Hopefully not every shop will need that much rehab. My goal was by no means an over-the-top shop, and I hope that the article will offer some real world tips on improving a shop with limited time and space and money in mind.
joe- Great story! It is a slippery slope we tread. I'd love to see shots of your shop. Good luck.
-Mike
Hey Mike,
Love this shop. I realize the article is way old, but im doing a very similar project as you have done. I have some questions on insulating if you have a moment.
Michael,
Could you please give the details of the floor construction? It looks like the sleepers are 2x4s laid flat. What spacing did you use, and did you conclude that is adequate for mobile tools, including a table saw? What grade plywood did you use? Did you finish it? Is sawdust and dirt in the grain of the plywood a problem (or an annoyance)?
Thanks for your help, and for all the information you already provided.
Alan Smith
+1 on the garage doors. I would love to see an article on the finer points of building garage doors!
Hi Alan, The 2x4s are laid flat and spaced 24 inches apart. The rigid insulation between the studs is the same thickness and has good compressive strength so there's very little bounce to the floor. I have no problems with heavy equipment. As a precaution, I added blocking below the workbench area to insure a solid footing for my bench. I used 3/4-inch tongue and groove plywood from my local home center.
I wasn't planning on finishing the floor, but I found it difficult to sweep which is what bugged me most about the original concrete floor. I applied a coat of de-waxed shellac followed by 2 coats of fast drying oil-based poly. I'm happy with the finish so far. There's enough of a build to sweep well, but it's not too slippery when there's a layer of sawdust on the floor.
-Mike
In talking with a roofer with many years experience, he says you should never insulate between rafters without an air space. The airspace keeps the shingles from overheating and prolongs their life. Also fluorescent fixtures with electronic ballasts work great and come on instantly. Only buy the fixture designed for the new T-8 bulbs. If it says T-12 or T-8, it's not a true electronic ballast.
What a difference it must be to work in a room with white walls and lots of light. The gray cinder block and low light conditions, (like my shop) just doesn't "feel" good to work in. I need to do this to my garage shop one day. Anyways, you did great on the transformation.
You BOUGHT a shed? ;)
Bruski- Good point, I've come across the same opinion on the web about unvented roofs. On the other hand, I've also read that venting a roof lowers the shingle temperature by 5 degrees or less and several manufactures will guarantee their shingles installed on properly constructed unvented roofs. Sometimes there's such a thing as too much information. I'm not an expert on the subject and I based my decision on the advice of my insulation contractor, an architect friend, and the town inspector. The climate in Connecticut differs from other parts of the country, so it definitely pays to get the advice of local experts.
Thanks, Mike
@bruski,
What you say (about unvented asphalt shingled roofs) may have been true in the past, but some manufacturers are now making shingles that are warranted for "hot roof" applications. There was a recent discussion on this somewhere online; I think it was over at Green Building Adviser. Also, Joe Lstiburek has pointed out that the measured temperature increases from using a hot roof design are small--generally less than 10°F. The temperature differences between an asphalt roof in Minnesota and one in Texas are much greater than that.
True electronic ballasts for T12 lamps do exist, by the way; they're just not as likely to be found at your local home center. And they're intended more for retrofit than new construction, as there's really no point to using T12 lamps in new construction.
-Steve
My only suggestion is this: correct the vocabulary before you publish it in Fine Homebuilding. :)
You didn't raise the rafters. You raised the collar ties. The rafters remain in their original position.
Dear Mike,
I did a similar shop build last year and yes it feels good. Someday I would like to do my doors in a awsome manner like you did. The reason I am writing is to warn of the drywall seam cracking on every joint I have. Yes we did tape them. I believe from the manner garages are built that they are more prone to movement. That is why most garage floors in michigan are cracked and shifted. If I had it to do over I would have used osb and just painted it white. Oh well, Enjoy that new mancave it looks awsome!!!
Wes
Mike: I think we're going to have to do a video tour of this baby!
Cheers,
Ed
Looks like a dream shop to me, although you must live in a warmer climate than I do. I live in Minnesota where winter temps can and have reached as low as -20 degrees, with snow several feet deep. I would have to have a heating plant installed. Also in the summer, the temps may reach 100 degrees with as high as 80 percent humidity. It might make working outdoors a tad uncomfortable and the effects on materials dramatic. That might mean air conditioning in the summer.
20x20 is nothing to be ashamed of. My shop is less than half that. I like buliding furniture, which can be very difficult in such a closed space. 20x20 would be a tremendous step up for me.
Mike, I love what you did and can relate well to your journey. I am at about the same state as you are, having reworked a 20x30 foot metal shed into an 18x21 (internal dimensions) workshop plus a storage bay for, well, all that other stuff. My workshop was an unorganized place in the shed where I stored my tools while I was remodeling parts of our 1974 vintage Colorado mountain retirement house. The shed was uninsulated with a couple of 4' light fixtures that came on when I plugged the 12 gauge extension cord into an outside outlet on the house.
Now nearly everything has its own place, the space is insulated, the six four-tube T-8, 4' troffer lights come on with the flick of a switch, the 9' high suspended ceiling is bright. I added 60 amp, 220V service and six circuits with 14 four-outlet boxes. Like you I added a loft storage area with pulldown stairs (a great suggestion from a neighbor). The oil stained concrete floor has been covered with salvaged plastic tiles (but not insulated).
I looked at alternatives for heating and decided to try a couple of 1500W plug-in electric heaters. Even on winter days in the upper teens, they bring the temperature up above 50 degrees. I can do a lot of heating with my $40 system before I could recoup the cost of a gas heater.
The walls are covered with 1/2" ACX plywood that I was going to paint but liked so much that they got a non-yellowing clear acrylic finish.
I'm not sure that a shop like this is ever completely finished. There is always one more bit of storage to be added or tool to be purchased, but the joy of a well lit, well organized retreat like this is making retirement even more enjoyable.
Donn F
Fantastic!! I too would really appreciate hearing more about your carriage doors...especially about the hinges you used and how you installed them and the doors. I've been mulling these details for my shop doors for about four years now. Getting real tired of the "temporary" plywood doors.
jrf- The carriage doors were easy to make. I made a poplar frame and skinned each side with plywood which created a big torsion box similar a hollow core door. This design should resist racking pretty well. The frame is 1 1/2 inches thick and joined with 1-inch long stub tenons. Instead of cutting individual mortises, I used a dado blade to run a groove along the inside edges of the frame parts. I filled the frame cavities with rigid insulation and faced the outside with 1/2-inch cdx plywood and the inside with 1/4 inch plywood. I also framed in a long opening that I later divided into 3 windows using glass salvaged from the original doors (as much for sentimental as economic reasons). I added pine trim to the outside face to hide the plywood look.
I chose strap hinges because they look cool and are a lot easier to mount than mortised butt hinges.
(http://www.hardwaresource.com/hinges/GATE+HINGES+AND+HARDWARE/Gate+Strap+Hinges/Strap+Hinges%2C+Bean+Style%2C+Heavy+Duty)
I lag screwed a 4x4 to each side of the opening to give me a place to mount the hinges. I installed the doors by first lag screwing the hinges to the doors then setting the doors in place. I used shims to center the doors and hold them in place while I lag screwed the hinges to the 4x4s. That's it!
There's an exploded drawing of the doors and a detail of the threshold in the Tools & Shops issue due out next month that will hopefully give you all the information you need.
Good luck, Mike
Mike, Thats a great shop you have there. I especially love the doors. I have a a local contractor working on a price for a shop currently. Now am wondering if I shouldnt build it my self. The floor sounds like a great idea. I'm sure my contractor is figuring on a concrete floor. I bet if I switched to a wood floor with good joists I would save money and my back. Thanks for the great article. Larry
Great shop ! Did not see or hear anything about dust control - how did you set that up.
Jack
Excellent stuff!!! Thanks for posting everybody.
I read your article yesterday. Again, a FW cover with a guy who has a 100' square shop. I have to drag my table saw into my driveway - sigh.
Anyway, I really liked the torsion box doors. It is a solution that I think will work great in my situation. Do you have a feel for how large a door you could make? I am looking at two 6' sections.
Thanks
Joe Boldt
hey Mike,
I was wondering how you keep dust under control in your shop? I did not see any collecters or air cleaners. Yet your shop seems as clean as a new house.
i didnt see any dust collection. I'm pretty sure this guy has something for that maybe? Any layout hidden or for future?
Hi...I've built these doors using allot of your ideas, and I am in the process of getting ready for the windows. One question though...What thickness did you use for your window sills (On your Carriage style doors)and for trim on your windows? The magazine article doesn't elaborate, and it would be nice to keep the same basic proportions (My doors are a bit wider)and look of your originals.
Log in or create an account to post a comment.
Sign up Log in