
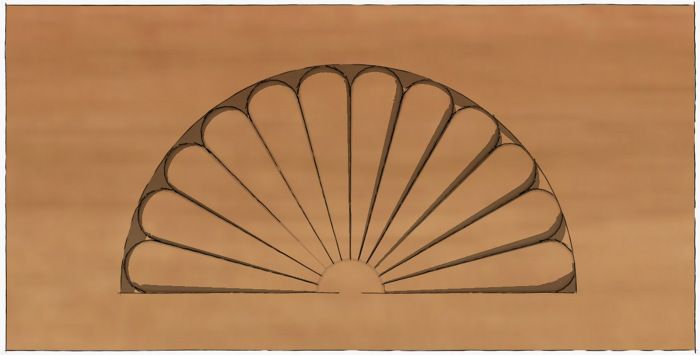
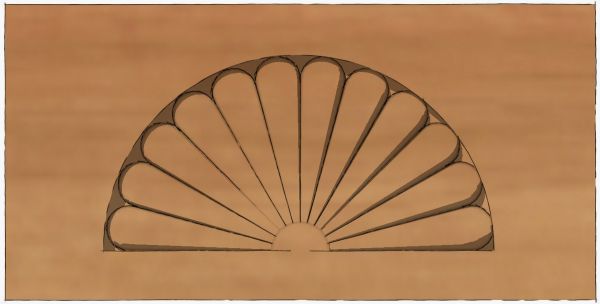
Carved fans and shells are a defining detail on Queen Anne-style furniture. The other day I had a request from a friend to show how I would go about drawing detail such as this. As with most things in SketchUp, there’s probably more than one way to draw this. The way I show is fairly painless and doesn’t really take much time. The finished component can, of course, be saved for future use so if you try something like this, don’t forget to save it in a components library so you can find it again.
Although this fan may appear to be a complex thing to draw, if you break it down into smaller parts, it is really quite straightforward. Perhaps the most difficult thing about drawing complex models is figuring out how to break them down. For some reason I am remind of an old joke about eating an elephant.
This fan could be drawn entirely with the native tools found in SketchUp; the free version, too. I cose to use a couple of plugins to streamline the procedure a bit. They are Weld and Simple Loft. To download the latter you’ll have to be registered but that is free.
Note: I had a little trouble with the video at the point where I rotate/copied the profile for the fan blade. It may not be clear how I set the axis of rotation. Here’s a description of the process for setting the axis of rotation when it isn’t on axis or you haven’t got a face on which to align the tool. Click to set the center of rotation–I did this on the end of the centerline–and hold the mouse button while you drag along the line. The Protractor will align itself perpendicular to the line. Release the mouse button and proceed as normal clicking the start and end of the rotation. I demonstrated this in the video clip I did on the Rotate tool although that was some time ago. This link will take you to that blog entry. This procedure shows up at around 50 seconds into the video.


Comments
Dave, I must be missing something or have the Loft plugin installed incorrectly but unable to get the faces on the fan. Weld applied - no faces and no to close curve. Selection/Rotate duplicate curve no problem. But then when I try to loft the faces - nothing happens. Your insight is appreciated in advance. MacOsX 10.5/Sketchup 7.1 pro
tenbears, I'm sorry you're having difficulty with Simple Loft. Let's see if we can straighten it out.
I have used this plugin on my MacBook with 7.1 Pro also and had no trouble.
First, installation. Check to see that you have clf_simple_loft_loader.rb and a folder called clf_simple_loft in the Plugins directory. The folder should contain two PNG image files and a file called clf_simple_loft.rb.
After confirming those files are in their proper locations, go to SketchUp>Preferences>Extensions and ensure the box for Simple Loft is ticked. You can also add the toolbar to the screen under View>Tool Palettes.
Second, operating the plugin. Start the plugin. Select the curves you want to use for the lofting. Hit Return (Enter). A dialog box should pop up to give you an option for the number of segments into which it will divide the spaces between the curves. For this excercise change it to 1. Then click OK. It should create the face.
Let me know what youy find. You can drop me an e-mail if you'd like. Click on my name, above to send an e-mail.
Dave
Dave: Un-installed, downloaded and re-installed, also re-installed extensions.rb and It is sort of working now. Your fan tutorial works but when I try it with other curves it has a habit of crashing. Also when simple loft asks for how many lines it only seems to work with the default of 5. I've also emailed Chris Fulmer who wrote the ruby script.
That is very strange. I just went through the process on my Mac and had no trouble. I do have MacOSX 10.6.4 But I wouldn't imagine that is the reason it works for me. I hope Chris will be able to help.
Have you tried it on something larger? perhaps try scaling the model up by a factor of ten or 100. I didn't need to scale my drawing up to make it work but perhaps the dimensions on your drawing is different?
tenbears - what do you mean reinstalled extensions.rb?
extensions.rb is part of SketchUp (free/pro) and is located in the su/tools and NOT su/Plugins directory - there is never a need to reinstall extensions.rb
Do you happen to have extensions.rb in your /plugins directory? if so, this may cause some unplanned issues/crashes with SU.
make sure you have extensions.rb in:
/Library/Application Support/Google Sketchup 7/Sketchup/tools/ (where is SHOULD be). and delete extensions.rb from your /plugins folder (or move it to your desktop to test and make sure SU works well)
Sharon,
Thanks for that. I hadn't caught that.
Dave
It is not evident how you were able to get the arced part of the design to rotate around the straight line; specifically, How does the straight portion nearest the origin stay fixed to the origin so the taper remains? When I rotate mine the rotated copy rotates around only the end of the straight line furthest away from the origin, thereby making a cylinder rather than the tapered shape.
Your tutorials are intriguing, however, you leave out explanations of too many steps that are neither obvious, or well known. If there were explanations for each step, that is disaggregated the process more, these would be stellar.
I did find a work around for the above difficulty, however it was based on geometric thinking and the fact. I have been suing SketchUp for several years, as well as Alibere.
Zool, I explained the rotation of that profile in the last paragraph of the blog post. I also gave a link to a blog post I did on using the Rotate tool. Perhaps the text here and the video at that link will help.
-Dave
Log in or create an account to post a comment.
Sign up Log in