
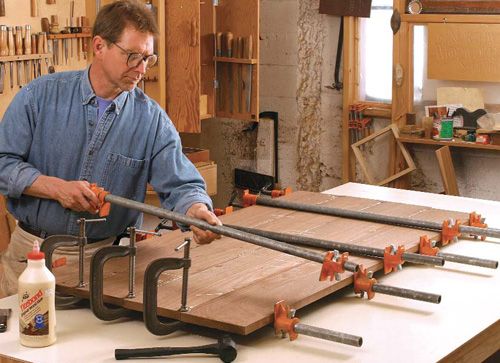
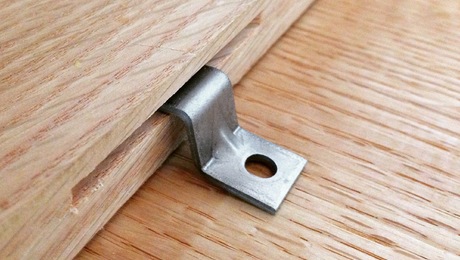
Spring has sprung, and contributing author Gary Rogowski has some great tips for edge jointing boards using a technique that's a perfect fit for the season.
Why not? It’s Spring, let’s talk spring joints. This simple little curve cut into an edge is the key to survival for many edge glue-ups.
Trees and Wood
A tree and its fibers are very much like a bunch of straws held together. These straws carry water and nutrients up the trunk to branches and leaves. They are incredibly porous in some woods and mildly so in others. But roughly twelve times as much moisture loss occurs out of the ends of these pores or the end grain of a board than does out of the sides of them or the sides of a board. What this means for an edge to edge glue up is that more movement occurs first at the end of a board than it does in the middle.
Wood is also incredibly flexible. You can take two boards that do not have flat edges and clamp them up even with a major league hump in their edges with gaps showing at the ends of the board. You can pull and glue the two edges together with sufficient clamping pressure and the occasional grunt. Great, now we know wood is flexible.
The problem occurs however when wood dries out and expands and dries out and expands, and over time the glue joint is undergoing some major league strain on it trying to hold together when the board wants to pull apart and resume its former natural state. Early in my woodworking life, I had an edge lamination pull apart and I said to myself, This is no good. I can’t be a woodworker if I can’t keep edge joints together. I had heard about spring joints. How to make them was the question.
Spring joints
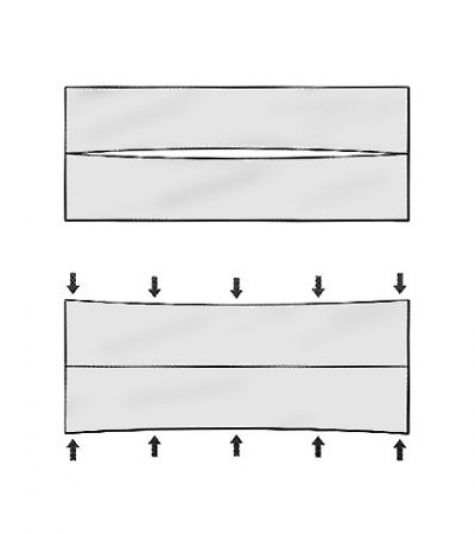 The spring joint is a simple arc cut into the edges of your boards so that there is a slight concavity cut along both edges. How much? Not so much that you can see France through it, but enough so you can see a little bit of light through the joint when you hold it up to a light source. This slight concavity has to get pulled out in your glue up which is pretty easy with just light clamping pressure. When you do pull it out, you press the ends together more. This smashes them together good. What happens next is pure conjecture on my part. But I figure you have compressed the long grain fibers enough so that when moisture exchange occurs, either plus or minus, you have some springback there in the wood. The joint wants to hold its original shape and keep touching at the ends and you rely on the glue in the middle of the joint to keep the edge together there.
Let me just say this. Thirty five years after that edge joint failure and with 35 years of spring joints, I’ve had no more failures. It works.
[[[PAGE]]]
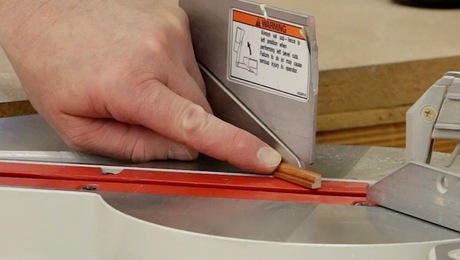
Cutting Spring Joints
There are several methods for cutting them. One is to joint your edges by hand and then with a jack or smoothing plane, fair in a slight curve into the edges. A bit tricky for those of you without sufficient hand skills. The jointer is the method really of choice for me. I start by edge joining my boards flat and square. If I run opposite faces to the jointer fence then square is not really much of an issue [subject of another talk sometime perhaps]. But make sure the edges are flat to begin with.
Next, I put in a hollow starting about 1/4 of the way from the beginning of the board and ending about 1/4 of the way from the end. The jointer manual suggests loosening your gib screws on the outfeed table effectively lowering the back end of the outfeed table. Supposedly this planes a curve into your board’s edges. But I find this method risky at best and more liable to mess up my jointer table settings and giving me mixed results.
I prefer to make my spring joint this way. Start with a flat edge as before. Then I start my next cut 1/4 of the way in from the front end by gently lowering the board down onto the cutter head and making a cut for a while and then lifting the board off about 1/4 of the way from the end of the board.
Now this leaves two unsightly ridges in the edges so now the job is to fair those in. Get ready to make a long full pass again. This time start with normal hand pressure on the board. Start your cut and then when you hit that first 1/4 mark start to press down with some force onto the board. This effectively pushes the board into the cutterboard. Remember wood is flexible right? So push down into the cutterhead and feed along and push and feed along and push until you get to the end 1/4 mark and then lighten up your pressure and continue feeding all the way through the cut. You may need to do make this cut two or three times. You may also need to reestablish the hollow by gently dropping the board down onto the cutterhead in the middle two quarters of it.
But by establishing a straight edge first, and then a hollow and then fairing that hollow in, you will get a nice curve cut into your edges. A little bit of light, say 1/32″ for two foot long boards is all you need. Just so when you place the two boards together edge to edge you feel good pressure at the ends. Another method would be to put the nice straight edge into the two boards on the jointer first. Then hand plane in a little hollow. But keep your plane cut square to the face of each board when you do this.
Checking the Joint
Check your spring joint by putting one clamp in the middle of the boards and clamping together. With good pressure at the ends and not too much of a spring joint, one clamp will be able to pull the joint together with no gaps showing along the length of the board on either side. Check be sure the joint closes up on both faces. This method is simple enough for me now that I use it for all my edge joints now. Ah Spring.


Comments
I share Gary's opinion of Spring Joints, but not his method of cutting them.
Gary briefly mentioned (horrors) using a hand plane. I found the technique using a #4 1/2 smoother or #5 1/2 jack plane to be very easy. Why knock your power jointer out of alignment when you can plane a long arc in your boards in a matter of seconds/board.
Charlesworth has a nice video on his method.
All I need is 3 swipes with a plane, 1 clamp, and little glue. I love spring joints.
FR
+1 for the handplane method. Quick and efficient. And if possible, I "fold" the two pieces together face-to-face and match plane the edges. Cancels out any angle I might accidentally introduce. :) Yay for fewer clamps in a glue-up!
Hey Gary. Great article, got a question. What happens with the tension you build on the board with this spring?
I couldn't find the "Charlesworth video" for making spring joints. Could someone post the link? Thanks!
Although I have the greatest respect for Gary Rogowski, (I own several of his books and read his articles in FWW), the idea of spring joints is a myth that has been passed on from one woodworker to the next. This was taught to me in a weekend workshop by Frank Klausz. He was adamant that an edge joint should be made completely straight and smooth so that the glue can do its job.
My procedure is to first, flatten and square the boards on the jointer, then using a shooting board and a No. 7 plane I smooth the edge to remove any machine marks left from the jointer. The boards meet perfectly straight and square.
The reason often given for a spring joint is end grain moisture loss. However, most woodworkers use kiln dried lumber with moisture content of 8-10%. The wood will not dry out any more and may gain moisture depending on climate conditions. Another reason not to make a spring joint is that at this stage of the building process most woodworkers are gluing boards with rough measurements to allow for trimming to final dimensions after glue-up. When you do cut the panel square then you have lost the compressed ends that you have so carefully built in.
The spring joint idea may be an old technique leftover from an era before lumber was commonly kiln dried. It might have made sense for those craftsmen who were working with air dried or green wood. One last point - the glues we are using today are very strong and reliable compared to the hide glue of the past. Make your edge joints straight, square, smooth, use good clamping technique, put glue on both edges so you get a small amount of squeeze-out and you will have made a strong edge joint.
Kelly Meyer has a positive comment for the "spring joint"too.
He uses the jointer. So simple and it works !
I tried this and the setting change is so minor I just leave it .
Bones 1
I was taught this technique years ago in junior high. senior high and in a college woodworking class. It works and is easily done with a hand plane. I have edge joints on furniture I have made that are close to 50 years old and still good. These were made well before some of the glues that are available today.
I still are no very proficient with hand planes being a new hobbyt and are learning to use its. I think that perhaps I will do a better job using a power jointer. I have a 6 inches Delta, but I dont know to. Glad to hear for more skill full wodworkers.
I don't know why anyone would knock the spring joint?
I've made thousands of carved mahogany signs over a 38
year span; all with spring joints. 95% of these are outside
with virtually no joint failure. The vast majority are commercial signs and often quite large.
Too many people rely on the latest technology and ignore the
tried and true.
1 Question - what happens when your top consists of more than 2 boards and the gentle arc created by putting 2 boards together is amplified to the overall piece by 3-4 times?
I am questioning from a vantage point of absolutely zero experience in spring joints, so take that into account and be nice in your responses! :)
I just created spring joints by running my boards edge-wise through my planer and varying the planing thickness during the milling pass. (this can be done safely up to 5:1 width to thickness ratio or by running several boards together).
The arc doesn't have to be 100% precise so as the board enters the planer, I progressively turn the planer thickness adjustment knob so that I remove up to 1/32" on each board at the mid-point, and return the knob to its starting position by the time the board finishes passing through the planer.
It takes a bit of practice and some hand-eye co-ordination but I've found it to work very well. Once you've mastered it, the technique is very fluid and repeatable and helps to easily produce solid joints.
BR,
Phil
I have the same question as sduncan000. If you have 3 boards, for example, wouldn’t the middle board tend to try to “pull” in two directions?
I'm making an ash table top that's 1-3/4" thick, 5.5' long. Each board is 7" wide. The stock is from the bottom of the tree and the grain goes every which way near the bottom of each piece. I don't see how anything this thick is going to "spring" into a flat joint and I'm concerned that I will be left with a major gap in the four boards. I don't own a jointer, only a 12" planer. I can see how a spring joint would work on 3/4" in stock but not on anything thicker.
Log in or create an account to post a comment.
Sign up Log in