
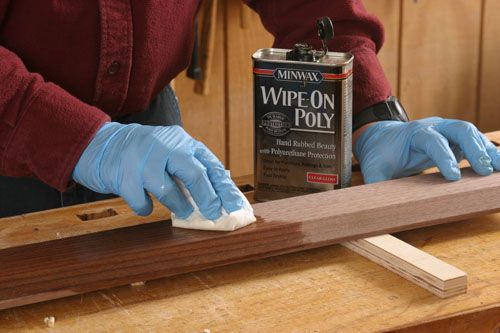
No runs, no drips. Minwax Wipe-on Poly goes on easily with a rag. It dries so fast that you can do multiple coats in a day.
Last week I was working with our Web folks and Tony O’Malley on our big mudroom build-off against our colleagues at Fine Homebuilding. During the process I was helping Tony prefinish some material for his project. We used Minwax Wipe-On Poly, and I loved it. Typically, I wipe on a home-made brew of thinned down polyurethane on my projects (about 2 parts thinner to 3 parts poly). My mix dries fast and builds to a nice sheen, but the Minwax has all the qualities of my brew without the chemistry.
It goes on fast with a clean cotton cloth or sturdy shop towel and is ready to recoat in a couple hours. The manufacturer recommends sanding between coats with 220-grit paper, fine steel wool, or a fine abrasive pad, but this isn’t always necessary because the stuff dries so fast. I’d recommend feeling the surface for dust nibs. If you find any, go ahead and sand and then remove the detritus; if you don’t find nibs, I think it’s safe to apply the next coat without sanding.
If you’ve had any trouble with finishing, this is a great way to put a nice finish on your furniture without worrying about drips and runs. I used the gloss version of the product. With it, you can build to the luster you want by simply wiping on additional coats. When you’re done, apply some paste wax and you’ll have a durable, nice-looking finish without the hassle.
Anyone want to buy some measuring cups?
-
No runs, no drips. Minwax Wipe-on Poly goes on easily with a rag. It dries so fast that you can do multiple coats in a day.
-
Dry the rags. Avoid the risk of fire from spontaneous combustion by letting the finish-soaked rags dry on the ledge of your garbage can or outside.


Comments
I agree with your endorsement of this product. I have been using it as my Poly finish for 3.5 years now with wonderful results. One does not always need to sand but when I do I use 320 wet/dry paper.
If you want an even smoother high quality finish, try drying under an Infrared heater (mine is on the ceiling about 5 feet from the top of my work bench. It seems to smooth out the product even more and reduce slightly drying times. I never attempt to recoat in less than 3.5-4 hours, though.
Don
Nothing that makes this product superior to other wiping varnishes, whether bought that way or mixed your self, and it come with the handicaps of polyurethane as far as adhesion. As far as measuring cups, precision in mixing your own is never needed--just pour some varnish into the container you will work from and then add a roughly equal amount of thinner. Stir. Stir really well, both before pouring into the use container, and after adding thinner if you aren't using gloss varnish.
Absolutely agree. I love this product and use it for all my projects that need a more protective finish. It wipes on beautifully and multiple coats can be put on in a day.
SteveScheone:
On the contrary, FWW did an article back in 2005:
SUMMARY REVIEW
The author tested 15 wipe-on finishes, including a water-based finish and both tung-oil and linseed-oil-based finishes. Pure boiled linseed oil and Minwax Fast-Drying Polyurethane, a brushing finish, were added for comparison. All the finishes were tested on pieces of red-oak plywood cut from the same sheet. All but two of the finishes tested fared well, but the Minwax Wipe-On Poly was particularly impressive, drying in three hours to a light satin sheen and offering excellent water resistance. It was the author's choice for Best Overall and as the least expensive finish tested ($5.95 per quart), Best Value as well.
You can read the article here:
https://www.finewoodworking.com/Materials/MaterialsPDF.aspx?id=24153
I have use this product and like it. It is easy to apply and for a novice, it makes the final product look like it was finished by a pro!
I've been using this product since 1973. In fact, I used it today!
John
I have used the wipe on poly and didn't like it.
Want a wipe on finish that is really quick. Use 50% Sherman-Williams fast dry gloss varnish, or any other fast dry varnish, mixed with 50% Naptha. Start wiping it on in the back and by the time you reach the front of the project the back is already dry. No dust, dirt or anything else to worry about. Plain paper towels work fine as an applicator, single sheet folded into a rectangle or square whatever you prefer. Use a small squeeze bottle to apply. If the dry time is too fast use less naptha or mineral spirits. Plain ordinary Naptha, not the High Flash too much sulphur in it.
You can re coat in an hour. 3 coats in a day. I have re-coated in as quick as 10 minutes.
I have a question: Would you dare finish an entire (small)kitchen with this minwax Wipe On Poly? I would be using little or no stain on the wood. The wood will be solid maple and maple/birch plywood for the cases. Would the finish look even enough and would it look like a first class finishing job? (Assuming that I would do a near perfect job.)
Or...Would I be better off doing a spray on finish for the look and speed?
Thanks for any experienced &/or expert feedback.
Dave
Talking about finishes.......Does anybody use a filler prior to finishing open grain woods like oak/walnut?
I cannot seem to find a decent product for filling.
Minwax wipe-on Poly is a great product I have used many times for needing something reasonably priced, and readily available at your local hardware or box store. But, I prefer the more difficult to find General Finishes Arm-R-Seal (Green can). I find it to have a great build up, and a beautiful final product. I first apply 1-coat of General Finishes Seal-A-Cell (Red can), then apply 2-coats of Arm-R-Seal with a disposable sponge brush and clean cloth. Next I use 0000 steel wool between each coat after, and usually stop around 5-coats. I wait a minimum of 4-hours depending on the humidity and temperature. I have never been disappointed with the results, ease of application, little mess, or years of durability. Best of all I really like the ease of touch-up if an accidental scratch or damage occurs. Tough to achieve with spraying products.
I agrre with Steve Schoene on this. Wiping varnishes are excellent with respect to speed of application and control of sags, runs and brush strokes. I generally use wipe on poly for protection of my furniture/cabinetry projects.
But I just do not like paying the price for a commercial product when it can be made simply by eyeballing a 50:50 mix, which is what I generally use. The varnish can be diluted with either mineral spirits or naphtha depending on the drying speed that is desired.
As a side benefit, I have found that diluting the concentrated poly into a wiping varnish helps to prevent it from skimming over due to oxygen exposure.
When I was new to woodworking and finishing, I found the Minwax Wipe on Poly to be the easiest and most reliable product for me to use.
It was nearly foolproof for applying without runs, it required no expensive equipment, and cleanup was easy. It requires several coats obviously due to the nature of the product, but they seem to dry relatively fast due to the thinner coats.
As a business, it was necessary to move on to the line of lacquers for rapid production to insure profit. But I still recommend the Minwax Wipe on Poly for any of the beginning woodworkers. It is readily available without mail order, easy to apply, inexpensive, no chemistry is involved, and easy to clean up.
I find it interesting to observe the behavior of woodworkers, because I will offer this advice and then find out they tried something else with great frustration. When asked why they didn't just use the Wipe on Poly as I suggested, they most often tell they didn't think that the answer could be that simple.
Ironically, this is most often the "secret" to woodworking. It is that simple.
Great product. Super easy to use and leaves a nice gloss that doesn't look plasticky...
I most recently used it while refinishing some 100 year old windows. The old varnish had puddled from a century of direct sunlight. I removed the lower window but left the upper window (never designed to move in this case) casing, apron, etc in place.
I stripped the old varnish using paper towels soaked in denatured alcohol covered with saran wrap. Let soften for 30 minutes and it came right off with a putty knife.
The point of all this was that I was able to brush the wipe-on poly on the vertical window casing with no drips or sags! Very nice to work, reasonably priced with and available at your local BORG. Life is good.
I've always been dissatisfied with various varnish products. I tried the wipe on Poly and LOVE IT. My friends now think I'm an expert wood finisher! I don't let on how easy this product is to use.
I agree 100%. I have used it for 10 years or so. The only I thing I due differently is that I use pieces of nylon stockings. When a pair is no longer usable, my wife gives it to me and I cut it into small pieces. The advantage is that it has no lint or other loose particles.
For furniture I give to family or sell, I put only six to eight coats since it goes on fast and dries quickly.
At my church, the men make faith chests that are given to all children at baptism. I have this varnish used because the rookies of varnishing can do a great job coating the wood. We only do three coats except for the red oak lid that has four.
We have been using this product for years with great results.Welcome to the club!!!
We have been using this product for years with great results.Welcome to the club!!!
I have had my share of finish trouble.It will be on top of my list for the next trip to the poly store! Thanks!
Aren't you concerned about bonding issues if you don't sand between coats? I have always been under the impression that poly does not stick to itself very well. Sometimes saving 5 minutes now can cost you hours down the road.
Geoff
The stuff's expensive when you can make your own, but it's convenient and good for small projects. I used semi-gloss on all my pine baseboards, over a gel stain, looks pretty good. Used it on oak newels and railing, over shellac - looks even better. I did a couple of 6-panel doors with it thinking wipe-on would be better than brushing but still have some smears on the stiles. I did exterior door and windows with Sikkens Cetol D&W, that stuff was great, leveled well, no brush strokes and just made the wood glow so I'm going to look for interior version to finish the rest of my interior doors.
I also make my own wipe on poly, it's far less expensive than the packaged product. It's an easy to apply, durable finish, that I use on utility products such a kitchens, bookcases and desks.
I don't use it on higher quality furniture, for that I use polymerised tung oil.
I find the tung oil produces a sheen that fits better with the Arts and Crafts furniture I often make.
For the tung oil finish I seal the wood with tung oil sealer, then mix polymerised tung oil 50/50 with tung oil sealer to reduce the gloss, and make application easier.
5 or 6 coats followed by a careful sanding with 600 grit paper, and a couple of coats of paste wax, yields an easy to apply finish that looks period for the furniture I make.
Regards, Rod.
I've been using the product for 5 or 6 years now, and I love it. I've used it on decorative boxes and small furniture pieces, all with excellent results. It's easy to use and relatively error free. I typically sand the first coat, then hand test each coat after that. Most of the time no additional sanding is required.
I agree with the others on the virtues of Wipe-On-Poly. However, I make small boxes and like bright finishes. This finish requires rubbing down. The varnish dries in layers and the rubbing process often goes through the outer layer which will show on a mirror finish. Shellac will not do this as each layer fuses. It is very discourageing to spend several days building a finish to have it ruined by rubbing down.
Tried it on a large teak coffee table from Indonesia that had finish in bad condition. It worked great with very light, lvery fine sanding inbetween the 7 coats. Looks wonderful. Only observation is that the open pores of the teak never fully filled in - probably should have used some kind of sanding sealer under the first coat.
I agree with the assessment of the Minwax product. I have also used and have had considerable success with Rockler's wipe on finish which happens to be water-based.
For projects that don't require polyurethane protection, I still prefer to use shellac. While it is a bit more trouble (e.g. diluting the Bullseye mixture with some denatured alcohol) it also dries in just a couple of hours thereby allowing the application of multiple coats in a single day. It produces a very acceptable shiny finish and allows for easy re-touching should the need arise.
I have been using General Finishes wipe on poly in both high gloss and semi-gloss for more than ten years. Want a quick finish retouch, sand lightly, and wipe on another coat.
You can make the project as shiney as you like or dull. I prefer shiny surfaces as they don't always look dusty when cleaned.
Joe
I have been working with this product for about 5 years and have had great success with it. When using it on large surfaces I did have a problem with tracking marks from the wiping pad. I solved this by taking a heavy napped paint roller, cutting it to half its length (4.5 inches) wrapping it in plastic wrap to prevent absorbtion, then wrapping the half roller with a lint free cotton cloth and using it to apply the wipe-on finish. The tracking problem was eliminated and after eight coats, with light sanding in between (400 grit) you are left with a beautiful finish.
One difficulty I am having is finding the product - it seems that it is being regulated out of use by the federal government. You would thing they would have more important issues to deal with. Water based poly does not come close to revealing the inherent beauty of the wood grain.
I have been using this product for about 5 years and have had great success with it. I was having a problem when using it on large surfaces such as a table top. I found the pad would leave tracking marks. I solved this by taking a heavy napped paint roller and cutting it in half lengthwise, wrapping it in a food plastic wrap to prevent absorbtion, then wrapping it in a lint free cotton cloth and using it as the pad to apply the finish. I would apply eight coats with a light sanding between coats - 400 or 600 grit is all you need - and I would wind up with a durable, track-free finish.
I have been having difficulty locating the product lately and learned that the federal government is basically regulating it out of existance because of more stringent VOC standards. You would thing they would have more important issues to deal with. Water based poly doesn't come close to revealing the inherent beauty of the woodgrain.
I have used this product on several projects, and highly recommend it. I also have used a "home brew" like auther, but find it less protective. Minwax wipe on poly seems to offer much better protection.
Chuck
Tex raised the question about rubbing (or sanding) thought the layers of applied polyurethane and creating witness marks. I had this problem using the General product when I sanded between coats, and I imagine a similar result with MinWax wiping poly.
Is this an inherent problem with polyurethane that should indicate it perhaps isn't appropriate for fine furniture, or was I just to agressive in sanding?
My first project as a beginning woodworker was a computer desk built from red oak. Knowing the desk would likely be prone to heavy daily use, beverage spills, etc., I opted for a durable poly finish. I started with a couple coats of Watco Danish Oil (fruitwood tint) for color, and let that cure completely. I then layered on several coats of Minwax Wipe On Poly, with a light sanding between coats. It was so easy to use, even for a novice like myself - basically idiot-proof! The finshed piece has a nice warm glow, without a plastic look to it. Friends and family were impressed. It made me look like I actually knew what I was doing...hehe!
I too agree with the wipe on adherents! Its a great product and because you can wipe on multiple coats in a day, there is no concern about bonding. While the surface feels 'dry' to the human hand within an hour or so, chemically it is still actively curing so the additional coats fully bond with the previous coat. Once all your coats are done, let your piece sit for several days before being pressed into service so the multiple layers have time to fully cure and harden. I tend to dislike a really glossy finish, so I often wet sand the final coat with 1500 wet- dry, available from auto body supply sources, and then sometimes rub it down with rottenstone. The surface is amazingly beautiful and sensual to the touch!
The wipe on finishes are very easy to apply and look great. I think they give adequate protection as long as your not in a high abrasion environment. I probably wouldn't use them to finish a high chair, but I certainly would use them to finsh a table. One that I used wirth good sucess is Bartleys Gel Varnish. It's an oil and uerathane product in gel form. It's easy to apply and dries very fast. You can get it from several suppliers on the internet.
Wipe on Poly is pretty much the only finish I use these days. I can apply it in my dusty shop and not worry about ruining my finish. I typically put on 4-5 coats and rub it out with oooo steel wool after letting it dry overnight. A coat of good wax to top it off gives it that good mellow glow.
I am a terrible finisher and always promised myself I'd learn to do it right. Once I discovered wiping varnishes, I was able to break that promise and still feel good about my results.
i tried this finnish and it takes a long time to dry and build
I see PapaWhiskey has also noticed the Taunton magazines are recycling material. Methods of work being a very common recycle bin.
I've used the satin version of this with great success. Couldn't be easier but now I mix it myself with mineral spirits--much cheaper. I use the minwax fast drying poly and mineral spirits. The advantage of mixing myself is I use about a 50/50 mix for the first three coats (can recoat is about 2-3 hours typically). Then after that I mix about 2/3 poly and 1/3 mineral spirits and even go to 3/4 poly and 1/4 mineral spirits. Still can wipe on well and builds faster.
I also wipe on the first couple of coats, thereafter I use 300 grit, then 400 wet/dry and sometimes up to 600 wet/dry sandpaper on a small block to "sand in" the finish. I keep the sandpaper wet with wiping varnish and sand lightly after wiping on. If necessary I'll wipe off excess but this yields an incredibly smooth finish with very little extra effort. Borrowed the technique from instructions on applying a wipe on finish at back of Jeff Miller's Beds book (Taunton Press). After the last coat (usually 5 or 6) I apply a little Briwax with 0000 steel wool to make it extra smooth to the touch. Easy, quick, flawless,looks and feels great.
I'm happy with this product, too, but I take issue with the instructions. It says to sand between coats with 220. When I did that, I saw unwanted scratch patterns. I had much better results using 600 grit on a firm foam pad.
As a final step, I run it out with rottenstone mixed with water. It really make for a nice smooth surface. I then add a thin coat of Renaissance wax, which seems to help with the fingerprints.
I used Minwax Wipe-on Poly for a cabinet I made for my wife:
http://www.splitcoaststampers.com/gallery/photo/1639288?&si=cherylquilts
The cart is oak and oak plywood, and I put on 3 coats of the finish, sanding after the first coat with 220 and then used 400 grit after the second and third. I ended up with 3 coats of paste wax.
I'm really happy with the results. This is a great product.
Walt
I've used this product for the last several years with good results. I rub it lightly with 0000 steel wool between coats. I haven't blown through it yet.
I normally apply 3-4 coats of Satin, depending on the look I want.
I don't think there's any difference in protection between this and undiluted polyurethane, this just builds slower because it is diluted.
I'm planning to experiment with applying full-strength polyurethan with an abrasive pad, as Dresdner suggests, to replace this product.
I love this product as well and have used it on a number of projects with excellent results , but due to it's high cost I'm more inclined to mix it myself, as one poster( robwein) suggested, using their fast drying poly. Another poster(PapaWhiskey) states he's purchasing this product for $5.95 a quart. He may want to check the volume content on his can as they are only selling this in pint can's. And around these parts( S0. Cal)it's selling for nearly $8.00.
How well does this work on wood that is prone to finish splotching such as cherry?
I too have been mixing my own wipe-on poly for many years. I mix it in an empty plastic cream cheese tub. Then I put the lid on the tub between coats. I usually apply two or maybe three coats per day. When finished I dump the remaining thinned poly back into the original can.
I typically sand with 320 grit after each two coats for the first four (or six) coats.
Finally, I polish it with a very fine abrasive pad (bought at an auto parts store) using the wipe-on poly as a lubricant. After polishing with the pad I wipe the poly off with blue shop towels. I clean the pad in mineral spirits and reuse it many times. This gives a very smooth surface with little fuss and time.
Sometimes I polish it further with wax using a fine polishing pad.
I am now retired but worked in the paint & coatings industry for 40 years before retiring. Believe it or not this is the part of wood working that a like the least. I only had success with spray finishing. Brushing almost always got me runs and uneven finishes. Shortly before retiring I worked for Zinsser, the shellac people. I tried to brush on this finish but got my usual lousy results. After discussion with the lab they said that wiping on was the way to go. I tried it and got excellent results. Even their "French Polish" was great.
I miss using Lacquers but with all of the environmental regulations it's hard to find. So no I'm a wipe on finisher. I tried oils, urethanes, shellac and varnishes. They all work great. Just remember to wipe once and let it be.
Art Paltz
I've had good results brushing on 2 or 3 coats of regular gloss poly then 2 coats of the wipe on semi gloss on small to medium projects.However covering a large area (20 sq ft plus) with semi gloss wipe on can be hit or miss. Streaking is hard to avoid. The folks at minwax had no cure for this problem. I've tried using a huge pad and or using two people to apply the finish quickly with no reliable success.
Has anyone found a cure for this?
Glendo.
Good advice, thanks. Question...Can it be used to refinish/recoat 30 year old window sills that were finished with a varnish??? Does it have a u-v protection?
I like to stain the wood, then i use nothin, but Minwax products to finish. For a very durable finish such as a table top, I use several coats of wipe-on to seal the wood, sanding between coats with 400 or 600 grit, then i build up numerous coats of satin or flat poly (general product)---I never thin it----I often lay a coat on before another coat is completely dry--I'm talking 'bout brushin'--then after smothin, it all out with the final sandin'---i finish it with wipe-on poly of the finsh i want---I think it's just like paintin' a car with repect to wax and will not wax or apply a polish for at least 7 days--I've used this method for many years with NO problems.
I am using watco wipe-on poly but I am getting streaks. I have used it before and this didn't happen. Will thinning the material help? or what should I do?
I discovered that the kind of wood makes a difference when choosing a finish. Keep this in mind before following the advice of any articles posted in FineWoodworking.
I needed to refinish a red oak bed frame. I wanted to keep the finish light in color. And I also wanted a very smooth but moderate gloss in-the-wood look. I also wanted to be done with the project in less than two weeks and I wanted a technique that matched by low tech, inexperienced skill level.
I read pretty much every article posted on FineWoodworking about finishes and finishing techniques twice. I followed up on the different opinions in several articles posted here and the advice of my brother who has a lot of wood working experience (see links below) by buying a 6'x4" length of red oak to use as a test bed. I sanded both sides well with 220-P grit. On one side I put a coat of Zinsser Seal Coat diluted to a one pound cut with denatured alcohol (1:1 since Seal Coat is a 2 lb cut out of the can). This was my brother's advice for use on a ringporous wood like oak. This was applied very thinly with a home-made french polishing cloth. Once this dried, I sanded lightly with a gray synthetic steel wool pad (rated as 000 or Fine) and vacuumed all dust away and then wiped with a clean, soft cloth. Then I divided the board into 3 2' sections with masking tape. I now had 6 test areas. To each side, I applied three different finishes. Minwax wipe-on poly gloss, and 3:2:1 and 2:2:2 homemade varnishes made by thoroughly blending mineral spirits:fast-drying Minwax gloss poly:Rockler pure tung oil. The original article for 3:2:1 recommended linseed oil but I did not like the strong smell so I opted for Tung oil. The homemade blends were sanded in as the video instructs and then wiped off repeatedly with a clean cloth till no more bleeding was seen. The unshellacked side had a lot more bleeding out. The Minwax wipe-on poly was applied with a french polishing cloth set up and then wiped off with a clean cloth to leave a thin coat. After 48 hours drying, every section got a light sanding with first 220-P, then 400-P and finally 600-P wet/dry moistened with mineral spirits. After sanding, all dust was vacuumed off and then the surface wiped clean with a soft cloth. I repeated this three times.
The results are in: Minwax wipe-on poly is the hands down winner. Of the two sections done with the Minwax, the shellacked side stayed lighter in color and helped seal the grainier sections. All sections looked better with the Sealcoat, but the 3:2:1 was a real dud on red oak. The finish looked dull and lifeless and the oil seemed to spot out. The 2:2:2 was somewhat better but also gave an uneven finish and took a lot longer to dry. It would need many more than 3 coats to look decent. I have now applied the winning finish to the bed frame. After one coat of the Sealcoat and three coats of the wipe-on poly, the bed looks great - the finish has a sheen but not a high gloss. It has an in-the-wood look, not a film. It is silky smooth to the touch and still quite light in color with a definite warm, red tone. I am going to do one more coat of the wipe-on poly and finish with a coat of Renaissance wax (after I test it on my test board.) I will write back with the final results.
If you are working with cherry or another type of wood, you may see different results since the basic structure of the wood is different. I recommend a test board for an important project to be sure you are satisfied with the results. You will feel less stressed out if you know for sure the kind of look your chosen finish will have.
LINKS:
https://www.finewoodworking.com/subscription/skillsandtechniques/skillsandtechniquesarticle.aspx?id=34065
https://www.finewoodworking.com/Materials/MaterialsPDF.aspx?id=24153
https://www.finewoodworking.com/fwnpdf/011207051.pdf
https://www.finewoodworking.com/SkillsAndTechniques/SkillsAndTechniquesPDF.aspx?id=30593
https://www.finewoodworking.com/Materials/MaterialsArticle.aspx?id=28833
Just a note of clarification on my previous post. Each section of the test board got 3 coats. The sanding I describe was as follows: 220P after the first coat, 400P after the second and 600P wet/dry moistened with mineral spirits after the third coat.
Log in or create an account to post a comment.
Sign up Log in