
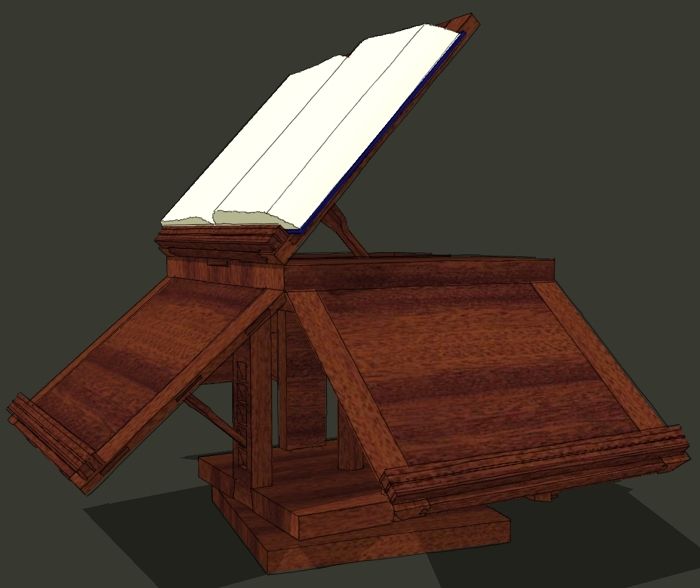
There are a lot of ways to approach drawing a model in SketchUp. I think most users develop a work flow that works for them. Recently I’ve spoken with several woodworkers who have told me their workflow isn’t working for them. They struggle with things like how to accurately place elements in the model and when to make components They asked me for another demonstration showing how I go about these things. Recently there’s also been some interest in Thomas Jefferson’s bookstand. I’ve been looking at it, too. It’s become another project on my long list of projects. After doing a bit of research, I decided I’d model it. I hope this is helpful.
Warning: This video runs a little over half an hour. I didn’t cut any of the process out or accelerate anything. There are a few spots where it looks like nothing is happening. Those are times when I am referring to my notes to get details.
Addendum: I neglected to add a link to a plugin I used to put the radiused corners on the easel supports. The plugin isn’t necessary but it does make the job slightly faster. Here’s the link.


Comments
Dave, thanks for posting this wonderful video! It's a project that is really exciting, plus you clarify how all sorts of tools are used. Great tips and tricks. Thanks again!
Dave - it's always a pleasure watching a master at work. Thanks.
For the rest of us novices, I recommend one extra step that I use regularly. Hit the save button! If/when mistakes are made, it helps to have a saved fresh start to fall back on.
Randy
Thank you Randy. I'm glad you enjoyed it.
You do make a good point. Hitting Save once in awhile is good insurance against crashes. SketchUp does perform autosave operations. By default, SketchUp autosaves every 5 minutes and creates a backup file. If needed, you can go to File>Revert. It'll give you the option to choose the file from the last time you saved it--the last saved SKP file--or the last autosaved version which is saved with the extension SKB. If you don't manually save your file, you'll have access to the version as it was when you last opened it.
You can also adjust the autosave frequency in the General section of the Preferences dialog.
Dave
Dave, loved the video. You really do make it look so easy. Picked up a couple more shortcuts watching you, I'll have to try them out.
Paul
Dave, it appears you are using a keyboard shortcut to create components. Can you detail what you are doing?
Naomi and Paul, thank you.
Jeff, I do use a keyboard shortcut for creating components. I think the default shortcut for making components is G although mine is Alt+G which is a holdover from the earlier days when the pressing G got you a group. I'm so used to the Alt+G that I haven't changed it.
To see what keyboard shortcuts are used for various tools, open the various menus. The keyboard shortcuts will be displayed to the right of the menu entries. You can make your own keyboard shortcuts as well by going to the Shortcuts section of the Preferences dialog.
If you do make your own, don't use numbers or the standard Windows/Mac shortcuts for things like Ctrl+C or Ctrl+V.
Dave
Dave,
I've been eagerly following the Jefferson bookstand projects since Naomi's initial posting. I was hooked immediately. Watching you build it in Sketchup has answered any nagging questions I had. Can't thank you enough for doing this. I'm ready to start cutting boards. Autumn
Dave,
Fantastic tutorial, as usual! I really appreciate all the work you put in to this blog. I always learn something new from your posts.
I was wondering if you ever use the arrow keys on the keyboard to toggle a lock to a global axis. I have found it very useful in speeding up my work.
And, thanks again for sharing your “black cherry” texture with me. I am using it a lot.
Todd
Thank you Autumn and Todd.
Todd, I don't use the arrow keys. I suppose that is because I started with SketchUp long before the arrow keys were used for locking. I kind of forget they are there.
I do use the Shift key though to lock the inference direction and for me, that works well. The Shift key along with Ctrl (Option on Mac) and Alt keys are used for so many things that I seem to always have my left hand resting resting at the corner of the keyboard ready to use them.
The cursor keys certainly do have their place and they can be really useful for those who have difficulty getting things to move in the desired direction.
Glad the cherry material is useful.
Dave
Thank you for your work. In the Jefferson's Bookstand , you were using a 2d drawing plugin to do radius on the supports. I can not find this plug in. Please tell me where I can get it.
Thank you
John,
Thank you and thank you for reminding me. I've added the link to the plugin at the bottom of the blog entry.
Dave
Log in or create an account to post a comment.
Sign up Log in