

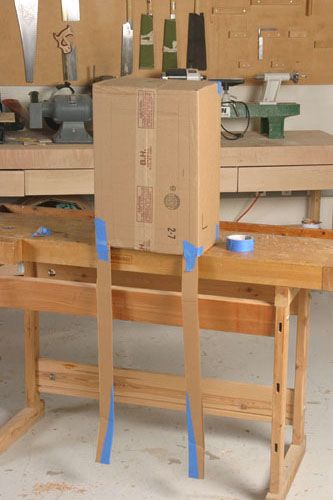
Humpty Dumpty sat on a bench. It looks pretty ragtag, but the cardboard mockup helped me dial in dimensions and proportions.
I have a lot of things to build for my home this year. They’re more honey-do’s than wanna-do’s. Any time I get to build something is fun, but the honey-do projects don’t present a whole lot of creative challenges–other than better time management. This year, however, I’m taking on a project I’ve always wanted to tackle: a cabinet on-stand. I’m currently in the design stage, but I was having some trouble.
You see, I don’t see things in my mind in 3D, and I’m not a great illustrator; my drawings don’t give the full effect of proportion and part dimensions. Many times I’ve built a piece only to realize that a shelf, a side, or a leg (you get the picture) is too big or fat. After the finish is on is not the point I want to see such design flaws.
This time I’m making an effort to dial in the design as much as possible before I start cutting up the stock. Many of the staff members, and many pros I’ve visited over the years, develop full-size mockups to gauge proportion and dimensions. I’ve joined the fray.
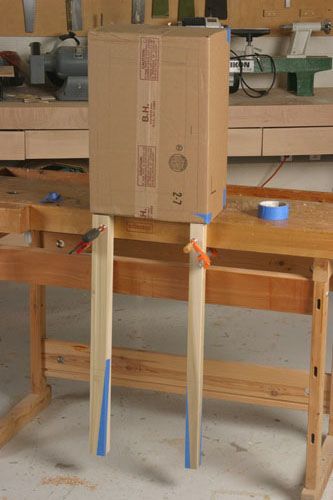
Although my sketches looked okay, I went ahead and made a cardboard mockup of the case and a couple legs. It took some cutting and taping, but I’m happy with he proportion of the case. The cardboard didn’t allow for a 3D view of the legs, so I made a wooden mockup of those, too. I’m happy I did, because the 2 in. dimension I had sketched ended up looking like a square Louisville Slugger. I trimmed it down to 1 1/2 in. and was satisfied. I also used blue masking tape to gauge the taper on the bottom of the legs.
Now that I’m happy with the overall proportions, I can revise the my original sketches and work up a detailed plan, including joinery. I’ll give updates as I progress. Be patient, though, I have other things to make at home, like two bookcases, a bathroom vanity and medicine cabinet, some basement storage shelves, window seats for my porch…
-
Humpty Dumpty sat on a bench. It looks pretty ragtag, but the cardboard mockup helped me dial in dimensions and proportions.
-
Finding my wooden legs. To get a 3D look at the legs, I made a couple mockups out of poplar. The 2 in. version (left) was overpowering and hefty. I like the 1 1/2 in. version better.


Comments
Sounds fun. Good luck with the project! -Gina
Thanks, Gina. Just ignore some of my harsh language in the FWW shop as I build this thing. By the way, folks should also check out Mike Pekovich's blog on how he used a mockup in building his Arts and Crafts display case:
https://www.finewoodworking.com/item/22491/mock-up-leads-to-a-happy-ending
His project will be published in FWW #211.
you should try sketchup, its easy to use and to learn. there are also thousands of free tutorials on youtube.
Tom, I look forward to seeing more of this project. I like the mock up idea. Michael's mock up was good, too.
telkwa has a point although seeing it full size so you can walk around it has a lot of advantages. Of course you know that you can learn SketchUp through the Design. Click. Build. blog right here on FineWoodworking.com.
Just for grins, I did a SketchUp mock up of your cabinet. I think it looks just fine. http://farm5.static.flickr.com/4062/4276384343_d973787df7.jpg
I wish I had more time to learn about SketchUp. Honestly, I'd rather spend the little free time I have in the shop... or at a nice warm pub.
Hey, with a laptop, you can learn SketchUp _while_ you're in a warm pub!
Multitasking, you know.
-Steve
But then I wouldn't be able to watch the game or eat my nachos without making a large mess.
Log in or create an account to post a comment.
Sign up Log in