
A reader recently sent a note saying:
I started learning Sketchup today for a bookcase I am going to build. I created the box of the bookcase, used the push/pull tool to create the inside of these boxes and when I went to put the face frame on, I had lines on top of lines which I know is not the correct way to do it, but what is?
I immediately questioned the reader whether “components” had been used in creating the bookcase design. As suspected, components were not implemented causing this problem of “lines on top of lines”.
As Dave Richards and I have repeatedly reported, the use of components is essential for success in SketchUp. Otherwise, the modeling is a bunch of lines and faces which interact and interfere with one another. And there is no way of working the model with pieces of “lumber” that represent each part of the furniture assembly.
Also, we have recommended making these components right up front in the beginning, even before the “piece of lumber” is entirely processed with moldings, joints, or other embellishments.
To make a component, simply draw a select box around your graphics (edges and faces) that represent a part of the furniture assembly (e.g., a leg, top, shelf, rail, slat, side, bottom, back, drawer front, etc.). Right click on the selection, and choose Make Component from the pop-up menu. Another box will appear, asking you to name the component. Type in the name – that is, side, front, leg or whatever – and click on the box “Create”.
After creating the component, click your mouse on it and the whole piece is selected, not just a single line, edge, or face. To change a component, remember to right click on it and select Edit Component from the pop-up menu. To save the changes, right click out in space and select Close Component from the pop-up menu.
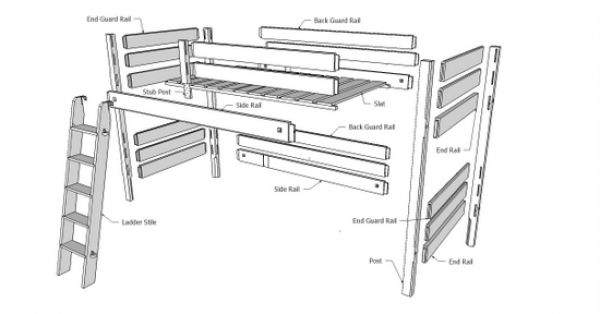
Components are extremely useful in many ways. You can move and copy parts of the furniture connecting them precisely into an assembled whole. When you change any one copy of the component, all other copies are automatically updated with the change. You can also quickly make exploded views by using the Move/Copy Tool to pull apart the assembly, as shown below for a loft bed.


Comments
I'm a professional woodworker and I use sketchup freqently for sketching projects and find it very useful, but I still have much to learn. One technique I could really use is how to miter moldings. I tried intersecting the molding with an angled plane and then tried to erase the excess but it erased everything. I'm stumped.
bduffin104, it sounds to me as if you missed opening the molding component for editing. This would cause the molding to disappear the first time you hit part of it with the Eraser. Remember that to modify a component, it must be opened for editing. Draw the angled plane, cutting plane, inside the component, run the intersect and then delete the unwanted stuff.
Dave
I have a question: I am designing a bookcase that has panels on the sides. I have rails and stiles. I am trying to lay over the top of these a cove molding and SketchUp does not like the path which is simply the sides and front of this bookcase. I have each part as a component, but do I need to group these components together?
JeffB, it won't help you to group the components as you still would not be able to implement a Follow Me path across multiple components. Also, if I'm understanding properly, you will need to miter the cove at the corners. The way I do this is to run the molding with Push/Pull Tool the full length of the rail and stile separately. Then I "cut" a miter joint for the molding only at each end independently.
If I misunderstood, you are welcome to send me your file on email.
Tim
Jeff, further to Tim's remarks which are excellent, if you want to create the cove molding as a single entity rather than as separate 'sticks', trace around the top perimeter of the case with the Line tool. Do this while you are NOT editing any components or if you have made the molding profile a component, open that component for editing. Then temporarily hide the case components so you have easy access to the lines you drawn. Those lines will be the path for Follow Me. Select them, get the Follow Me tool and click on the molding profile. Once the extrusion is made, delete the path if it is not part of the molding. Finally, unhide the components you hid. Don't forget to make a component of the molding to protect it from other geometry.
I finally figured out how to miter moldings. Just draw the profile at the edge you want then use the "follow me" tool. This is now so easy I feel dumb for asking in the first place.
While I am by no means an expert, I feel pretty comfortable with Sketchup. However I am still confused as to the difference between GROUPS and COMPONENTS. Other than the fact that with COMPONENET, if you make a change it will be made to all similar components - are there any other differences/advantages betweek GROUPS and COMPONENTS?
Thanks!
Bob
Hopefully Tim won't mind if I reply to you, Bob.
As you mention, editing one component instance in a model results in all other instances in the model being edited. This is perhaps the number one benefit because it saves you a great deal of time in drawing. Suppose you want to modify the legs of a table you're drawing, if the legs are groups, you'll have to edit each one to make the change. If they are components, you need only edit one of them.
Here are a few other advantages or features that components have over groups in SketchUp.
Components can be saved into libraries for future use. Well, groups could be but they become components anyway when imported into other models.
Components have their own axes that can be placed to aid in alignment and insertion point.
Components can be set to cut openings and glue to surfaces which also makes placing them easier.
Components can be substituted very quickly. Suppose you've drawn a highboy complete with all the drawer pulls. Now suppose you want to replace those pulls with a different style. You can select all of the original ones--right click the thumbnail in the In Model Component library and choose Select all instances. Then right click on the thumbnail for the new one and choose Replace selected. Done.
Unless you purge the unused components from the In Model library, you can always retrieve a component you might have inadvertently deleted. Delete a group and it is gone.
Hope that gives you some ideas.
Dave
Thanks Dave! Yes I have a mych better understanding now - almost appears to be no real need for the groups then - only in instances where you have a unique, one-time item you draw!
I appreciate your time in responding - keep up the great work.
I am new to this forum and must say I am quite impressed!
Bob
Bob, glad that helps. I agree there's really no need for groups. I would suggest that you make a component even if it is the only one in the piece. You might be tempted to make a table top, for instance, into a group instead of a component since your table only has one top. Suppose you copy the model over to the side so you can make an exploded view. And then suppose you need to edit the table top. I bet you can see where that is going.
My advice would be to ignore groups altogether and make only components. You never have to think about which to make and you've already got the component if you need it to be one later.
Dave
I agree - speaking of exploded views - other than manually performing the actions, is there an easy way to create an exploded view when creating a project. I designed a Wood Slat Bench in Sketchup (using only GROUPS - grr - wish I had this discussion with you about 2 weeks ago - lol! Had to manually resize like 20 slats - each individually! HA HA - now they are components - after the fact)
Anyway - I manually pulled each group apart to create the exploded view - they used the Dimension tool to get piece sizes. Came out pretty well - but a real PIA!
Thanks again!
Bob
Bob, there's nothing like learning the hard way, is there?
There are a couple of plugins available that create exploded views by moving the components away from a central point. The problem is they move all components proportionally. In the exploded views that I make, the components are moved different distances and often only parallel to one axis. I also don't explode the entire model. For example, it's usually enough to show the tenon on one end of a rail. The other could stay in its mortise.
My process for making exploded views is to start with a selection box around the components on one end of the model, say the right end. Move the selection over to the right. Then change the selection to include only those components on the front that I want to shift. Move that selection forward. Proceed to reduce the selection set as you make further adjustments to the explosion. You'll still have to tweak some component positions based on the view you choose and what details you need to see. If you establish the camera position first by making a scene, you can easily go back to it to check to see that the details that need to be visible are indeed showing.
Dave
Dave and Tim
First thank you for all of the amazing material here.
I use a CNC system to design and cut 2 1/2 d carvings. My CAD software can export the 3d carvings only as STL files. I can convert them to DXF and import them into my trial copy of Sketchup Pro. My question is will I be able to close the back of them and then use them as components. My goal is to be able to use the library of these CAD files to design pieces in Sketchup. Seeing how the will integrate into a design and being able to show a client will be invaluable. My CAD program can just show one board or panel at a time so it can be very hard to visualize the whole project. This idea of components that can be combined makes the whole thing work, if I can close these "backless" files.
Thanks
Bob, I gather by being able "to close the back of them" you mean create faces from your DXF imports. Is that correct? If so, it is indeed possible to create those faces. There's a plugin that will do this for the selected geometry quite rapidly. Be aware that CAD programs aren't as picky about having closed polygons as SketchUp is. If there are gaps between line segments, you won't get a face. You'll need to hunt down the gaps and close them. They can be very tiny though so you may have to zoom in quite close to see them. There is also a plugin to automate finding those gaps, too. Look for Make Faces and Close Opens at Smustard.com for them.
Usually SketchUp imports DXF files and creates components. remember that to modify them you'll need to open them for editing. It may be that you'll need to delete some geometry as well.
Dave
Log in or create an account to post a comment.
Sign up Log in