
Are you ready to build a brand-new workbench dedicated to sharpening? If you have a bit of extra space, check out blogger Tom Fidgen’s new project and download a free plan at the bottom of the page.
You can also read along as he builds the project start to finish as a hand-tool-only project. You don’t have to build it with hand tools, but his step-by-step account is a good view into an unplugged workshop.
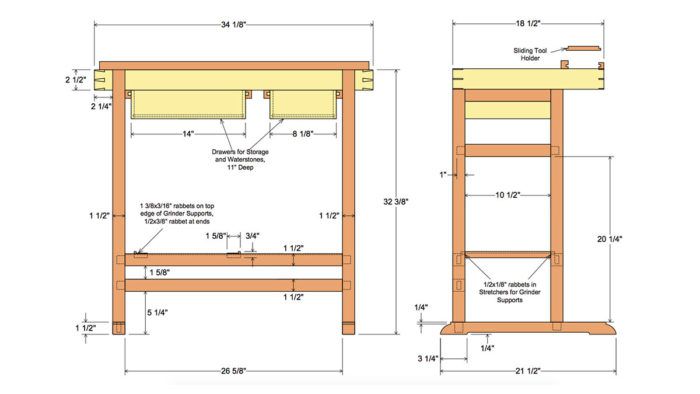
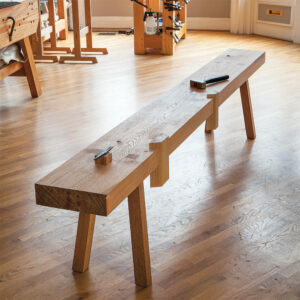
Build a sharpening station like this with help from a free plan by Tom Fidgen.
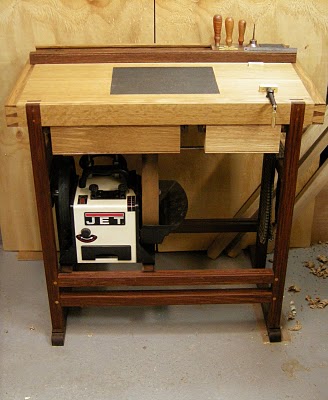
He starts by building a square and stable base and a flat top. Then he adds specialized sharpening accoutrements including a granite insert, a drawer to hold sharpening stones, and a walnut tool tray.
Fidgen’s already put his bench to use and says he’s pleased with the results. “My sharpening routine has indeed become much more pleasurable and efficient having this dedicated sharpening bench.”
Plane blade maker Ron Hock concurs that a sharpening station is a bonus for any woodworker. In his blog he writes, “A dedicated station like this is more than a luxury, it belongs in the shop as much as any other work station.”
So, if you have a bit of shop space and a bit of time over the holidays, give this project a try.
To download the free woodworking plan for Fidgen’s Sharpening Station, please click the View PDF button below.


Comments
Tom,
Great job! I've been wanting to build a sharping station for a while and your bench may have give the push I needed. Just got your book the other day and really am enjoying it.
Keep up the good work.
Rusty Miller
It's a fantastic bench. I have a dedicated waterstone sharpening station but I would never have dared build anything so sofisticated because of the premenant presence of water eager to do its damage at every opportunity. How do you intend keeping everything dry!!
I'd like to know what software was used to produce the plan drawings. Does anyone know or can Tom let us know?
Tom - why don't you make "Part Nine" showing the bench in use, that would satisfy my earlier comment.
Perfect timing. Santa just delivered my Jet Sharpening station.
This is one of the best plans for a sharpening table I have seen. There are a few minor modifications that I would make, but I think Tom's done a great job.
My personal preference would be to make the top out of something like solid surface. You can pick up surplus sheets at a fairly reasonable price and add a "no drip" edge fairly easily to significantly reduce the possibility of water damage. Another thing I would consider would be extending the top beyond the base or foot. No matter how stable my table is, I like the added stability that comes with being able to press the back edge of the table top firmly against a wall.
I am a total novice in Malaysia who just retired from service early this year.... and trying to pick up woodworking without going to school..For starters, I just ordered some books from Taunton. bought some drill bits and a used Stanley Handyman Smoothing Plane from EBay, a vintage Stanley No. 110 Block Plane from EBay.... and some plywood from my local store. I think this sharpening bench will be my first project ( or my first victim )lol...Kind regards !
What is the purpose of the granite block?
Merry Christm and happy new year por all carpinters y finewoodworkers in the United States. God bless to my friends
craftmans and carving woods. Mario
Thank you for tha plan sharpenning station I enyoided in my work wood working.
This is the first set of plans for a sharpening station that I would actually use. I also echo "Lipsters" ideas for changing the top to a solid surface, adding a no-drip edge and extending the top edge to position it against a wall.
Great magazine and website!!
David Rohm
Well it seems the comments don't take time off for the holidays ;) thanks everyone-
I'll do my best to answer.
Rusty- thanks for the feedback, happy to hear you're enjoying the book.
Shedmanuk- I'm not too concerned with water- I think people would be surprised at how little water gets onto the wood while I sharpen. A small spray bottle for keeping the stones moist when in use is all that's needed. I have been placing a small towel under the stones while I sharpen- this has helped in keeping the water out of the oak.
I will post another 'chapter' showing the bench in use- it'll walk you through my routine. Probably won't get to it this week so keep watching in the New Year.
Kenny- I didn't make the bench drawing so I can't comment on the software. Sorry.
Papa504pvd- congrats on the new sharpening system...I've been using the Jet for a few years and I'm pretty happy with it.
lipster- thanks for the comment and the suggestion for a sheet product top. This totally makes sense and would help with wood movement issues. I used the oak off cuts because it was here in my shop and I was really working on a budget. I'm hoping the construction will allow the wood to expand and not have any ill effects on how the bench functions...time will tell I suppose.
Zakri- good luck with your journey into woodworking....it's a fantastic way to spend the day and the social network and woodworking community is amazing thanks to sites like this one! ;)
loghacker- (love the name) The granite is for reference purposes as well as flattening plane soles. A piece of sandpaper on top is all thats needed for any dressing over the seasons...especially on my wooden planes.
marioignacio- happy you like the bench plan- enjoy!
and finally David024- thanks for the feedback. I think a solid surface will make sense and as mentioned already, help deal with any wood movement.
Cheers everyone-
Have a healthy and happy New Year!
Tom
I have the perfect spot for this wonderful shop accessory. Have plenty of sharpening equipment (stones, jigs, etc) this would help me get it all organized into one workable area.
Thanks for sharing the plan!
I, too, am new at woodworking. I am fascinated by your dedication and skill using only hand tools. Inspiring stuff!
Hi All, great project, do you think that a piece of impact glass would work instead of the granite?
Links to the "More from this series" are all broken. Please fix.
All the links in the inset box are still broken. Please fix them! I have been a member for over 10 years and am quite tired of finding broken links on the FWW website. More web maintenance is needed!!!!
Links are fixed
Log in or create an account to post a comment.
Sign up Log in