
Follow along as Tom Fidgen builds a dedicated sharpening bench. In this first post, he gives an overview of the bench. Read parts two, three, four, five, six, and seven for more details on this project.
An Introduction…
“The best hand tools in the world are worthless in the hands of the woodworker who cannot sharpen them.”
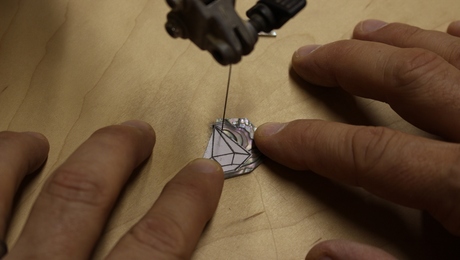
After reading and experimenting with, practicing and then studying the different techniques of sharpening I’ve come to settle on a system that is working for me in my current shop space and that’s good! A freshly sharpened hand tool can turn the most challenging joinery tasks into wonderful and relaxed procedures. Your work will be cleaner with tighter fitting joinery and your tools will perform as they were intended to the day they were made. The joys of working wood will be that much the greater.
In my own basement work space here in Toronto, I’ve followed the line and I’m happy with my results; but something I’m not happy with and have been promising myself for months to address is my sharpening location and current set-up.
One day last year, I noticed a neighbour throwing out a small wooden table. I snatched it up, rescuing it from the eternal wasteland of the land fill site and have been using it as my sharpening table ever since. Prior to the table I was using a sharpening hook system I designed awhile ago. It was basically an over-sized bench hook with some cleats to hold water stones and a side area for stone storage. The sharpening hook worked when my bench top wasn’t cluttered, (which if you know me you know that it hasn’t happened much this past year!) so the routine of moving my work project or tools to make room for the sharpening hook soon became tiresome. The small ‘throw away’ tables footprint has also become reminiscent of a drunken sailor on shore leave so I’ve finally decided, with a little help from FineWoodworking.com, to build a new bench dedicated to sharpening.
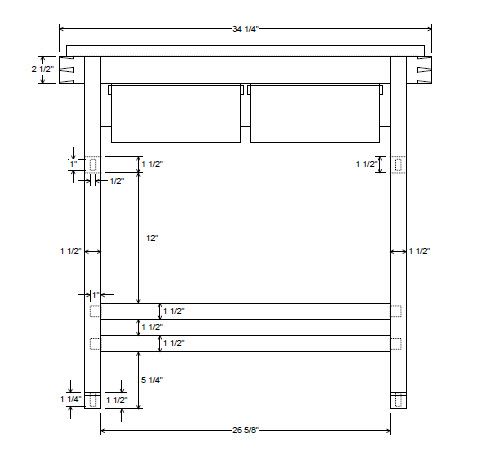
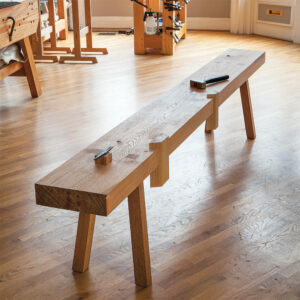
A small scale workbench with large scale workbench strength. The frame has mortise and tenon joinery with a solid 1″ thick work surface that has bread board ends fitted into a heavy, through dovetailed apron.
It has a tool tray featuring a unique and convenient way of actually ‘holding tools’ ! (not just for the hamsters anymore) and I’ve added some ‘off the shelf’ items that will also add to the -dare I say- pleasure of sharpening?
Do you currently have a dedicated sharpening area? Is it a re-used piece of furniture or maybe a purpose made table or bench? I’d love to hear about it- be part of the discussion and share some thoughts.

In the next post I’ll assemble my cut list and get right into the project with some stock preparation and glue-up the top panels… stay tuned.


Comments
My sharpening station consists of a plastic bin full of water that I drag out onto the top of my MDF workbench. MDF and water don't play well together so I considered making a bench hook type sharpening station but haven't gotten around to it yet. I'm anxious to see what Tom has come up with though I'm not sure I have room in my basement shop for such as station.
JLYoung- thanks for the comment !
My shop is also in my basement, a 12' x 12' storage room to be more specific. This small space, with it's low ceiling and poor lighting has been ~working~ for me but indeed has pre-determined the scale of this design. I'll let you know how it works out. It may be a good option for you in your own basement workshop.
I've also used a bench hook sharpening system and it's a great option for small spaces- problem was I always had to move my work or some tools off of my bench top to use it. And while that's not a big deal, when you're in the middle of a project, all set up on your bench top and need to resharpen a tool-it can get be a bit of a pain. Now if I had a second bench ?
-also strolled down the MDF vs. H2O path as well!
cheers ;)
Under the somnolent effect of too much turkey, I happened to thinking the deep thoughts of the directions I would like my woodworking to take, and a greater emphasis and reliance on handtools looms large in that vision. I have a similar plastin bin setup as JLYoung, so I too am excited about Tom's project. I also am short of space, and I was wondering if a picture or plans of the bench hook approach might be included, if only to convince us space-sparse folks what we would be missing if we didn't spring for the full on bench.
I took some 2x4 construction lumber and laminated a bench together. The top is 30" x 16" x ~3" and rock solid. After the glue had dried I flattened the top with my hand planes and mounted a sheet of hardboard. I mounted a storage shelf underneath where I have my stones and other loose sharpening items.
On the bench I have a hand crank grinder and a dedicated place for my water stones when in use. I also have a good sized granite reference plate that helps keep the table from moving around. Finally I have a simple clamp on light mounted above so I can see how my sharpening process progresses.
thanks for the comments everyone ~
Ted- I wasn't planning on including the bench hook plan here but you can see a shot of it on my blog- http://www.tomfidgen.blogspot.com
it's really as simple as it sounds...just a big oversized bench hook with a couple of sticks of wood nailed down to wedge my water stones between. a plastic container is on the left with the stones. it sits on a table I grabbed on garbage day and looks like hell...I'll post a shot in a future blog.
Kaytrim-sounds like a good strong bench ! also sounds like we share a few common needs on our sharpening benches. this design also has a granite insert, an area for my stones but man I wish it needed a place for a hand crank grinder !! ;)
I gotta watch for one...
cheers!
I'm right at the beginning of building my tiny basement shop (10'x17') and one of the things I will include is a utility sink that currently is in the laundry area. It is one of those generic plastic molded sinks almost 2' cubed. The great thing about them is they have a lip around the top much like a bathtub. I can place a 3/4 piece of plywood about 10" wide on the rims of the sink and it holds firm, stays flat, and I can line up and rinse my stones as I need them with no fear of getting water everywhere. I even have an area at the corner of the plywood to put my honing compound for the final touch.
starryNight- sounds like a good plan- my 'luxurious' basement shop also has one of those laundry sinks and I'm always rinsing off my stones placing them on my washing machine...(my slow speed grinder is currently on my dryer) your shelf idea may find it's way to my sink too !
thanks for the comment. ;)
cheers!
I recently accomodated a small but very handy sharpening station in my workshop (apparently some people use this part of their house to park cars?
It sits unobtrusively in the corner and has all I need to sharpen anything from chisels and plane blades to kithchen knives.
I made it out of plywood, covered it with a rubber liner and made a couple of drawers to store all my jigs, abrasive sheets, files etc. I keep my sharpening pond (Lee Valley) out and ready to go with my various stones either in the water or nearby, ready to go (ie. my diamond stone and 8000 water stone). Although a sink would be nice the 'water pond' and a rubber bucket on the floor and a spray bottle deal with all the water issues.
The best thing about this sharpening station is it is set at a height that is the most comfortable for sharpening, it has a lot of lighting and a magnifying lens/lamp. Having eliminated the task of 'setting up' before sharpening it is now a simple matter of walking over to the station for either a quick 'honing' or a serious repair of a damaged edge.
My benchtop belt sander takes care of all the power grinding I need. No hollow grinding for me. But that's the way I like it.
twotone- thanks for sharing.
How do you like the Lee Valley 'stone pond'?
I've looked at it a few times and always thought the plastic looked a little light...any issues with it?
keep me posted. I do like the design but was worried it would be too light weight. Any feedback would be appreciated-
cheers!
Tom
Hello Fidgen,
in reply to your question about the LV water pond, I do like it and use it all the time. I like that the stones are always wet and ready for use and that the lid keeps the water from evaporating. The plastic is ridgid enough and once you have water and a couple of stones in it the weight makes it quite stable (also the bottom has two rubber strips to keep it from sliding around). The nice thing about it is that since I am constantly flushing my stones with a spray bottle the water has somewhere to go (right back into the pond) rather than all over my bench and floor.
The draw backs are that if your stones are wearing down and getting thin the clamps that hold the stones protrude above the ends of the stone. This is a problem because it is too easy to run the edge you are sharpening into the metal and undo all the sharpening you've been doing. The answer to that of course is to make sure that the stones you use are thick enough. The other problem is that unless you place your stones near the sides of the pond where not only are they resting on the aluminum bracket but also on the edge of the plastic then the stones are somewhat unstable and wobble around. Again, that is easily overcome by using the outermost slots and having one side of the stone actually resting on the edge of the pond. Hope that makes sense and you find this useful.
twotone,
thanks for the detailed info- this system sounds appealing and may be a great solution for woodworkers.
all the best.
Tom
The hand crank grinder I have was purchased from a fellow woodworker at a swap meet our club held last spring. I replaced the stone with a Norton 3x wheel. These hand crank grinders pop up quite frequently on ebay. Just go to the sub categories like this one (collectibles/tools-hardware-locks). http://collectibles.shop.ebay.com/Tools-Hardware-Locks-/13849/i.html?_npmv=3 and this one (tools-home-improvement) http://home.shop.ebay.com/Tools-Home-Improvement-/159907/i.html?_npmv=3 Enter "hand crank grinder" as the search terms and you should get several hits. Be careful though some of those that are listed are not as good as they appear.
kaytrim,
thanks for the info- I'll do a search and see what I can find. Do you find it awkward cranking with one hand and holding the iron/tool with the other? I'm so used to using both hands while sharpening it must take some getting used to. Kind of like patting your head and rubbing your stomache at the same time ! ;)
thanks again.
cheers!
I have a plastic bucket with a 2x6 cut to fit onto it with a space chisled out for a water stone. I bring this into the kitchen to do the sharpinging and dump the bucket along with the sludge left from the sharpeing and put the stone, bucket and board onto a shelf when I am done. I only use it once a month or so so to dedicate a bench for it wouldn't be practical for me.
I turned an old "microwave cabinet" - basically a ~3' tall cabinet into my sharpening station. I mounted a fluorescent lamp with a magnifying lens on an articulating arm to the back right corner and a metal working vise to the front left corner. I made a sharpening "platform" from a piece of laminate-clad plywood about 14" x 20" with cleats which hold two waterstones and a diamond stone in place using wedges. I keep all my other sharpening accessories in a box which sits at the back of the 2'x3' top and a bunch of other occasionally-used tools below, like metal working equipment.
It's the brown cabinet on the right.
https://eufxdw.blu.livefilestore.com/y1mQctxkEurR0KboHKy3SXkfiyZGOL26Y82ywPebg9pf9kpasjRvOeF9QaFT4vKzkCGzU2JQp-CW4ml96Hxl6FPYtBYfRDJcx0CV73xwpHcrrmB6R8r7_Zqb6GcLc_8aDfgd61_r0iGcpAB1dV9VmHr4w/IMG_3300r.jpg
On the Lee Valley pond - bought one and am not pleased with it because: 1- stone clamps don't grip well, 2-stones sit quite high (Norton combo stones) and aren't well supported by the rails/clamps & 3 the stones sit in the slop on the bottom - I put thin paver risers in mine to get the stones out of the slop.
Frank Klaus has a pond plan that seems to work much better.
From old microwave ovens to plastic buckets- these examples show just how resourceful we woodworkers can be!
In my shops over the years I came up with a few different scenarios but none of them were ideal. This is what inspired the dedicated bench. If you don't have room in your shop then perhaps some of these other examples will work for you but if you do have the room, then........
Instead of me trying to convince you, here is what 'Sharpening Expert' Ron Hock had to say on his blog a few days ago-
This bench would make a valuable addition to any shop. Sharp tools are essential to quality (and safe!) work. If it’s a pain in the neck to find and set up the sharpening gear, your tools may not receive the attention they (and you) deserve. A dedicated station like this is more than a luxury, it belongs in the shop as much as any other work station.
Very nice work, Tom. We’ll look forward to your next post. Thanks!
http://hocktools.wordpress.com
Is the above drawing available for download?
Taigert,
A full set of detailed bench plans will be available for download very soon- thanks
My sharpening consists of a plastic container with a small hollow on the top that I bought at the Salvation Army thrift store for like a buck! Aw c'mon, that wasn't nice. Lol. Seriously, I tried sharprning on tables and got the sludge everywhere. I tried on the counter, not much better, but at least there wasn't any ink from the newspaper left behind. It is able to keep my honing jig that I use mostly for my low angle block plane and shoulder plane irons. (Those I kind of want pretty accurate.) It will keep the lapping grit, my combination stone, and 8k stone in there. It even has room for a dirty little oil stone I used to keep in my mechanical toolbox. I know it isn't really pretty, but I'm on a student budget. The best part of it is that it is plastic and with the hollow area on top, it lets the slurry drip down into it without the slurry going anywhere.
I was really amazed by your work. I'm not presently in a workshop where there are lots of tools, what with trying to get all the technical training done this year. As a result, I'm confined to a laminate floored living room, so I totally relate to using **mostly** hand tools. I agree, it is good for the soul. I've decided I'm going to build a replica. I don't presume it will turn out as well, but I think I know a place I can get a free chunk of granite. I probably won't start it for some time. I should've been in bed a while ago, (tomorrow's the first day of 4th year), but I hope you'll understand why I would spend the time reading your whole post. I'd like to know what the 'scary sharp' method is that some people had mentioned.
Tim
tdevries-
sounds like you have a system that's working for you and that's really what counts. Good job!
To answer your question- the scary sharp method is using sandpaper instead of water or oil stones. The sandpaper is applied to something like safety glass or other suitably 'flat' surface and the blades are honed.
All the best and thanks for the comments-
cheers!
Looks good, How/when can I get Parts 2 to 7 and the Plan?
A very beautiful piece of work - but I'm curious how you handle the water involved? I use japanese water stones and am constantly adding water - so my sharpening 'bench' is a table inset I set up (dowels as pegs) over my sink - gives me instant and easy access to water, and a few holes in the surface drains all the run-off into the sink. When I'm done it stores easily under the sink...but it doesn't look anywhere near as nice as your dedicated table so I'm curious how you deal with water runoff?
thanks for a very informative excellent article!
Log in or create an account to post a comment.
Sign up Log in