
UPDATE (4/12/2011): Lie-Nielsen now has the blades for sale on their website. For most folks the big advantage of the blades (as opposed to buying blanks like I did) is that you wont have to do any of the grinding or heat treating. That was definitely the least fun part of making the planes.
UPDATE (4/6/2011): Folks, at long last the time has come. The article explaining how to make these planes is in the issue that is just about to land in mailboxes and newstands. Keep an eye out for it. And starting April 7, you can enter to win a pair of grooving planes made by me. I’ll post back then with a link.
UPDATE (12/1/2009): This is just a quick note to let ya’ll know that I will be writing an article on these planes for the magazine. I’ll explain all the geometry and construction, and cover the blades as well. Once I know for certain which issue it will be in, I’ll update this post again.
I recently made a box with three small trays for my mom. As I was grooving the tray parts for their bottoms, using the router table and a 1/8 in. dia. straight bit, I thought to myself, “This really isn’t safe. The parts are too small.” I could have rigged up some kind of push stick, but I’ve always thought that a push stick in this type of situation lessens your control over the workpiece. So I started to think of how else I could cut grooves in small parts like those trays.
Some kind of grooving plane, I knew, would be great. I’ve used a Stanley No. 50 to cut grooves. It worked great, but was a borrowed plane. Also, making all the adjustments was a bit tedious. And I didn’t want to waste time searching the internet looking for one. So, I decided that I’d make a pair of small grooving planes. They weren’t hard to make. I basically used the Krenov method and it only took me about 1 hour to get the pair done. Of course, I spent about 5 hours working on the prototypes, but that was time well spent, because the final pair work exquisitely. In fact, I like them so much that I think I’ll make another pair for larger drawers. Check out the video to see them at work.
The best thing about these planes is that they require no adjustments, other than setting the blade. Why? Because I made them so that they cut a 1/8 in. wide and deep groove 1/8 in. up from the bottom of drawer and tray sides. For small parts I always cut the exact same size groove in the exact same location. So why not make a plane that does just that?
I made the plane irons from some molding plane irons purchased from Lie-Nielsen. I ground them down to the right width, hardened them with a MAPP gas torch and then tempered them in the oven.
This isn’t the first time I’ve made a tool and it won’t be the last. If you haven’t already, give it a try. If you have, tell me about it in the comments below.
-
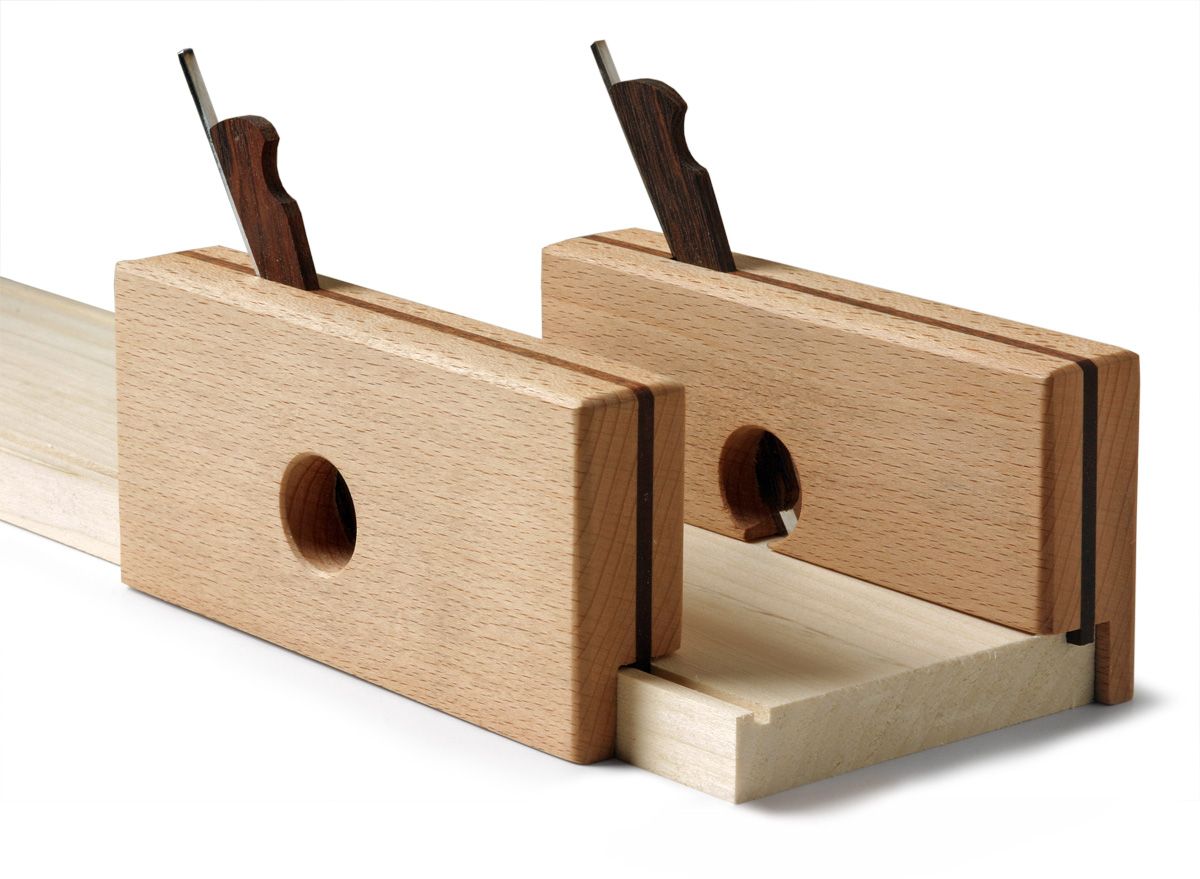
Smart construction. Beech sides sandwich a rosewood core that serves both as the "frog" and as the skate.
-
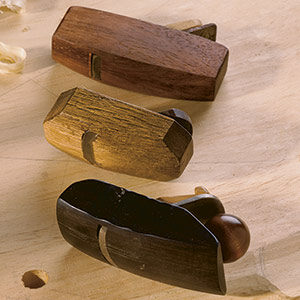
Shop-made satisfaction. Using a tool you've made yourself is pleasing, especially when it works as well as these grooving planes.


Comments
Could you please provide some more details on the planes?
Or, will there be more provided in an upcoming issue — Tools & Shops perhaps?
Philh,
It's possible that these could end up in a future issue, but what in particular would you like to know about them?
Matt
First off, I should have said it in my earlier post, but they look very nice.
Here's what I was looking for:
What's the overall size of each plane?
Could you tell me what the bed angle is?
Is the "skate" relieved behind the cutting portion of the iron to provide clearance? It would seem that being full width could cause binding.
Thank you, again, for posting these cool tools
philh,
The planes are 1 in. thick, 5 1/2 in. long, and 2 1/2 in. tall (on the side with the fence). The bed angle is 57 degrees and the front of the throat is 67 degrees.
To make the skate/bed, I started out by planing it as thick as the iron is wide. After I had the plane glued together, I used a shoulder plane to take a few thousandths off one side. I left it as is on the side facing the fence. That way the plane would tend to pull itself against the workpiece. After I put some finish on (one very thin coat of Tried & True danish oil) there was no binding at all.
Hope that helps.
That helps a lot. Thank you Matthew.
These look really nice. I would love to see an article on how you made them and maybe a bit of history of the grooving/moulding plans.
An article is possible, but it would be focused on how to make and use them. What would you find interesting or useful about the history of grooving planes? In other words, what would you want to know? A history of molding planes in general, I'm afraid, would need an article (or book) all its own.
A how to build and use article would be fabulous!
One thing about the how to build articles that I always find discouraging is the inability to obtain a part. Sometimes the writer will say something like you did, about getting some plane blanks, then grinding and reheating and all of the associated heat treatment and metalwork.
While that is pretty cool in and of itself, it can be a slight turnoff. If you write this article, it would be great if you could also provide a good source to buy working irons, it would make the article so much more usable in my opinion.
Looking forward to seeing it!
Jon,
If by working irons you mean one that are already heat treated, then I don't think I can help. I don't know of anywhere to buy heat treated irons that would work, that's why I bought the annealed iron blanks from Lie-Nielsen. Don't be discouraged by the prospect of heat treating irons. I used a MAPP gas torch to harden mine and then tempered them in the kitchen oven. It's a lot easier than you might think.
Re: irons that are already heat treated. Lee Valley sells replacement blades for their plow plane. I've not seen them in person, but there is a chance they would work for a plane like this. You'd have to buy one to try.
I like to make tools. Knowing some of the tools history gives me a sense of how and why it was originally created. I like to know any progression that has been made over time to improve the tool or make it not as useful. That way I have some potential options when I make my own.
With something like this, a molding plane, maybe history is the wrong word to use. Like you said the topic would be to big to fit into an article, but maybe some highlights could be mentioned.
Just my thoughts.
Thanks.
Outstanding! I look forward to seeing more of this from you!
These are awesome, I have had the same thoughts about using the router to do such things. This really gives me some great ideas.
Matt said: "but what in particular would you like to know about them?"
Everything!
Materials dimensions, sources, video demonstration of the steps in building, - EVERYTHING!
Matt said:"They weren't hard to make. I basically used the Krenov method and it only took me about 1 hour to get the pair done."
What's the Krenov method? I don't know what that is.
These are neat planes and it would be great to know more about them.
Did you make one to do the drawer bottom groove and the other to make a rabbet on the edge? I sort of looks like that in the photo.
So much to learn! So little time!
Best regards,
Don Butler, working wood in Waterford, PA
Thanks for the great planes. I intend to make them.
You said that you used a shoulderplane to take a few thous off "one side" and that it helps hold the plane against the workpiece.
I am not clear on where to do that. Can you help?
Matt,
I'm curious to find out about the hardening and tempering. It seems to be pretty easy. How exactly do you do it?
I find the video to be meaningless. It does not tell anything about the steps involved. What a waste.
About four years ago I made two spoke shaves out of wood and brass. The prototype was maple that I made into a concave and the other was rosewood that I made with a flat sole. I made one of the blades from an old jointer knife. They worked very well in shaping the Queen Anne legs for my period reproduction chairs. I would be interested in seeing an updated article on making, using and a history of thes planes. I seem to recall an article many years ago in FWW on a similar subject. Thanks, working with well designed sharp tools is always more fun and relaxing than with power tools.
I agree with aged sage below. What a waste, as there are no instructions for how to make, what is used for a blade, or deminsions.
To The Flash, Aged_Sage and ERshopsmith,
I find that there is a wealth of information out there IF YOU Look. On the subject of hardening and tempering a quick search of the internet produced this article among many more:
http://www.ehow.com/how_4550011_harden-temper-mild-steel.html
I should think that the dimensions and such are largely a personal choice based on what you want to do with the planes.
Kindest Regards
TJack74
An easy approach to making the plane blade is as follows: start with O-1 tool steel, which is available from a huge number of suppliers in a terrific assortment of sizes. In 5 minutes of web searching, I located 1/8" x 1/8" stock, 18" long selling for about $10. (You are not stuck with these dimensions!). This saves a lot of trouble grinding something to the right size, it arrives with very nicely milled surface from the vendor. Cut the stock to length. Even annealed tool steel is tough on hacksaw blades, I prefer to notch the steel with an abrasive disk (such as the type found in Dremel tools or similar) Once the notch is partway across the stock, clamp it in a vice and snap it off at the notched point. (This is an old knifemaker trick, I'm an old knifemaker.) Grind or file your cutting bevel. Hardening in O-1 means heat the cutting to bright orange in a torch, then quickly dunk the still-glowing hot end into a little cup of oil (Peanut or olive oil will work!). Turn on your oven to 350 F, put your part in for an hour to temper it, which should give you roughly Rc 61 (Rockwell C hardness scale), plenty hard for a small cutting tool. The tempering process relieves some brittleness at the cost of loss of some hardness. Now hone your final edge.
Clicking "print" above only gets me text; No pictures. I agree with others above: This is just a teaser without more detail and illustrations.
Hi.
Great planes. DonzoB wrote;What's the Krenov method? I don't know what that is.
A good place to start would be to watch on YouTube a very good video from Ron Hock titled Make A Plane From a HOCK plane kit. This is a typical James Krenov plane design.
I hope it helps some?
Cheers
jyb
I saw something years ago about doing something similar without having to make up a blade. The idea was built around using the same laminated construction, but was made to fit standard bench chisles as blades.
I don't think think this is a waste at all... if one just uses deductive reasoning, it's easy to figure out the dimensions of the plane.
Without being snide or insulting to any of y'all reading this:
The author even goes so far as to give almost TOO MUCH information: He says the planes are designed to cut 1/8" in and 1/8" deep, which basically gives you the inner dimensions of the plane. So long as you have one dimension, the rest can be figured out. As far as angle of the plane's blade, well, just use the old GP rule of thumb: 55 degrees for hardwoods, 45 degrees for GP, 35 degrees for soft.
At the very least, one can simply size the given pictures till the center, dark section of the plane's width equals 1/8" (or perhaps a hair over), and you got the width of the plane- once you know one dimension, you got all the others.
Not to mention the planes are nothing but a bunch of rectangles and right angles ('cept for the big hole in the side and the blade angle)...
Y'all want him to give you EVERYTHING on a silver platter?? USE YER NOODLES!! ;D
As I have gotten older, I have realized how lucky I really was. I grew up with a Grandpa who was a Master Cabinetmaker in The Netherlands and used to moan when I had to go over to help him move a cabinet or a set of doors, etc. He had one electric applience in his shop, a double set of lightbulbs. All was done by hand and most of his precision tools were hand made. What I do with routers and shapers, he did with his handplanes. As I changed careers from the steelindustry to the woodworking trade (now near 40 years as a Cabinetmaker) , I have thought back on the missed opportunities to learn more. However some did rub off and I do have a number of handmade planes which were made when the need arose. Amongst them are a routerplane, setup to use a standard chisel (thus having a variety of sizes available) and a set of french door planes (try buying those anywhere today with the proper matching concave and convex radii moved past the radius centre!). One of the greatest rewards one can have is creating/ constructing some of your own tools. Much more fun than running to Lee Valley and buying what you need. You also don't need the fancy woods a/o metals, the purpose is function. And if it looks good, bonus. Most of mine are made from good old ash. One of the most usefull woods around, hard, stable and nearly indestructable.
Have fun;
Hoek.
Very cool, Matt! I'm not sure what the complaints are about; it says clearly it's a video of them in use, not a how to make them video. Having said that, I want to echo a few other comments: it would be great if you could do an article about making these.
Where can I find information about hardening and tempering plane irons?
First, thanks for the article. I have a Record 043 (small English plow plane with 1/8", 3/16", and 1/4" irons) that would do the job. Doubtless the new LV plow would too. But I like the idea of a couple of pairs of dedicated woodies for drawer bottoms.
Second - for the complainers - the Internet holds more free information on the anatomy of plow planes, the heat treating of plane irons, and the building of Krenov-style planes than anyone could possibly digest. Without intending to start a holy war, I think that hand-tool users are accustomed to figuring out how tools work, since the old ones seldom come with any instructions. Almost inevitably, they also figure out how to make them.
Matt,
What temperature was the oven set to? When you took the blade out of the oven, did you quench it in water or oil, or did you let it cool in air? Was the steel A2?
Nice article!
Bill
Here's one link that has a little on heat treating.
http://www.bigtreeturnings.com/articles/siegel%2018-4.pdf
Thanks for all the comments everyone. I've been out with the flu and forgot the check this blog for comments. For those of you hoping to see these as an article one day, I think the chances are good. If they don't end up in the magazine, I'll do something more detailed on the web. So, I'll hold off on giving dimensions and the like right now. However, if you search our website, you'll find a recent article by David Finck that gives the basics on the Krenov method of plane making.
I apologize for not giving all of the nitty-gritty details. This blog post was never meant to be a how-to. It is really just a peak at something I did. I should also note, that I sometimes forgot that most people aren't like me in that I'm more than willing to just go out in the shop and give something a try. I didn't have any instructions on how to make these. I knew the Krenov method and found the bed angle in a book on plane making that I own. Everything else was figured out by making prototypes. That's not a criticism of those looking for detailed instructions. It's just an explanation of why I didn't think to include that info in this blog.
Also, as I explained in the blog, I made these planes to satisfy my particular way of making drawers and trays. So I thought the dimensions (location and depth of groove) were a bit to particular to be of use to others.
Here's a few notes on heat treating.
I used a MAPP gas torch (the kind you can buy at a home center) to harden the blade. Focus the flame about 1 inch up from the bevel and let the heat slowly travel toward it. The bevel is very easy to burn. When the business end of the blade is cherry red/bright orange quench it in some vegetable oil. I put about a quart in a small paint can. If it were to catch fire I could quickly put the lid on and cut off the oxygen. I wiped of the oil and then put the blades in the oven for 30 minutes. It was pre-heated to 460 degrees. I then took them out and let them cool down in the air. They take a great edge and cut wonderfully. I should note that I am no expert on heat treating. I have no idea how hard the blades are. I just know that they cut well and retain a good edge.
Matt,
No complaining from me, just a word of thanks for the video and info you have already provided. Thanks for taking the time, I look forward to the article.
Have we all forgotten how to appreciate someone sharing their knowledge?
Is there any decision yet on when an article on the making of the grooving planes will be available?
Paige
I'd be interested in the upcoming article as well. Any news on the publish date?
I'd be interested in the upcoming article as well. Any news on the publish date?
Clever idea; one of those head slappers where you say "now why didn't I think of that." Good idea. Look forward to reading the article.
Tim
Hi Matt, Your grooving planes are a great idea. Any chance of a quick article or even a simple construction drawing? Thank you for posting the pictures and some of the measurements above.
Chris B.
Another voice to the chorus: please post some detailed plans.
I've wanted to make a molding plane for a long time now as this looks like something that I could do.
Whether in FWW or on the website, please post some plans.
Thanks! Keep up the great work!
Folks,
I appreciate all the great comments and interest in the planes. Here is an update, as of Oct. 1, 2010. First, we've done all the work for an article on how to make them. And it has been scheduled for an issue. It will be out in the spring (with the caveat that nothing is for certain until it is actually in print). Also, Lie-Nielsen has made blades for these planes and will sell them. I'm not sure when. I've seen a pair and they are exactly like the ones I made for myself.
As for posting plans or an explanation on the website before it's in the magazine, I'll have to check on that.
--Matt
About 30 years ago someone wrote an article in FWW showing how to make a Krenov hand plane. Using that article and some two inch maple I constructed a small smooting plane. It isn't very pretty but it sure does a good job smoothing I bought my 1 1/2 inch iron from Woodcraft. I used it just last week smoothing a piece of red oak. Just takes a sharp iron and a little patience to set.
James K. Walker
Levelland, Texas
Very nice Matt! I can't wait for the article. I wish I knew what the Kenov method was, but then again, I'll just read the article and do the "Kenny" method when I build mine. Great idea, I hope you put some more stuff you made on here too!
Cheers!!
Get a life people!!!! If you don't like the video and information given, don't complain since it's clearly worth more than you paid for it. I have several projects in mind that I could use dedicated planes for, and the IDEA and info given gives me enough info to start planning planes in my mind---and perhaps a perfling plane as well, tho shaped more like a marking gauge with a small (maybe 1/16 or 3/32") plane iron instead of a scratch or knife edge iron.
Thanks for sharing and maybe stirring some innovative ideas in those of us who don't HAVE to have specifics since what you use it for and what I use it for may be different.
Matt These are just the planes for a box progect i'm working on. Thanks for the vidio.
Just as your original video appeared, I had just finished making a series of Kernof-style planes using plans from Hock Tools. I made my molding planes from hard maple sandwiched between a piece of Brazilian Cherry. I made mine to accept a 1/4" iron because I like locking dados joinery. I called Ron Hock and he agreed to make me two 1/4" irons. They all work so great that I may also have make a 1/8" version. Thanks for the idea and I look forward to the article.
Matt . . . are we any closer to seeing the plans in an upcoming issue? Can you give us a publication date?
Hi Matt,
Love the planes, can you share the plans? will you have companion article in the near future?
A quiet router for my apartment workshop
Log in or create an account to post a comment.
Sign up Log in