This is the second entry in a series covering the creation of shop drawings. Last week I showed the use of Scenes to provide a way of capturing views of the model required for construction in the shop. These scenes (sometimes as many as 50 for a single piece of furniture) are spread out in the 3D space on multiple copies of the model or pieces of the model. I’m fairly liberal about copying my model or pieces of it, as I find it easier to create detailed and specific views and scenes without interference from other model content.
I suppose one could create construction drawings from a single assembled model. However it would necessitate careful execution of multiple layers. I prefer to minimize the use of layers by pulling the model apart and spreading out copied model pieces.
By the way, I should recognize the importance of using components for your furniture parts. Without components we would not be able to manage parts and sub-assemblies and spread them out for creating unique views in 3D space. Remember the powerful feature, that changing any one component automatically adjusts all copies in the model.
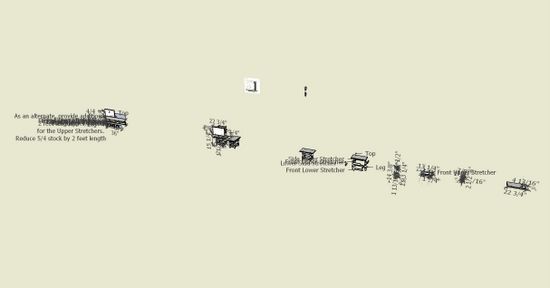
Using the model of the Connecticut Stool discussed last week, I’ve shown below a wide angle view of the entire SketchUp file. By clicking on View Extents, all of the 3D space used by my modeling comes into the view of a single screen. Each “blob” on the screen is a scene and these blobs are separated in space so that I can zoom in and focus an isolated part or subassembly.
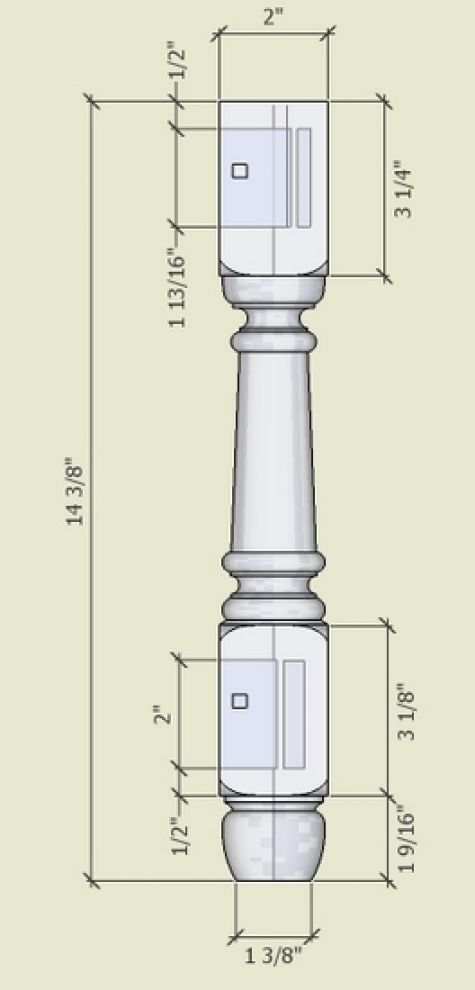
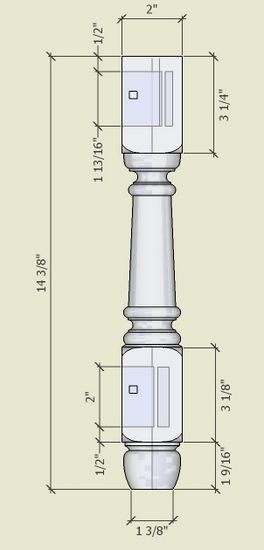
A separate scene is created for each component part of the model. For example, the leg component’s scene is shown below. This is where I apply overall sizing dimensions. Often I use X-ray view, to show hidden joinery details. Also, I’m showing the leg component with the Camera set to a standard Front View and Parallel Projection. This enables printing a full-size template for use during turning operations on the lathe.
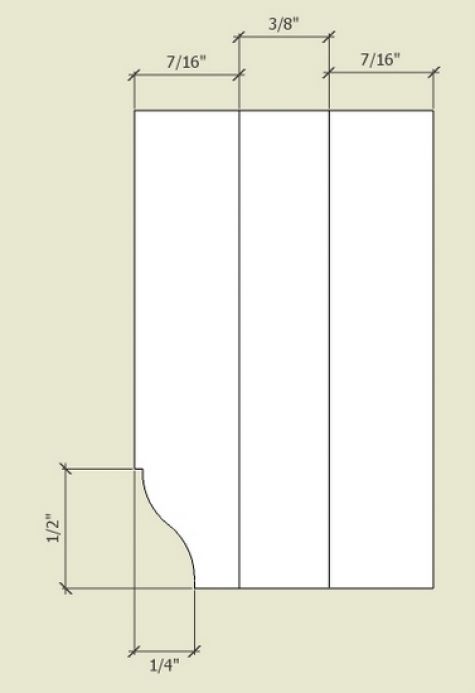
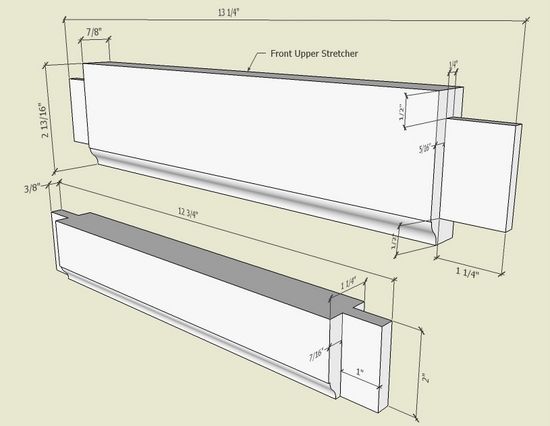
Here is a separate scene showing the two front rails.
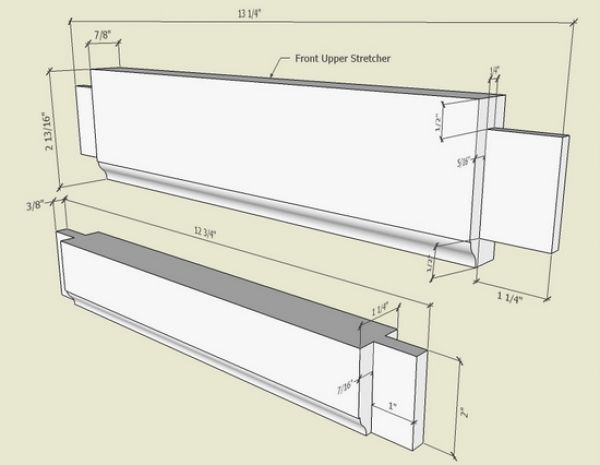
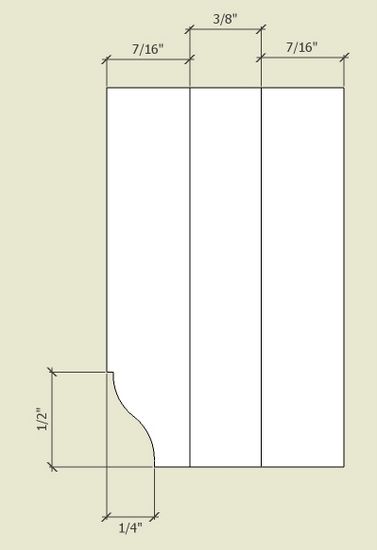
The rail components have a molded lower edge, so I provide a detailed view to help with the shop work in the shaping of this edge. Again, a standard view (in this case a Right View facing the end of the tenon) is used with parallel projection to allow the printing of a full-size template.
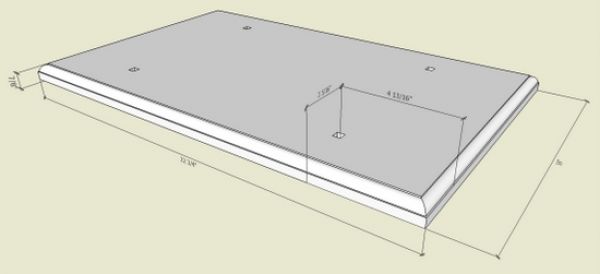
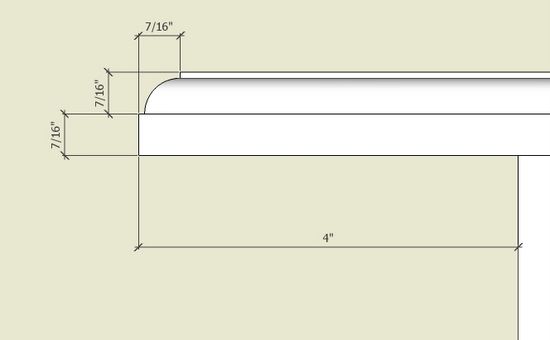
Here is the Scene of the Top component.
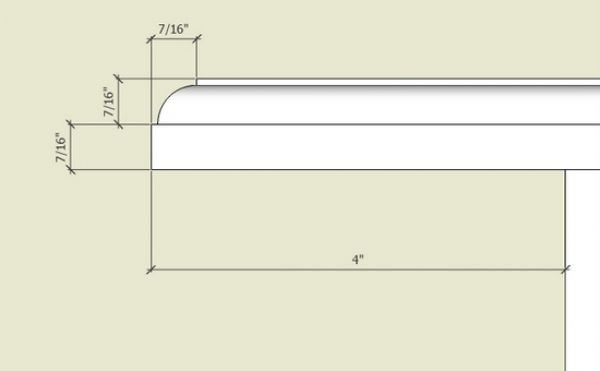
Then I rearrange the camera for a close-up detail of the molded edge.
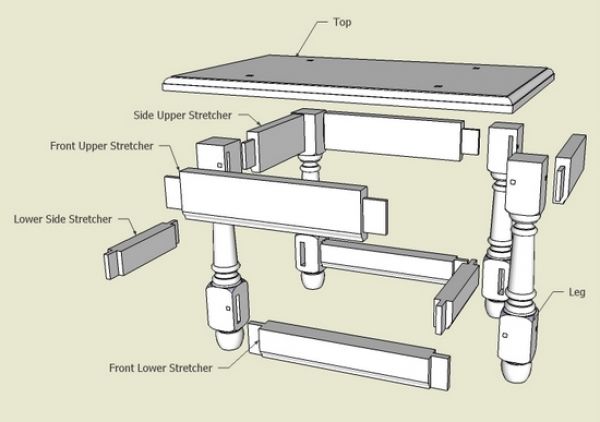
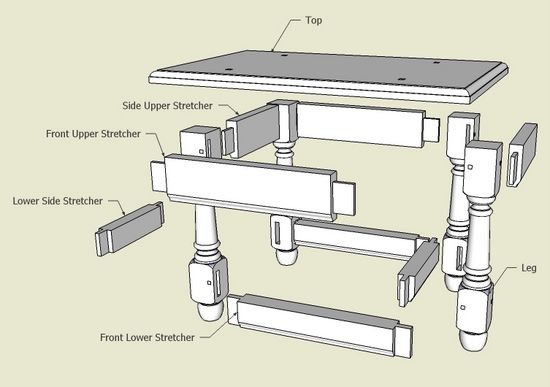
I always include an exploded view of the entire model. In more complex models, say with drawers and doors, I will show them assembled in the overall exploded view. Then I create specific exploded views for these complex sub-assemblies as separate scenes.
I’m often asked how to make the exploded views. I simply copy the entire assembled model and move over to a clear 3D space. Then with the Move/Copy Tool, I pull the model apart. It only takes a few minutes and I add the component names using the Text Tool. No typing required here, since the Text Tool automatically places the name of the component part. Again, I will emphasize the importance of using components (not groups) for enabling these features.
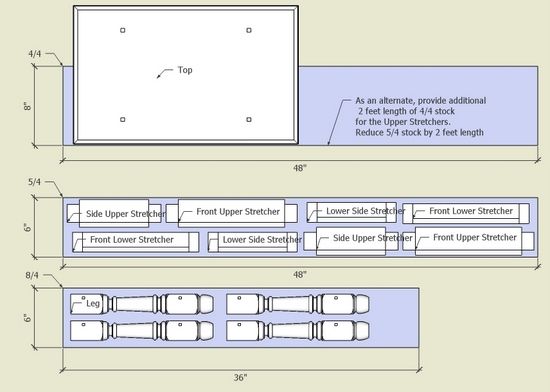
I often create a Cutting Diagram which helps me organize and select the pieces of lumber required. I layout planks of various thicknesses and widths which are typically available for a specific species of lumber. Then I copy a model over to this area of 3D space and pull it apart, rotating and moving the individual components on the respective lumber planks.
I find this to be more effective than creating a CutList.

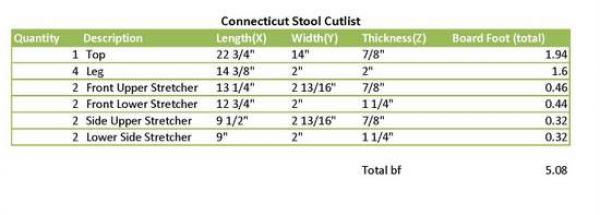
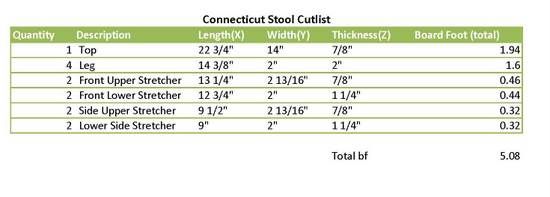
Nevertheless, I usually do create the CutList using Cut List 4.0 plug-in. There have been several entries on use of this plug-in in this blog, so I won’t repeat these instructions. I output to an Excel Spreadsheet and often create a JPG format for importing into Layout.
While you can create and print all of these documents without it, I almost always make my final documentation package in Layout (a SketchUp companion program only available with the Pro version). Layout provides more flexibility in organizing the content in a drawing package. Also, it is much easier to add instructional text to the drawing pages. Usually, I can combine scenes onto a single page in Layout significantly reducing the total number of pages. I can also adjust the Pan, Zoom, and Orbit in Layout to improve the scene, so I don’t have to re-do the SketchUp file for final tweaking adjustments.
Finally, Layout produces a high quality PDF document which is very handy for email distribution to customers and students.


Comments
This is a great tutorial. Thank you.
I have a question about printing. You say that you can print out a full size template (of a leg, for example) to use on the lathe. How do you do that? Do you have a large format printer?
For those of us who don't, is it possible to have SketchUp print a large component on several sheets along with registration marks for taping the sheets together?
Thanks again.
David
Oops. Never mind. I found your post on this subject here.
http://finewoodworking.taunton.com/item/2440/organizing-bundling-and-printing-full-size-templates
David
Tim, thanks for this info and all you do for us SU users.
You mentioned in this blog about converting Excel files into JPEG. Do I have to have special software to do this? If so can you direct me to it on the web?
David (baudi)
Printing a full size part on a standard 8.5 x 11 laser or ink jet printer is certainly possible. Keep in mind that as Time mentions you have to set the Camera to Parallel projection. Once that is done, choose print and make sure that Fit to Page is not selected. Now, just set the "In the Printout" and "In SketchUp" Scale values to 1 and 1, respectively. SketchUp will automatically expand the drawing across as many sheets as necessary to fit the full view you have chosen to print.
I do find that it gives a far wider margin than I would like, but this method has worked fine for me. Although it does involve a good bit of cutting and pasting for large templates, the ones that I have made came out pretty well without too much effort paid to getting things perfectly matched up...
Chris
Croc: regarding Excel to JPG..... Unfortunately Layout will not import Excel, Word or PDF. (I think these imports would enhance the Layout application). Therefore, I export the Excel to PDF at first. Then I open the PDF in Adobe Acrobat and export to JPG. This is cumbersome I know, but is the only way I know to get my cut lists into Layout.
Tim
If I may add... there is an alternative to creating a screen shot of a table for insertion into Layout.
I open the CSV file in Excel and adjust its appearance there. I usually end up rearranging rows and deleting some columns. Then I copy and paste it into Word. There I convert it from table to text and then save it as an RTF file. I also usually end up changing the font style and size before saving.
Next it is on to Layout. I go to File>Insert and choose the RTF file I just saved. It gets imported into a text box automatically. The text can be edited as in any other text box, the font and size can be changed if desired and so on.
As with SketchUp, there's almost always more than one way to get a job done.
Dave
In the new LayOut 3 You can copy and paste the table from Excel.
Dedmin, you can but you have little control over its formatting once you have it in your Layout project. Proper handling of tables was requested for LO4 by several people including myself at 3D Basecamp
Log in or create an account to post a comment.
Sign up Log in