Eight Tips for Securing Work to a Benchtop
 Mar 14, 2013
This simple bench hook is but one of many ways to secure a variety of workpieces to any benchtop for traditional handplaning.
There is an endless variety of techniques for securing furniture parts to a workbench for handplaning and other tasks, and for those of us who have been woodworking for a while, it’s easy to take this now second-nature knowledge for granted.
If you’ve found yourself struggling from time-to-time to figure out the right way to secure a difficult workpiece, fret not. Here are a few simple techniques guaranteed to help you better secure your work, for optimum results-especially when hanpdlaning.
*NOTE: Click on any of the images below for a larger view.
A Traditional Plane Stop
 The traditional plane stop most seasoned woodworkers turn to secure a workpiece is nothing more than a glorified T-square. The “T” locks into your workbench’s front vise, and the long batten serves as a stop, against which you rest the piece you’re handplaning. The other end of the batten is simply clamped to the benchtop. Doesn’t get much more simple than that.
You can watch FWW art director give an overview of this style of plane stop in a short video titled Building and Using a Simple Plane Stop.
Two Fences Help Secure Narrow Furniture Parts
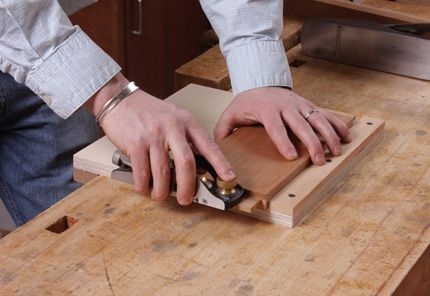
 Here’s another plane stop variation. I first learned about this style from Fine Woodworking’s art director, Michael Pekovich. It’s comprised of an MDF or plywood base, with fences that meet at a corner. A skinny leg registers against the two fences for simple, effective handplaning.
The stop is secured in your bench vise via a piece of 3/4-in. thick hardwood screwed to the bottom of the base. You can see this stop in use in a short video I shot with him.
Bench Hooks Come in All Sizes
 Bench hooks are great to secure tenoned components (as seen in this photograph) when you need to carry out final paring with a rabbeting block plane. You simply slide your workpiece up against the fence, hold it down, and plane with your right hand. This bench hook was constructed using 3/4-in. plywood with a 1/4-in. hardwood fence screwed down to the top. On the underside of the base, a piece of 3/4-in. hardwood acts as a stop, registering against the edge of my benchtop.
Phil Lowe’s Super-Simple Bench Dogs
 Bench dogs come in all sorts of shapes, sizes, and materials-but furniture maker Phil Lowe’s are perhaps the simplest ones I’ve ever seen. Lowe keeps a series of these simple L-shaped dogs around, with varying “head” thicknesses. Some protrude above the benchtop by 3/8-in. (great for planing 1/2-in.-thick stock), others protrude about 5/8-in. (great for 3/4-in. stock)-you get the idea.
 In this Image, you can see the “heads” of various thicknesses I sometimes use for different thicknesses of stock I’m handplaning at any given moment.
Bench Dogs in the Edge of Your Benchtop?
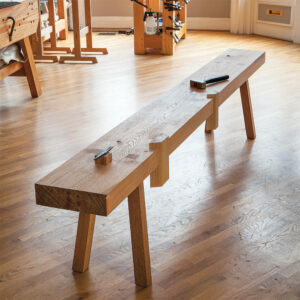
 You betcha! I incorporated a series of dog holes that go into the edge of my workbench’s top. This is great for securing long boards (think the long apron of a big table). I can clamp the end of the board into my vise, and then allow the bottom edge of my workpiece to sit atop a couple of dogs placed into the edge of my benchtop.
You can learn more about this bench in my Video Workshop series, The Not-So-Big Workbench.
Workbench Drawers Add Great Support
 When I built my workbench, I used 100-lb. full extension drawer sides for two reasons. One: I knew I was going to be loading these drawers up with tools and wanted to ensure I had plenty of strength in the mechanical components. Two: I like to use my drawers to support large workpieces like this oak cabinet door from underneath. I simply slide out a drawer, rest the workpiece atop it, and secure one corner in my bench vise.
For really large pieces, sometimes it’s a good idea to use a long bar clamp to secure the end opposite the bench vise, across the benchtop.
Align Your Dogs with Your Vise
 If you have a cast iron vise with a built-in metal bench dog, put it to use by locating a dog hole in your bench top that’s in-line with it. Heck, that’s what it’s there for! Although I often see bench’s that don’t make use of this great little feature in many-a-bench vise.
In this image, I’ve highlighted the alignment of the vise’s benchdog, with the dog located across the benchtop.
Holdfasts are Quick to Use
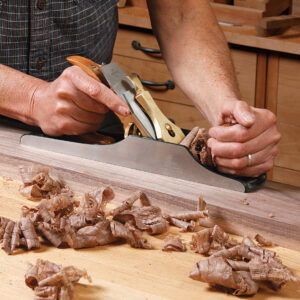
 Holdfasts are often used in pairs and are akin to having a third hand to assist in holding a piece against a bench for planing, chiseling, and more. This device simply gets tapped into a dog hole in your benchtop. Because its shaft has a slight bend to it (almost invisible), when you tap it into a dog hole, it holds tight. To release it’s grip, you just give it another tap (from its side) and it releases with no fuss.


Comments
Thank you for the article. Sometimes us beginning woodworkers can't initially afford a vise, so we look for ways to hold the work to a horizontal surface. Sometimes the horizontal surface happens to be a "woodworking bench" that is waiting for a vise to be attached.
By the way, the last picture did not have a larger view.
Dean
Looking at the plane stop, I can see that working better for me with wider components than the chair leg (?) you are using for illustration.
I think I would find it difficult to maintain such a long and narrow piece perpendicular to the stop while planing.
theoffcut: Indeed the traditional stop is more often used for panels and such. Just happened to be a photo I had on-hand.
Best,
Ed
PS: I'm going to continue adding a few more suggestions to this post over the course of the next few days - beginning with a "hold-fast" - working on that now. That is an awesome little device!
E
Thanks for the post Ed. A lot of good info in this post.
http://www.woodworkingwithajo.com
Before loading heavy items in the full extension drawers, I would suggest adding two extended feet to the end legs to prevent the bench from tipping forward. I am 73 and have begun to revert to non electric tools since learning how to sharpen planes and chisels.
My neighbor's 12 year old daughter has discovered woodworking and is a quick learner. I have used the drill pres, table saw and bench belt sander while assisting her in her school projects. She thought I was trying to fool her when I said the dedicated mortiser drilled square holes, so I had to demonstrate it.
I feel the need to teach her to work with hand tools while she still has all her fingers. So I am giving her my traditional six foot workbench for her father to set up in their basement. I am outfitting it with short extension runners with adjustable leveler pads. The bench is narrow (front to back) and this will make it more stable.
This exposition about bench dogs and hold-fasts is very timely for me. I just finished installing these items in a work bench at my canoe club's storage shed/workshop. Will add this information to a small "manual" to keep with the bench.
Kingbird: I'm glad this information was helpful to you. Thanks for you comment.
Best,
Ed
Nice collection of hold downs for we newbies. Do you (FWW) have a link to an article or video describing the differences among work bench VISES? Images of a couple different styles in this article indicate there are reasons for selecting one over another. They are an important component to a well constructed bench AND not cheap...thanks.
There are other variations of these bench jigs which can be adapted to different types of benches. I did an article with FWW a few years ago focusing on bench jigs which use round dog holes. FWW # 202 -> 4 Bench Jigs for Handplanes
https://www.finewoodworking.com/workshop/article/4-bench-jigs-for-handplanes.aspx
Norman Pirollo
http://www.pirollodesign.com
A better method of supporting wide workpieces such as doors is a bench jack. This is a vertical board, secured to the apron of the bench, with a series of dog holes down it. This means it can adjust to any width of workpiece with the other end held in the vice.
While the article looks like it would be very helpful it appears all the links are broken. Any help here?
Log in or create an account to post a comment.
Sign up Log in