A Basic Woodworking Bench That’s Quick To Make
 Mar 13, 2013
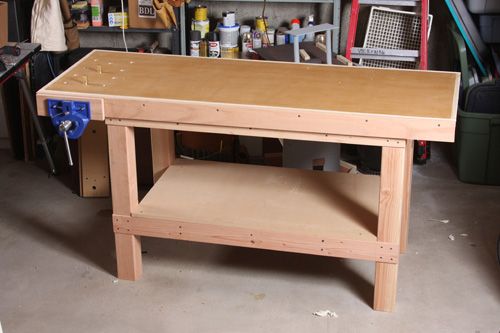
It's not a monster. But my bench is a great shop helper. It's 33 1/2 in. tall by 66 in. long by 24 3/4 in. deep. The lower shelf is 24 1/4 in. wide by 41 in. long. It will be a place where I store my soon-to-be-made bench jigs, like a saw hook.
Having a job at Fine Woodworking definitely has its perks. Aside from traveling the country to visit some of the best woodworkers of our time, we get to play-I mean work-in a sizeable, well-equipped shop, just next door to our office.
One of the best tools, aside from our monster jointer, is the beefy bench in our hand-tool room. For me, it’s been a blessing, and a crutch. It’s such a nice bench that I’ve been neglecting building one of my own for my basement shop at home. But I finally got it done.
My bench is no monster. I didn’t want a massive, heavy bench because my space is fluid-I need to move stuff around the space quite often-so I built a basic bench.
For the legs I used Doug fir 4x4s. The front stretchers and aprons are 2x4s, joined to the legs with half-laps and reinforced with glue and screws. The front and back assemblies are connected to one another with a series of 2×4 crosspieces.
The top and lower shelf were cut from one sheet of 3/4 in. thick MDF. The top is a double layer screwed and glued together. I screwed the shelf to the crosspieces. To attach top I used L-brackets-easy as pie. The entire assembly makes for a very rigid bench.
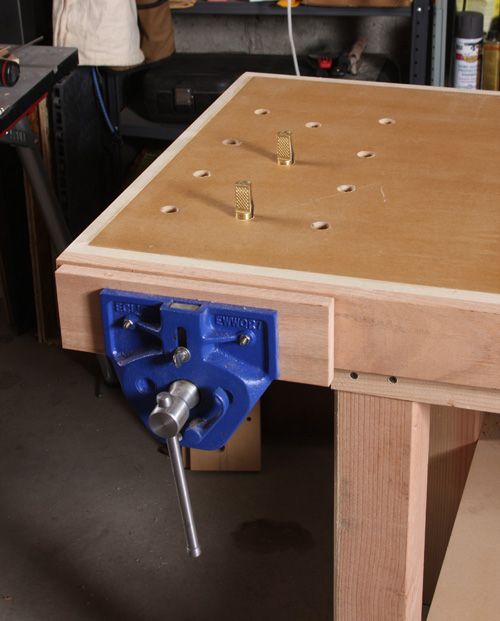
I edged the top with hardwood, installed a 7-in. quick-release vise, drilled the dog holes (see photos), and now I’m ready to roll. I still plan to add a tail vise. For that I’m going to use a small 4 in. metal vise I picked up at a tag sale, and I’ll drill a few more dog holes along the front.
Having the bench has helped me get better organized, and best of all, I have a place to handplane at home without having to jigger up ways to hold workpieces. And I got it all done for less than $100. (Confession: I did have a gift card that helped pay for the vise.)
-
It's not a monster. But my bench is a great shop helper. It's 33 1/2 in. tall by 66 in. long by 24 3/4 in. deep. The lower shelf is 24 1/4 in. wide by 41 in. long. It will be a place where I store my soon-to-be-made bench jigs, like a saw hook.
-
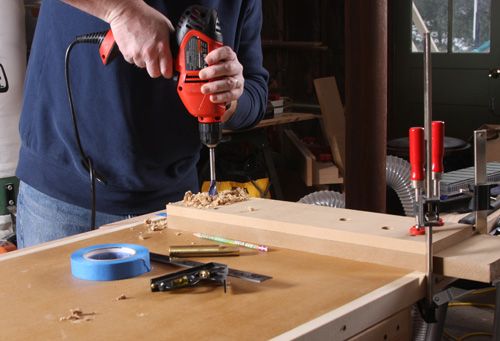
Guide for dogs. To drill the benchdog holes perfectly vertical, I made an MDF guide block. I laid out the holes on blue tape on the benchtop and aligned the guide-block hole over each mark. To help support the benchdogs, I extended the hardwood spacer block for the vise all the way to the back of the bench.
-
Drill, baby. With the guide block clamped to the benchtop, I drilled the dog holes, one by one. I used a 3/4 in. Speedbor Max bit from Irwin. The bit flew through the MDF layers, but once it hit the oak spacer block the self-feeding nature of the bit became a problem. It simply was too aggressive and jammed frequently.
-
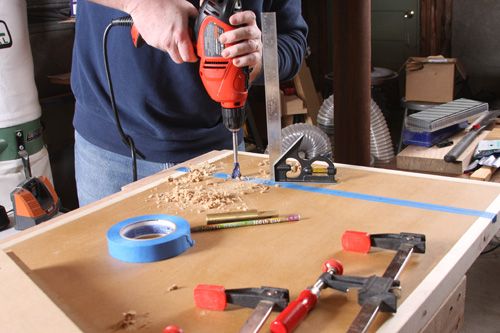
Safety net gone. Once the hole was started enough, I removed the guide block and finished the job. Chips were easier to clear without the guide block in the way. I kept the square in view to check that I was still working vertically.
-
Dogs, unleashed. With my vise installed and dog holes done, I'm ready for handwork.


Comments
Nice basic bench. Practical. Cost-effective.
In my small shop I use a pair of Festool MFT1080 MultiFunctionTables (MFTs - 25" x 43") connected end to end. Rigid enough for hand planing. The grid of 20mm holes is really useful for holdowns, clamping, etc.
Unfortunately, the MFT1080s are no longer available. But replacements tops still are. At $115 including shipping, I bough one to make it the top of a table otherwise like yours.
While $115 may seem expensive, try accurately boring a grid of 20mm holes on 96mm centers in 3/4 MDF. I have for a table for our retirement community shop - - its a pita. Plus the MFT material seems denser and more water resistant than garden-variety MDF. And the single-thickness has proven sufficient the last several years on my original 1080s. Still dead flat.
cahudson42 comment is valid and has a point, but as an owner of an MFT/3 and probably every Festool thing you could name, I am building a table not too far off this one.
I thought the Festool would be grand for moving around as it was light. Well, 18 months on and I think I nudged it about 1" closer to my TS to help as a runoff.
Great if you are a Tradesmen and need to lug it onto the site, but this doesnt seem to be me!
The dog holes are simple enough. I used my existing MFT/3 tabletop and gripped a sizable piece of 19mm MDF to the underside and used the plunge router down through the holes (with a top guide bearing) to make up a nice big template. I then used the template to transfer doing the same technique to the big tabletop.
Perhaps a photocopy of a photocopy, but it is absolutely dead spot on across the whole tabletop.
The beauty of the template is I can further use this to make more in the future :)
Evanism: Great Technique on boring the grid! May I ask where you found a 20mm plunge bit with the top-guided bearing? Make and P/N if possible? Thanks!
cahudson42, I thought it up in a dream!
I'll take a bit more time as it is terribly practical...
1- cut a large enough piece of "scrap" MDF of decent thickness (19mm) and clamp it to the underside of the MFT. I did a fairly big piece, almost the same size as to what I could fit underneath.
2 - use a plunge router with a bottom bearing cuter bit such as this from rockler: http://www.rockler.com/product.cfm?page=25160&site=ROCKLER .... I thought to use the short one as I plunge it directly downward in the centre of the hole until the bearing reaches within the tabletop hole. I suppose one could use a long one, but the stubbiness seemed more practical (the big bearing ensured accuracy?)
To answer your query directly, I thought to use one about half the size. It isn't a drill bit, so I chose something smaller (1/2 inch) so I could plunge it down the middle without fear of zinging the edges of the MFT on the way down.
3 - wiggle it around to clean up right to the edges
4 - repeat!
Mine is similar but a bit more robust. The top is a sandwich, two 18mm sheets of WBP ply with an 18mm mdf filling. The legs are mortise and tenoned together, the ends glued and pegged, the stretchers are joined with long bolts so it comes apart. I stiffened it by adding a very closely fitted cabinet underneath (it had to go in dead square) and it is now absolutely rock solid.
Oh and I added an end vise with three dog holes in the wooden jaw and a triple row across the bench. Just using the outer two and angling the dog jaws I can clamp a circular piece.
I have hand planed large pieces by clamping a stop between the front vise dog and the bench dog then butting the long piece against it clamped from behind by the end vise.
@cahudson42 I bored the holes in my sandwich top with a 3/4" power auger bit with the drill in a portable drill guide that kept it vertical and in a way a bit like a plunge router. The guide screw of the auger was dead easy to centre over the laid out grid points. The holes are dead straight and clean sided. The auger bit was new which probably helped. As stated I have three rows from an end vise running the length of the front as well as from the front vise and holes in the front apron to support long pieces as well.
I really like this. I've been busy designing my own workbench to replace the ropey old thing I currently use. You've made me reconsider exactly what I need a bench for - I think I've been more than a little seduced by the idea of a beautiful hardwood bench when, if I'm honest, I don't need one. My cash would be better spend on timber for furniture projects that my family can enjoy rather than a wonderful workbench that I can only use on the weekends.
Log in or create an account to post a comment.
Sign up Log in