Plane Irons and Chisels Need a Flat, Polished Back
 Mar 07, 2013
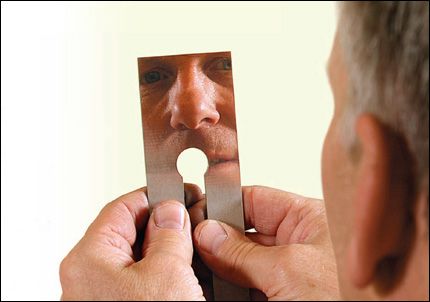
Clear as a mirror, sharp as a razor. The high polish means that the back-and the cutting edge-is truly flat and without blemishes. When it meets a bevel that's just as polished, the blade will be truly sharp.
This article by Chris Gochnour originally appeared in Fine Woodworking #232
You surely have heard it before: A sharp cutting edge is the meeting of two flat, polished surfaces. That’s why you need to give as much attention to the back of a plane blade or chisel as you do to its bevel. You must first flatten and smooth it, and then polish it to remove all the scratches. When you’re done, it should be as clear and reflective as a mirror.
I wouldn’t be surprised if the prospect of flattening and polishing a blade or chisel’s back kept you out of the shop for a while. It can be a boring and tedious job, but it doesn’t have to be. My technique is fast and gives perfect results. I use sandpaper for the heavy work, gluing a progression of grits to a piece of granite. Sandpaper is inexpensive and easy to find, and because the granite never goes out of flat, the sandpaper doesn’t either.
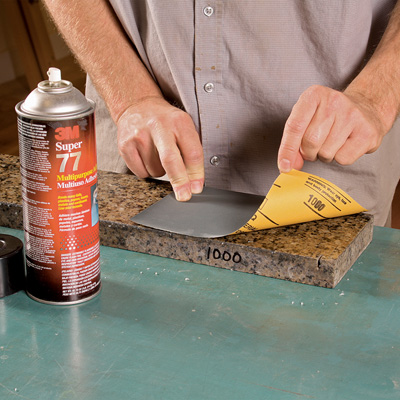
| Get ready. You need coarse grits to flatten a blade back efficiently, but coarse waterstones are soft and go out of flat very quickly. A better way is to use sandpaper, which cuts quickly, is cheap and easy to find, and when glued to a flat piece of granite, never goes out of flat. |
 |
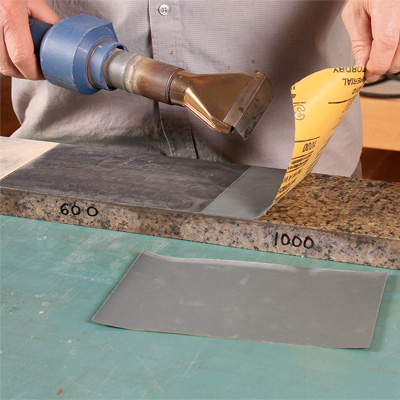 |
| Easy on. Use spray glue, which is easy to apply and can be removed easily when it’s time to replace the paper. | Easy off. To pull off the sandpaper cleanly, use a heat gun or hair dryer to soften the adhesive. |
How to Flatten
I flatten the first 1-in. to 2-in. of the blade behind the cutting edge. That’s essential on a chisel, but some say that it’s unnecessary on a plane blade, that only the cutting edge needs to be flat and polished. But for a plane to cut well, you need more than just a sharp edge. On bench planes, for example, the chipbreaker must mate perfectly with the back of the blade. Any small gaps between them are opportunities for shavings to get stuck and eventually clog the throat. By flattening a larger area of the back, I create a perfectly flat mating surface for the chipbreaker. Also, working a bigger area makes it easier to hold the blade flat on the sandpaper.
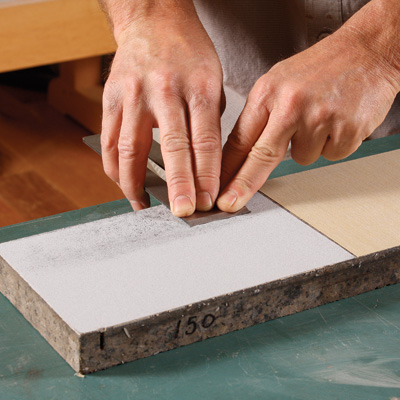
| Flatten and smooth the back. This stage is a lot like preparing a wood surface for finish. You want to get the surface flat first and then smooth it with progressively finer grits until it’s ready to be polished. |
 |
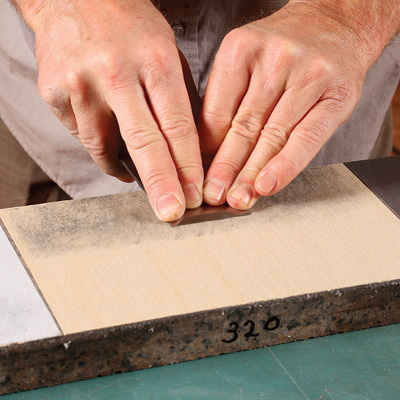 |
| Start with 150 grit. Apply pressure with fingers from both hands within about 1/2-in. of the cutting edge to ensure that the blade is flat on the sandpaper. Move the blade from side to side along the length of the paper, not in and out. Stay at this grit until there is a consistent scratch pattern extending back 1-2-in. from the edge. |
Work up through the grits. On the second grit, move the blade in and out until the side-to-side scratch pattern from the previous grit is gone. Then you can move up to the next grit. Continue to alternate beween side-to-side and in-and-out movement as you change grits, working from 150, all the way through to 1,000 grit. |
Flatten, Smooth, then Polish
Preparing the back is really a three-step process. But before you start, polish the back a bit on your highest-grit stone or sandpaper. This will give you an idea of how flat the back is. Blades and chisels from high-end makers might already be flat and just need polishing.
The first step is to flatten it (on some blades and chisels you might also be removing machine marks at this point). This is work for the coarsest sandpaper (150 grit). Don’t move up in grits until you’ve created a consistent scratch pattern and an even sheen. After the back is flat, use the grits from 320 to 1000 to create ever-smaller scratches. This stage of the process is like sanding a flat surface in preparation for a finish.
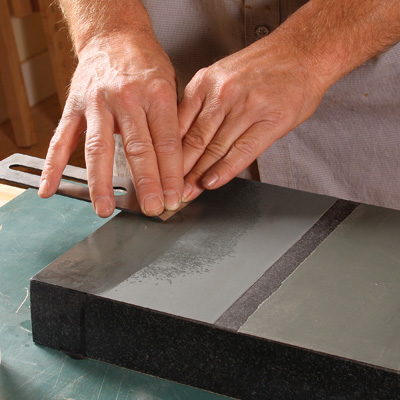
Then, after the back is smooth, you can literally polish off the last of the scratches with your 4000- and 8000-grit waterstones or 1500- and 2000-grit sandpaper, moving the blade side to side on both grits.
 |
 |
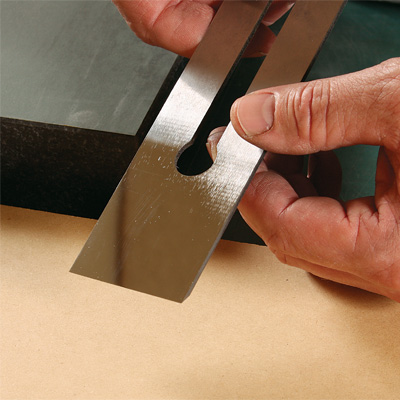 |
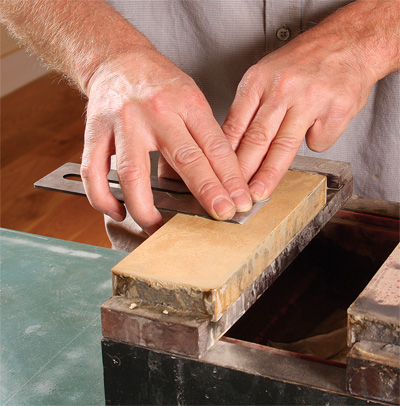
| Use sharpening stones. Start with a medium grit stone, like 4000, and finish up with a polishing stone (8000-grit or higher). Just be sure to make sure your stones are flat before you begin. | Or stick with the sandpaper. Extrafine grits of sandpaper can produce a polish just as well as sharpening stones. A second granite surface plate for polishing is nice, but not necessary. | The payoff. The back is now ready for work, and you won’t need to flatten it again. Removing the burr on the polishing stone (or 2000-grit paper) when you hone the blade is all the maintenance the back needs. |


Comments
Not to complain, but did someone edit this!
This issue arrived just before I had to prepare 12 antique plane irons and 8 antique socket chisels for my booth at The Furniture Project at the New England Home Show.
I used this method on all of them, with fantastic results, fast and effective. After sharpening the bevels, all the tools not only had wonderfully sharp edges, the surfaces they left behind where silky smooth as glass.
You should have seen the faces on people when I demonstrated shooting a miter on a shooting board and passed the piece around.
I've updated my blog post about show preparation with the link to this article, thanks for making it publicly available! http://www.closegrain.com/2013/02/final-preparation-for-new-england-home.html
Good information that I'll put right to work. But... you've given us a jigsaw puzzle of paragraphs that we have to put together in order to get a clear picture of the process. Please tell me this isn't the same format that made it into FWW magazine.
I haven't gotten an issue of FW for several months now--and I haven't missed it.
Excellent way to sharpen,but cannot find the that fine sandpaper-most I can find is 400 grit.
Couple of things:
You can get a small granite surface plate for less than $25 -- most of the discount machine-shop suppliers have them. Or you can go to a glazier's and ask for a piece of plate glass -- be sure it's PLATE, which is almost as flat as a surface plate. Or wait for recycling day and look for an old glass-topped coffee table on the roadside. If you use glass, build a wooden frame for it and cut a piece of plywood to lay over it when you're not using it... that will protect it from dropped things.
The paper in the photos looks like silicon-carbide "wet-or-dry" paper, which really is the only thing to use for this kind of work -- regular sandpaper will shed grit so fast you won't get much done before you need to replace it.
The really fine grits of sandpaper aren't that easy to find. Try an auto-accessories store, or a body-shop supplier.
Batts
Go to Kingsport Woodworking. You can get rolls of wet/dry silicon carbide PSA from coarse up to 2000 grit.
What were the actual grits used in this process? Not a well written article from a source, FWW, which is known for good writing.
Very useful article, thanks for writing it. I don't see anything wrong with the writing. It's clear as a bell to me.
Even if you don't want a back bevel (Goggle "ruler trick"), it's only the few millimeters closest to the edge that need to be polished. To be sure, the entire back needs to be flat, but polishing that entire surface as shown is a waste of time, meant only to impress the ignorant. That time might be better spent making sure the frog is flat.
Hey Batts, you can source finer sandpaper at online retailers, or look in your local auto parts store. I've found 1000 and 2000 grit there, handy for taking the haze off your headlights, as well as polishing your steel
Very nice article, and not deserving of the snarky comments by the intellectually inbred.
You listen to the pros and cons of flattening then polishing the back of the blade and no one comment truly about the perfect fit of the blade to the frog. Plane and simple the better the fit the better the performance. Therefore the flatter the surfaces are the better they mate and there is less chatter and will allow for a sharp edge. Will the average woodworker notice the difference? I doubt it but on a cold winter day when I can not go out int the shop to work I flatten plane blades and frogs. Truly maybe not needed but it is my preference.
Wonderful article, well written,clear,concise. For those who can't find the various grits go to Klingspor Woodworking Shop. Sandpaper is their specialty. If you don't live in NC try this link woodworkingshop.com I was there today and they have a nice sale going on.
Notwithstanding 'blindleader's' comment to the contrary, it is not a waste of time to polish the back of the iron 1 to 2 inches from the edge. I guarantee that I can keep the iron flatter on the abrasive by controlling an inch or two rather than a millimeter or two. Further, if I have polished a couple of inches of surface to a mirror finish, I have, in fact, created a flatter surface than one with a non-mirror finish. An even reflective surface is the visual feedback that tells me it's flat. A dull finish can mask areas that are not flat.
As far as spending time flattening a frog, 'blindleader' might want to sell every plane he has that uses "frog technology" and advance to bevel-up planes. That way he wouldn't have to waste his time with frogs or any other amphibians for that matter.
Please try to not brand everyone who doesn't sharpen exactly the way you do as ignorant. There are others of us, expert sharpeners like yourself, who get a great deal of satisfaction out of creating a mirror finish and don't see it as a waste of OUR time at all.
A fne and useful argument. But all this about getting granite or glass seems to me be be a bit precious and expensive. You can contact your local supplier of Corian, a DuPont product used for countertops. (They don't sell it in stores). They'll GIVE you cutoff scraps from their shop, and it's very flat and stiff.
If you can't find or don't want to spend money on a granite d slab, don't. Any one that has a good cast iron table saw or jointer has a good solid flat surface that will do the very same thing as the granite or glass. Glue down the sanp paper the same way and go to work. After just make sure to clean with solvent and treat as you would any other time. It works great and most of us already have it and we don't have to store a large slab afterwards. I do know for a fact that this does help the work. I have also polished not all the way to 1000 grit but to 600 grit the flat of my planes. They slide with so much less effort and so much smoother. When everything is polished and honed, put back to gether you get a real joy in the work every time you use your planes or chisels.
An inexpensive flat surface is available at your local Home Depot. They have 12" x 12" marble like tiles. They are flat to the point that I can't get my thinest feeler gauge under my straightedge. They are cheap enough to have several.
Reading between the lines a little, is the author hinting not to waste money on coarse water stones? I use only a combination 4000/8000 grit Norton stone for the polishing stage after flattening with wet/dry sandpaper on granite. Even the fine grit stone won't stay flat. I have to re-tune it after polishing only one or two tools, so most of the stone goes down the drain in the rinse water. There seems to be a lot of poor performing water stones and I don't get near the mirror finish shown in the photos. I'm thinking about ordering some Ohishi stones since L-N recommends them.
i have used this method using 10mm glass with good effect. i have never gone as far as 1500 grit - my question is - what are the grit breaks appropritate as one moves between 150 grit toward 1500/2000. i have never advanced beong 600 grit water paper?
For a flat surface, go to the shop (not showroom) of your local granite countertop fabricator and ask if they have any remnants. I asked for a piece approx. 12x12, didn't care about color or even if it was rectangular. The guy took me out to his bones pile and picked a piece off the top that was 25x19. I asked how much he wanted and he said nothing since he was going to throw it away anyway.
You really can't argue with a woodworker like Chris Gochnour watch his videos & how well his planes and chisels work. I have followed his advice and I can tell you it works for mere mortals like me. There is, beyond experience, a lot of science in anything we humans do, some just seem to ignore it or think the detail irrelevant. Its the attention to detail that give some the edge(pardon the pun)
Beence: Awesome information. Thanks for posting that tip!
Ed
Modern high quality irons made with modern precision grinding/lapping systems are easily brought to this level of polish which, no doubt is ideal. However the reality is I have never ever found a old tool with anything like that kind of polish. This fact brings to mind the following story from early in my career as a wood worker:
30 years ago an old timer showed me something about sharp edges and how to get them. He was most known on the job site as a crank and chewer of tobacco who wore the same clothes day after day regardless of the weather. None the less, with a collection of amazingly old beaten tools and with remarkably less fuss and effort than the youngsters around him, he produced a prodigious amount of really fine finish work.
One day he took pity on me as I struggled with a dull block plane. He asked why I didn't sharpen it up. I replied something about it being good enough, I was trying to get the job done and didn't have time right now... He grunted and walked away and my other coworkers smirked.
Minutes later, he came back into the room I was working in carrying his oil stones, his ancient plane blade and a roll of black electrical tape. The iron was as worn and battered as everything else in his kit. It was rusty with paint drips on it. He proceeded to shave his wrist with it. My companion and I were suitably impressed but still unwilling to put "all that time" into getting our tools that sharp. He then took my iron to the stones (lubricated with a copious amount of stomach turning tobacco juice) and proceeded to get it just as sharp in about 3 minutes... Now we were paying attention!
He easily refined the bevel free hand to a polish. Nothing special there I hear you say... but the black electrical tape? He wrapped a couple turns of that about 1 1/2 inches from the edge with this little lift he polished the cutting edge on the back in about 30 seconds.
This is the so called "ruler trick" so popularized in the endless blogsphere. I am pretty sure anything my old coworker knew about sharpening or woodworking general was learned before Chris whats-his-name's father was out of short pants.
None of the preceding is meant to diminish what Chris is suggesting. Just bear in mind that there is more than one way to get the job and that is part of the fun! Thanks FWW for posting the article to Chris for writing it.
What are the sandpaper grits used between 150 and 2000? It seem at some point (say 320) you can pretty much start to double -- 320, 600, 1200, 2000, but maybe below it needs to be 100, 120, 150, 180, 220?
There are many possibly intermediate grits from 100 to 2000 -- just wondering what is reasonable. If we buy in bulk it's hard to buy a 50pk of every single one.
Another place to get granite stone is from a headstone maker, creepy but cheap! Years ago I bought 2pcs, one about 16 square by 2" thick and the other 12x16 by 6" thick (heavy!)for five bucks, both dead flat. This allowed me to have one for portability and one to inset into me sharpening station.
If you are interested in getting the finest edge possible without investing in expensive stones, look into micro lapping films.
It's essentially the finest sandpaper you can get measure in microns. Three (3) microns is equal to an 8000 grit stone.
I usually follow this up with a 1 micron diamond past and .5 micron chromium. That's about as sharp as you can get using conventional methods.
Ed
A number of people have asked a very simple but very relevant question : What are the grits between 120 and 2000 used by the author. Some referred them to Klingspor but I find this article very disappointing as it firstly lacks this relevant information and secondly it came across as a series of notes jotted down preparing for an article yet to be written. What about the bevel side of the blade which is not discussed and nothing is said about micro bevels etc. I'm sorry, I may be out of line but I really expect more from an article in "Fine Woodworking"!
Can the staff of "Fine Woodworking" please contact the author and ask for the grit information that so many requested. This medium differs from the printed version in that it is easy to update and it should be updated otherwise having this blog is a waste of time. Maybe even better the editors should've asked the author to include the relevant information: ie edit the articles before they are published.
I am not having a go at the author, he sharpens tools and I'm sure he does a good job, but I'm disappointed with the editors who should check all articles in depth to get omissions etc before publishing. I am very disappointed by the quality of some articles in "Fine Woodworking" and have been for quite a while.
C'mon guys, how about reading the articles objectively and thinking them through before publishing them. I'm sure the author knows the grits that he uses and I'm sure that he has read these posts. How about updating the article.
A lot of the readers subscribe to get information and some articles are just not giving them all of it. Read the articles as a novice would not like those of us that have been woodworking for decades because those who yearn to get information are your subscribers for the future and it'll be worth your while looking after them. The public are hurting financially because of the world economies and giving up a subscription that is not an essential is one of the first things that fall by the wayside. This is a lead article but is it????????
I'm sorry guys if I have tread on some corns but it's been long in the coming. I'm looking forward to some really good, well researched articles in the future.
Going off what EdMerc said you can get 1000, 1500 and 2000 a lot of time at autobody shops pretty cheap. I happen to have a parts place here in town that sells up to that grit (HE Eversons). I may have to give the lapping sheets a try. Thanks EdMerc for the tip: http://www.bestsharpeningstones.com/catalog/Lapping%20Film.htm#
Also, thick piece of glass can also be pretty easily gotten cheap for sandpaper backing.
I edited the print article that this blog is based on. I'm sorry that some of the artwork (that shows the grits used) did not make it into the blog. Here they are: 150, 320, 600, 1000, 1500, 2000. However, I would point out that if you look at the photographs on this page, all of the grits are identified on the granite that Chris uses. Of course, we still should have included them somewhere more explicit. I'll ask the web producers to make a note in the blog itself.
As for not covering the rest of the sharpening process, we didn't do that because article, which ran in the section of the magazine called Handwork, is solely about flattening the back. It's a very detailed look at the technique that Chris Gochnour uses. We have run many, many articles about grinding and honing the bevel through the years, so we decided to focus only on the back this time.
Matt K.
Can anyone tell me if red oak can be flattened successfully with either a #4 plane [I have a Stanley and a newer Vertas model] or a Vertas Low Angle Jack. When I tried it my planes just dug in to the wood so I am wondering if the problem is not a sharp enough plane iron or an inappropriate choice of plane.
I have slab upon slab of granite out back. Granite stores have to toss tons of the stuff each year. Many pieces are perfect for this.
For a quick shine, consider McGuires Mag Polish. It's FAST and does a great job. I dob a little on a wheel set in my drill press and get mirror finishes on knives in minutes. Of course, it's best to get close, say, 1,500 grit, first, but you can experiment.
Log in or create an account to post a comment.
Sign up Log in